5. カ メ ラ
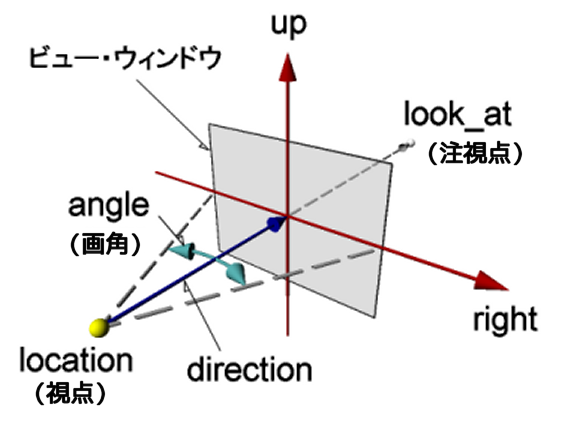
カメラにより作成したシーンを写し出すことができる。自分の見たい位置、見たい方向を設定し、POV-Rayがレンダリングを実行すると目的の画像(写真)を得ることができる。カメラはいくつか種類があり、現在、下記の8種類のカメラが使用できる。
通常のカメラ▷パースペクティブ (perspective;透視投影)▷ 1 正射影(orthographic) ▷ 2 魚眼(fisheye) ▷ 3 超広角(ultra_wide_angle) ▷ 4 オムニマクス(omnimax) ▷ 5 パノラマ(panoramic) ▷ 6 円筒投影(cylinder) ▷ 7 球投影(spherical)
POV-Ray では特にカメラタイプを設定しない限りパースペクティブ カメラが使用される。これは市販されている一般的なカメラに相当する。ここではパースペクティブ カメラを中心に、カメラの設定について説明する。
< camera の構文 >
camera {
[ CAMERA_TYPE ]
[ location <VECTOR> ]
[ right <VECTOR> ]
[ up <VECTOR> ]
[ direction <VECTOR> ]
[ sky <VECTOR> ]
[ angle FLOAT ]
[ CAMERA_MODIFIERS ... ]
[ look_at <VECTOR> ]
}
camera カメラのキーワード
CAMERA_TYPE
カメラの種類のキーワード、8種類(パースペクティブ:perspective、正射影:orthographic、魚眼:fisheye、超広:ultra_wide_angle、オムニマクス:omnimax、パノラマ:panoramic、円筒投影:cylinder、球投影:spherical)がある。
location <VECTOR>視点(カメラ位置)の設定 [デフォルト:<0, 0, 0> ]
right <VECTOR>up とともに使用してビューウインドウ(イメージが投影される平面)のサイズとアスペクト比を設定、座標系を設定するためにも使用 [デフォルト:<1.33, 0, 0> ] ▷「5.3 アスペクト比」 参照▷「5.1 座標系の設定」 参照
up <VECTOR>right とともに使用してビューウインドウのサイズとアスペクト比を設定 [デフォルト:<0, 1, 0> ]
direction <VECTOR>カメラの最初の向きと視点からビューウインドウまでの距離の設定、right とともに水平方向の視角を決定 [デフォルト:<0, 0, 1> ]
sky <VECTOR>天頂方向(カメラの傾き)の設定 [デフォルト:<0, 1, 0> ]
angle FLOAT水平方向の視角、0~180 度の範囲で設定 [デフォルト:67.4度 ]
CAMERA_MODIFIERS
特殊効果の設定 ▷「5.5 カメラの特殊効果」 参照
look_at <VECTOR>注視点の設定 [デフォルト:<0, 0, 1> ]
※ look_at (注視点、見ている点)は最後に設定する。
次の図5にパースペクティブ カメラのパラメータを示す。
図5 パースペクティブ カメラのパラメータ
★カメラ文の主なディフォルト設定(パラメータ記述を省略するとこの設定値を使用)
camera {
perspective
location <0,0,0>
direction <0,0,1>
right <1.33,0,0>
sky <0,1,0>
up <0,1,0>
look_at <0,0,1>
}
カメラのデフォルト座標系は 左手系(y-up)、ビューウインドウ(スクリーン)のアスペクト比は 4:3 となっている。
camera { }
5.1 座標系の設定
シーンを作成する場合には、設定された座標系に基づいて物体などを配置する。POV-Rayでは座標系の設定はカメラ文の中で行う。POV-Ray のデフォルトの座標系は左手系である。しかし、CGの分野では過去は左手系であったが、現在では右手系が標準となっている。このマニュアルでも説明は原則的に右手系で説明する。
シーンを右手座標系で作成するためには、カメラ文で次の設定を行う。カメラを右手座標系、天頂点をz方向になるようにする。
<右手座標系に設定するための設定例>
camera {
location <50, 50, 100> // 視点(カメラの位置)
sky <0, 0, 1> // カメラの天頂方向
right <-1.33, 0, 0>
look_at <0, 0, 0> // 注視点(見つめる点)
}
※ 上記は典型的な例を示している。通常の場合は上記の設定項目だけでよい。location や look_at は自分の見たい画像に応じて変更する。上記はレンダリング画像のアスペクト比(横縦比)は4:3となる。カメラを水平ではなく傾けたいときは 天頂方向を示している sky ベクトルを変更する。
※ 任意のアスペクト比の設定(▷「5.3 アスペクト比」 参照)
※ right、sky:▷「5.2-2 right、up」 及び ▷「5.2-5 sky」 参照
※ 右手系と左手系の違い:▷「3.1 座標系」 参照
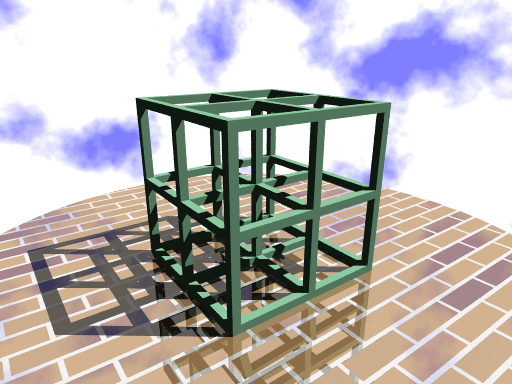
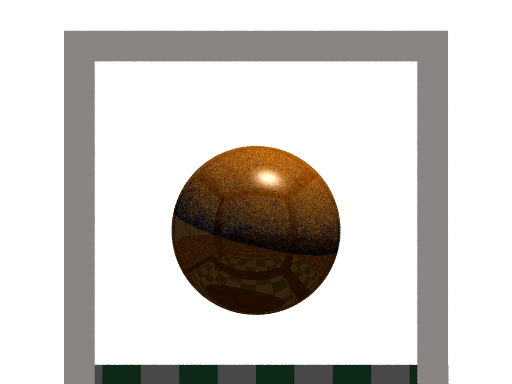
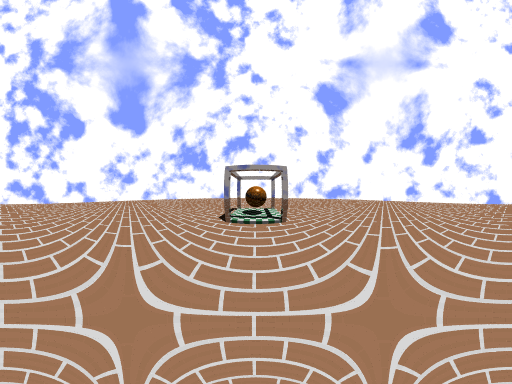
5.2 パースペクティブ カメラ(perspective)
パースペクティブ カメラは、通常の透視投影法であり、もっとも多く使われている一般的なカメラに相当する。ピンホールカメラをシミュレートしている。カメラは perspective がデフォルトであり、CAMERA_TYPE を省略すると、このカメラが使用される。
図5.2 パースペクティブ カメラ
∇ POV-Rayソース: 図5.2 パースペクティブ カメラ
//-------------------- Fig. 5.2 perspective camera
#version 3.7
#include "colors.inc"
#include "textures.inc"
global_settings
{assumed_gamma 2.2}
//=========================== perspective camera
camera{
location<-1.3,-1.8,1.3>
sky<0,0,1>
right <-image_width/image_height,0,0>
look_at<0,0,0.5>
}
light_source {<800,-600,1200> color White*1.2}
//---------------------------------------jungle gym-
union{
#declare A=0;
#while (A<=4)
#declare B=0;
#while (B<=4)
box{0,1 scale <1,0.05,0.05> translate<-0.5, -0.5+B*0.25, A*0.25>}
box{0,1 scale <0.05,1.05,0.05> translate<-0.5+B*0.25, -0.5, A*0.25>}
box{0,1 scale <0.05,0.05,1> translate<-0.5+A*0.25, -0.5+B*0.25, 0>}
#declare B=B+2;
#end
#declare A=A+2;
#end
pigment{color rgb<0.7,1.0,0.8>*1.2}
}
//---------------------------------------ground
disc{0,z,2
pigment{brick White*1.0, color rgb<0.8,0.6,0.4> scale 0.05}
normal{brick 0.05 scale 0.05}
finish{phong 1 reflection 0.3}
}
//-------------------------- sky
sky_sphere{
pigment{
wrinkles
color_map{
[0.3 color rgb<0.5,0.5,1.0>]
[0.5 White]
}
scale 0.2
}
}
5.2-1 視点(location)、注視点(look_at)
location は視点であるカメラの位置である。視点は x、y、z 座標で設定する。look_at は注視点であり、見つめたい点または、その方向上にある適当な1点を設定する。カメラの向きは視点と注視点により決定される。
5.5-2 right、up
right と up のベクトルの長さはビューウインドウのサイズとアスペクト比を決定する。視野の広さは right、up、direction のベクトルの長さの比率によって決まる(図5参照)。up は通常は変更する必要はない。
※ up、right、direction は、常に互いに垂直になるように設定する(垂直でないとイメージが歪んでしまう)。
right は座標系の設定にも使用する。right ベクトルのx成分を正の値にすると左手系、負の値にすると右手系になる。
5.2-3 direction
direction ベクトルは、look_at や rotate のベクトルによって移動する前のカメラの最初の向きを設定する。また direction ベクトルと right ベクトルの長さとの比率によって水平方向の視角が決まる。direction は通常は変更する必要はない。この機能により視野の変更ができるが、通常はより簡単な次の 画角(angle) を使うほうがよい。(angle の設定は、direction より優先される。)
5.2-4 画角(angle)
angle はカメラの視野の広さを設定するために使用する。角度が小さいと望遠レンズになり、角度が大きいと広角レンズになる。
デフォルトの angle は 67.4度 でなので、ズームしたい場合は、angle をこの値より小さく設定し、もっと周辺を見たい場合は、angle をこの値より大きくする。angle の値は 0<angle<180 の範囲で設定する。(angle を使用しないで、代わりに視点を変更してもよい。)
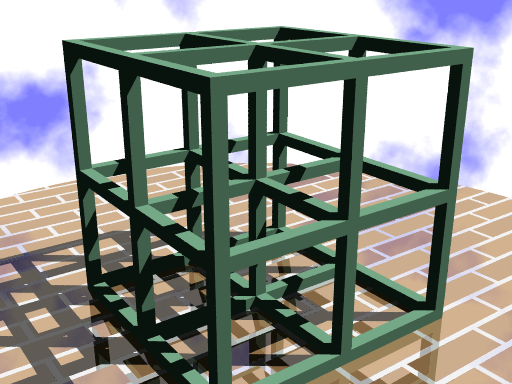
最初の図5.2 パースペクティブ カメラは、デフォルトの画角 (67.4度) である。次の図5.2-4 は 画角45度を設定した例である。
図5.2-4 画角 angle 45
∇ POV-Rayソース: 図5.2-4 画角 angle 45
//-------------------- Fig. 5.2-4 angle 45
#version 3.7
#include "colors.inc"
#include "textures.inc"
global_settings
{assumed_gamma 2.2}
//================================ angle
camera{
location<-1.3,-1.8,1.3>
sky<0,0,1>
right <-image_width/image_height,0,0>
look_at<0,0,0.5>
angle 45 // <<<-----------------angle 45
}
light_source {<800,-600,1200> color White*1.2}
//---------------------------------------jungle gym-
union{
#declare A=0;
#while (A<=4)
#declare B=0;
#while (B<=4)
box{0,1 scale <1,0.05,0.05> translate<-0.5, -0.5+B*0.25, A*0.25>}
box{0,1 scale <0.05,1.05,0.05> translate<-0.5+B*0.25, -0.5, A*0.25>}
box{0,1 scale <0.05,0.05,1> translate<-0.5+A*0.25, -0.5+B*0.25, 0>}
#declare B=B+2;
#end
#declare A=A+2;
#end
pigment{color rgb<0.7,1.0,0.8>}
}
//---------------------------------------ground
disc{0,z,2
pigment{brick White*1.0, color rgb<0.8,0.6,0.4> scale 0.05}
normal{brick 0.05 scale 0.05}
finish{phong 1 reflection 0.3}
}
//--------------------------- sky
sky_sphere{
pigment{
wrinkles
color_map{
[0.3 color rgb<0.5,0.5,1.0>]
[0.5 White]
}
scale 0.2
}
}
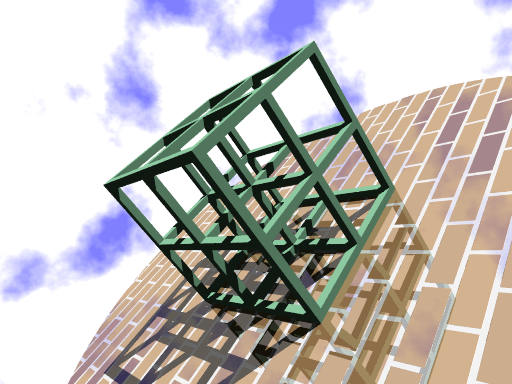
5.2-5 天頂方向(sky)
カメラの天頂方向は sky ベクトル により決定される。カメラの傾きはこのベクトルを変更して調整する。これによって飛行機が旋回する時のようなイメージも表現できる。
※ sky は look_at より必ず前に記述する。
図5.2-5 sky <1, 0, 1>
∇ POV-Rayソース: 図5.2-5 sky <1, 0, 1>
//-------------------- Fig. 5.2-5 sky
#version 3.7
#include "colors.inc"
#include "textures.inc"
global_settings
{assumed_gamma 2.2}
//============================== sky vector
camera{
location<-1.3,-1.8,1.3>
sky<1,0,1> // <<<-------------------sky vector
right <-image_width/image_height,0,0>
look_at<0,0,0.5>
}
light_source {<800,-600,1200> color White*1.2}
//---------------------------------------jungle gym-
union{
#declare A=0;
#while (A<=4)
#declare B=0;
#while (B<=4)
box{0,1 scale <1,0.05,0.05> translate<-0.5, -0.5+B*0.25, A*0.25>}
box{0,1 scale <0.05,1.05,0.05> translate<-0.5+B*0.25, -0.5, A*0.25>}
box{0,1 scale <0.05,0.05,1> translate<-0.5+A*0.25, -0.5+B*0.25, 0>}
#declare B=B+2;
#end
#declare A=A+2;
#end
pigment{color rgb<0.7,1.0,0.8>*1.2}
}
//---------------------------------------ground
disc{0,z,2
pigment{brick White*1.0, color rgb<0.8,0.6,0.4> scale 0.05}
normal{brick 0.05 scale 0.05}
finish{phong 1 reflection 0.3}
}
//---------------------------sky
sky_sphere{
pigment{
wrinkles
color_map{
[0.3 color rgb<0.5,0.5,1.0>]
[0.5 White]
}
scale 0.2
}
}
5.3 アスペクト比(横縦比)
アスペクト比は、イメージが投影されるビューウインドウ(スクリーン)の幅と高さの比である。POV-Rayでは right と up のベクトルの比によってアスペクト比を決定する。従って、スクリーンサイズと、right の設定値が一致していないと、歪んだ画像が生成される。
デフォルト値はright <1.33, 0, 0>、up <0, 1, 0>であり、このアスペクト比は4 : 3(以前の典型的なPCのモニターのアスペクト比)のものである。現在のモニターやテレビ等に多く使われているアスペクト比は16 : 9 で、この場合は 1.33 ではなくて 1.78 となる。スクリーンサイズを変更すると、right の値も変更する必要がある。
● 任意のアスペクト比 (right の設定)
POV-Ray ではスクリーンサイズは、横サイズは image_width 、縦サイズは image_height という変数に常に入力される。任意のアスペクト比への対応は、right の設定で可能になる。全てのスクリーンサイズに適応しているカメラ文は、右手系では次の例のようになる。
camera{
location <15,-20,25>
sky<0,0,1>
right <-image_width/image_height,0,0>
look_at <4,5,3>
}
視点 location 、注視点 look_at はそれぞれ自分で見たい位置で設定する。
アスペクト比が 4:3 と 16:9 以外の画像を生成したいときは、Windows ではコマンドラインからスクリーンサイズを入力しないといけない。例えば、解像度 600x200・アンチエイリアス有 の場合は次のように入力する。
+W600 +H200 +A
カメラ文を上記のような設定にしておくと、すべてのスクリーンサイズに対応できる。
5.4 カメラの識別子
カメラは識別子として宣言できる。これによって数種類のカメラを簡単に変更できるようになる。
例)
#declare Zoom_Lens =
camera {
location <0,-100,0>
right<-1.33,0,0>
angle 30
}
#declare Wide_Lens =
camera {
location <0,-60,0>
right<-1.33,0,0>
angle 80
}
camera {
Zoom_Lens // カメラの選択
look_at <0,0,0>
}
5.5 カメラの特殊効果
POV-Ray ではカメラの特殊効果として、焦点ぼけや映像の揺らぎをサポートしている。
5.5-1 フォーカルブラー(焦点ぼけ)
POV-Ray では実際のカメラの口径の変化による焦点ぼけを表現できる。この機能は特定の部分のサンプリングを多くすることで焦点の被写界深度による違いを表現している。
< フォーカルブラーの構文 >
camera {
[ CAMERA_MODIFIERS... ]
[ aperture FLOAT ]
[ focal_point <VECTOR> ]
[ blur_samples FLOAT ]
[ confidence FLOAT ]
[ variance FLOAT ]
}
camera カメラのキーワード
CAMERA_MODIFIERS...
視点、注視点などの設定
aperture FLOAT鮮明に見える範囲を0~1で設定する。値を大きくするとぼやけた部分が大きくなる。[デフォルト:0 ]
focal_point <VECTOR>焦点の位置の設定、設定した座標を中心に焦点ぼけが生じる。[デフォルト:<0, 0, 0> ]
blur_samples FLOAT各ピクセルに使用する光線の最大数、値を大きくすると結果のイメージは滑らかになるがレンダリングは遅くなる。
confidence FLOATサンプリングの精度の設定、評価される色が実際の色の何%になるまで計算するかを0~1で設定する。[デフォルト:0.9 ](90%)
variance FLOATサンプリングの許容誤差の設定 [デフォルト:1/128 ]
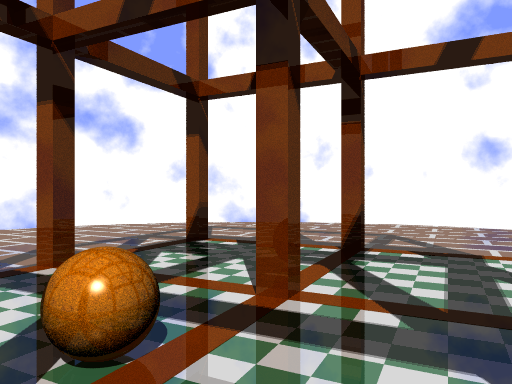
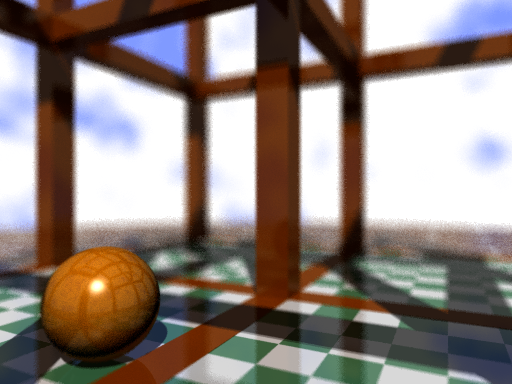
(a) フォーカルブラーなし
(b) フォーカルブラーあり(焦点は球)
図5.5-1 フォーカルブラーの効果
∇ POV-Rayソース: 図5.5-1 フォーカルブラーの効果 (a) フォーカルブラーなし
//-------------------- Fig. 5.5-1a
#version 3.7
#include "colors.inc"
#include "textures.inc"
global_settings
{assumed_gamma 2.2}
//============================== perspective
camera{
location<0.25,-0.5,0.2>
sky<0,0,1>
right <-image_width/image_height,0,0>
look_at<0,0,0.2>
}
light_source {<500,-800,1000> color 0.5}
light_source {<510,-810,1000> color 0.5}
//---------------------------object
union{
union{
#declare A=0;
#while (A<=4)
#declare B=0;
#while (B<=4)
box{0,1 scale <1,0.05,0.05> translate<-0.5, -0.5+B*0.25, A*0.25>}
box{0,1 scale <0.05,1.05,0.05> translate<-0.5+B*0.25, -0.5, A*0.25>}
box{0,1 scale <0.05,0.05,1> translate<-0.5+A*0.25, -0.5+B*0.25, 0>}
#declare B=B+2;
#end
#declare A=A+2;
#end
pigment{color rgb<0.8,0.3,0>}
finish{phong 1 reflection 0.1 crand 0.1}
}
box{-0.5,0.5 scale z*0.099
pigment{checker White*1.2, color rgb<0.3,0.6,0.4> scale 0.05}
finish{phong 1 reflection 0.2}
}
}
sphere{0,0.05
pigment{color rgb<0.8,0.4,0>*1.7}
finish{phong 1 reflection 0.1 crand 0.3}
translate<-0.03,-0.25,0.1>
}
//--------------------------ground
disc{0,z,2
pigment{brick White*1.0, color rgb<0.5,0.3,0.2> scale 0.05}
normal{brick 0.05 scale 0.05}
finish{phong 1 reflection 0.3}
}
//----------------sky
sky_sphere{
pigment{
wrinkles
color_map{
[0.3 color rgb<0.5,0.6,1.1>]
[0.5 White]
}
scale 0.2
}
}
∇ POV-Rayソース: 図5.5-1 フォーカルブラーの効果 (b) フォーカルブラーあり(焦点は球)
//----------- Fig. 5.5-1b focal blur
#version 3.7
#include "colors.inc"
#include "textures.inc"
global_settings
{assumed_gamma 2.2}
//============================== perspective
camera{
location<0.25,-0.5,0.2>
sky<0,0,1>
right <-image_width/image_height,0,0>
look_at<0,0,0.2>
//---------------------------focal blur
aperture 0.04
focal_point<-0.03,-0.25,0.1>
blur_samples 10
confidence 0.5
}
light_source {<500,-800,1000> color 0.5}
light_source {<510,-810,1000> color 0.5}
//---------------------------object
union{
union{
#declare A=0;
#while (A<=4)
#declare B=0;
#while (B<=4)
box{0,1 scale <1,0.05,0.05> translate<-0.5, -0.5+B*0.25, A*0.25>}
box{0,1 scale <0.05,1.05,0.05> translate<-0.5+B*0.25, -0.5, A*0.25>}
box{0,1 scale <0.05,0.05,1> translate<-0.5+A*0.25, -0.5+B*0.25, 0>}
#declare B=B+2;
#end
#declare A=A+2;
#end
pigment{color rgb<0.8,0.3,0>}
finish{phong 1 reflection 0.1 crand 0.1}
}
box{-0.5,0.5 scale z*0.099
pigment{checker White*1.2, color rgb<0.3,0.6,0.4> scale 0.05}
finish{phong 1 reflection 0.2}
}
}
sphere{0,0.05
pigment{color rgb<0.8,0.4,0>*1.7}
finish{phong 1 reflection 0.1 crand 0.3}
translate<-0.03,-0.25,0.1>
}
//--------------------------ground
disc{0,z,2
pigment{brick White*1.0, color rgb<0.5,0.3,0.2> scale 0.05}
normal{brick 0.05 scale 0.05}
finish{phong 1 reflection 0.3}
}
//----------------sky
sky_sphere{
pigment{
wrinkles
color_map{
[0.3 color rgb<0.5,0.6,1.1>]
[0.5 White]
}
scale 0.2
}
}
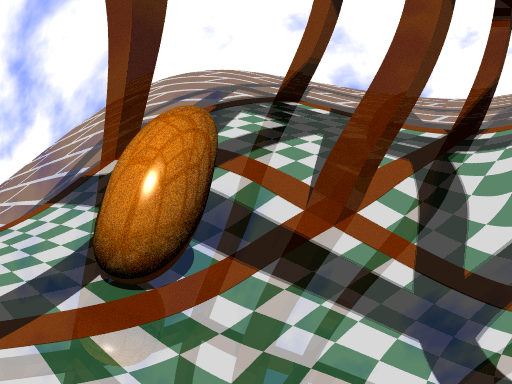
5.5-2 カメラ光線(視点から出る追跡光線)の揺らぎ
カメラにノーマル文を追加することによって、イメージ全体が歪んだような特殊効果が得られる。(参考: POV-Ray添付シーン scenes/animations/camera2.pov)▷「12.2 ノーマル」 参照
図5.5-2 ノーマルの効果
∇ POV-Rayソース: 図5.5-2 ノーマルの効果
//--------------- Fig. 5.5-2 perturbation
#version 3.7
#include "colors.inc"
#include "textures.inc"
global_settings
{assumed_gamma 2.2}
//============================== perspective
camera{
location<0.25,-0.5,0.2>
sky<0,0,1>
right <-image_width/image_height,0,0>
look_at<0,0,0.2>
normal{bumps 0.8} // <<<---- ray perturbation
}
light_source {<500,-800,1000> color 0.5}
light_source {<510,-810,1000> color 0.5}
//---------------------------object
union{
union{
#declare A=0;
#while (A<=4)
#declare B=0;
#while (B<=4)
box{0,1 scale <1,0.05,0.05> translate<-0.5, -0.5+B*0.25, A*0.25>}
box{0,1 scale <0.05,1.05,0.05> translate<-0.5+B*0.25, -0.5, A*0.25>}
box{0,1 scale <0.05,0.05,1> translate<-0.5+A*0.25, -0.5+B*0.25, 0>}
#declare B=B+2;
#end
#declare A=A+2;
#end
pigment{color rgb<0.8,0.3,0>}
finish{phong 1 reflection 0.1 crand 0.1}
}
box{-0.5,0.5 scale z*0.099
pigment{checker White*1.2, color rgb<0.3,0.6,0.4> scale 0.05}
finish{phong 1 reflection 0.2}
}
}
sphere{0,0.05
pigment{color rgb<0.8,0.4,0>*1.7}
finish{phong 1 reflection 0.1 crand 0.3}
translate<-0.03,-0.25,0.1>
}
//---------------------------ground
disc{0,z,2
pigment{brick White*1.0, color rgb<0.5,0.3,0.2> scale 0.05}
normal{brick 0.05 scale 0.05}
finish{phong 1 reflection 0.3}
}
//------------------- sky
sky_sphere{
pigment{
wrinkles
color_map{
[0.3 color rgb<0.5,0.6,1.1>]
[0.5 White]
}
scale 0.2
}
}
5.6 各種カメラ
POV-Rayではパースペクティブ カメラ以外にも様々なタイプのカメラが使用できる。
各種カメラ▷ 1 正射影(orthographic) ▷ 2 魚眼(fisheye) ▷ 3 超広角(ultra_wide_angle) ▷ 4 オムニマクス(omnimax) ▷ 5 パノラマ(panoramic) ▷ 6 円筒投影(cylinder) ▷ 7 球投影(spherical)
カメラのタイプの設定には、カメラ文の中にそれぞれのカメラのキーワードを記述すればよい。タイプによって使用するパラメータが異なるので注意する。
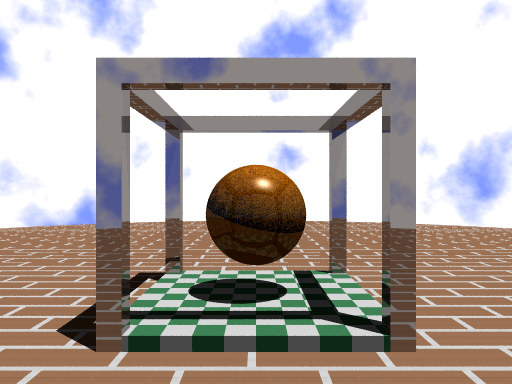
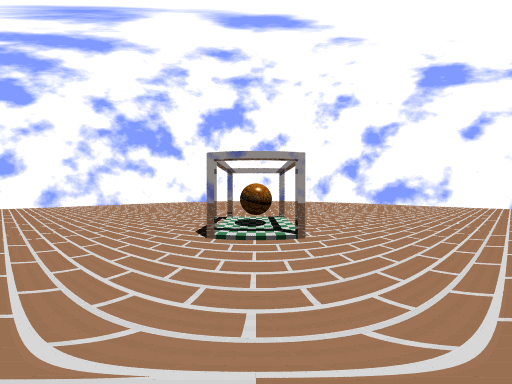
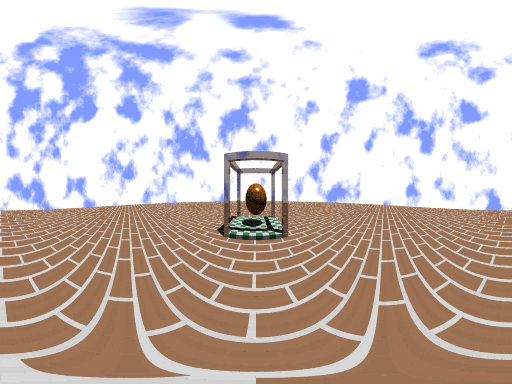
次図は通常使用するパースペクティブ カメラによる画像である。比較がしやすいように以下の特殊なカメラでも同じシーンと視点を使用する。
図5.6 パースペクティブ カメラ
※ 超広角、パノラマ、円筒を使う場合は direction には単位ベクトルを設定したほうがよい。
※ 正射影、魚眼、オムニマクスを使う場合は direction ベクトルの長さは関係ない。
※ パースペクティブ カメラ以外は視角の大きさに制限はない。視角を360°より大き くした場合はイメージを繰り返して見ることになる(繰り返しの方法は使用するカメラの 特性による)。
∇ POV-Rayソース: 図5.6 パースペクティブ カメラ
//------------- Fig. 5.6 perspective
#version 3.7
#include "colors.inc"
#include "textures.inc"
global_settings
{assumed_gamma 2.2}
//===================== [default] perspective
camera{
// orthographic
// fisheye angle 180
// ultra_wide_angle angle 360
// omnimax
// panoramic angle 180
// cylinder 1
// cylinder 2
// cylinder 3
// cylinder 4
location<0,-1.7,0.5>
sky<0,0,1>
right <-image_width/image_height,0,0>
look_at<0,5,0.5>
}
//---------------------------------------light / sky
light_source {<600,-500,2500> color 0.8}
sky_sphere{
pigment{
wrinkles
color_map{
[0.3 color rgb<0.5,0.6,1.1>]
[0.5 White]
}
scale 0.2
}
}
//---------------------------ground
disc{0,z,5
pigment{brick White*1.5, color rgb<0.55,0.4,0.3>*2 scale 0.05}
normal{brick 0.05 scale 0.01}
}
//---------------------------object
box{0,1 scale z*0.1 translate<-0.499,-0.499,-0.05>
pigment{checker White*1.5, color rgb<0.3,0.6,0.4>*1.5 scale 0.1}
}
sphere{0,0.22
pigment{color rgb<0.8,0.4,0>*1.7}
finish{phong 1 reflection 0.1 crand 0.3}
translate<0,0,0.4>
}
#declare pillar = object {box{0,<0.08,0.08,1>} }
#declare beam = object {box{0,<1,0.08,0.08>} }
union{
object{pillar translate<-0.5,-0.5,-0.08>}
object{pillar translate<0.42,-0.5,-0.08>}
object{pillar translate<-0.5,0.42,-0.08>}
object{pillar translate<0.42,0.42,-0.08>}
object{beam translate<-0.5,-0.5,0.84>}
object{beam translate<-0.5,0.42,0.84>}
object{beam rotate z*90 translate<0.5,-0.5,0.84>}
object{beam rotate z*90 translate<-0.42,-0.5,0.84>}
texture {New_Penny}
}
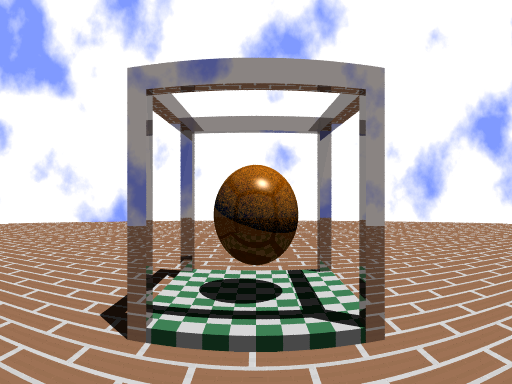
5.6-1 正射影(orthographic)
この投影法はカメラから出る平行光線を使ってシーンのイメージを作る。
※ right、up はビューウインドウのサ イズとアスペクト比を設定する。
※ direction、angleは使用しない。
図5.6-1 正射影カメラ
∇ POV-Rayソース: 図5.6-1 正射影カメラ
//------------- Fig. 5.6-1 orthographic
#version 3.7
#include "colors.inc"
#include "textures.inc"
global_settings
{assumed_gamma 2.2}
//========================= other camera
camera{
orthographic
// fisheye angle 180
// ultra_wide_angle angle 360
// omnimax
// panoramic angle 180
// cylinder 1
// cylinder 2
// cylinder 3
// cylinder 4
location<0,-1.7,0.5>
sky<0,0,1>
right <-image_width/image_height,0,0>
look_at<0,5,0.5>
}
//---------------------------------------light / sky
light_source {<600,-500,2500> color 0.8}
sky_sphere{
pigment{
wrinkles
color_map{
[0.3 color rgb<0.5,0.6,1.1>]
[0.5 White]
}
scale 0.2
}
}
//---------------------------ground
disc{0,z,5
pigment{brick White*1.5, color rgb<0.55,0.4,0.3>*2 scale 0.05}
normal{brick 0.05 scale 0.01}
}
//---------------------------object
box{0,1 scale z*0.1 translate<-0.499,-0.499,-0.05>
pigment{checker White*1.5, color rgb<0.3,0.6,0.4>*1.5 scale 0.1}
}
sphere{0,0.22
pigment{color rgb<0.8,0.4,0>*1.7}
finish{phong 1 reflection 0.1 crand 0.3}
translate<0,0,0.4>
}
#declare pillar = object {box{0,<0.08,0.08,1>} }
#declare beam = object {box{0,<1,0.08,0.08>} }
union{
object{pillar translate<-0.5,-0.5,-0.08>}
object{pillar translate<0.42,-0.5,-0.08>}
object{pillar translate<-0.5,0.42,-0.08>}
object{pillar translate<0.42,0.42,-0.08>}
object{beam translate<-0.5,-0.5,0.84>}
object{beam translate<-0.5,0.42,0.84>}
object{beam rotate z*90 translate<0.5,-0.5,0.84>}
object{beam rotate z*90 translate<-0.42,-0.5,0.84>}
texture {New_Penny}
}
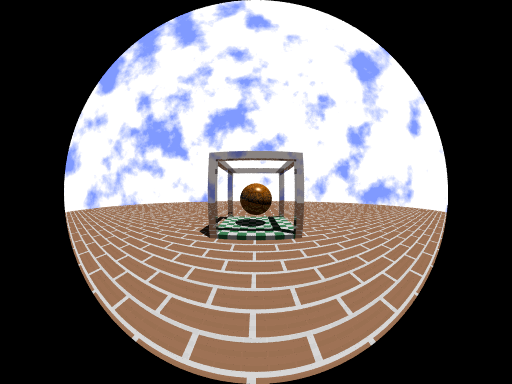
5.6-2 魚眼(fisheye)
これは球状の投影法である。楕円状のイメージを得たい場合はアスペクト比を調整する。▷「5.3 アスペクト比」 参照
※ 視角はangleによって設定される。180°であれば標準的な魚眼となり、 360°であれば全てが見える " 超魚 眼 " となる。
※ right、upはアスペクト比を設定す る。
図5.6-2 魚眼(180°)カメラ
∇ POV-Rayソース: 図5.6-2 魚眼(180°)カメラ
//------------- Fig. 5.6-2 fisheye
#version 3.7
#include "colors.inc"
#include "textures.inc"
global_settings
{assumed_gamma 2.2}
//========================= other camera
camera{
// orthographic
fisheye angle 180
// ultra_wide_angle angle 360
// omnimax
// panoramic angle 180
// cylinder 1
// cylinder 2
// cylinder 3
// cylinder 4
location<0,-1.7,0.5>
sky<0,0,1>
right <-image_width/image_height,0,0>
look_at<0,5,0.5>
}
//---------------------------------------light / sky
light_source {<600,-500,2500> color 0.8}
sky_sphere{
pigment{
wrinkles
color_map{
[0.3 color rgb<0.5,0.6,1.1>]
[0.5 White]
}
scale 0.2
}
}
//---------------------------ground
disc{0,z,5
pigment{brick White*1.5, color rgb<0.55,0.4,0.3>*2 scale 0.05}
normal{brick 0.05 scale 0.01}
}
//---------------------------object
box{0,1 scale z*0.1 translate<-0.499,-0.499,-0.05>
pigment{checker White*1.5, color rgb<0.3,0.6,0.4>*1.5 scale 0.1}
}
sphere{0,0.22
pigment{color rgb<0.8,0.4,0>*1.7}
finish{phong 1 reflection 0.1 crand 0.3}
translate<0,0,0.4>
}
#declare pillar = object {box{0,<0.08,0.08,1>} }
#declare beam = object {box{0,<1,0.08,0.08>} }
union{
object{pillar translate<-0.5,-0.5,-0.08>}
object{pillar translate<0.42,-0.5,-0.08>}
object{pillar translate<-0.5,0.42,-0.08>}
object{pillar translate<0.42,0.42,-0.08>}
object{beam translate<-0.5,-0.5,0.84>}
object{beam translate<-0.5,0.42,0.84>}
object{beam rotate z*90 translate<0.5,-0.5,0.84>}
object{beam rotate z*90 translate<-0.42,-0.5,0.84>}
texture {New_Penny}
}
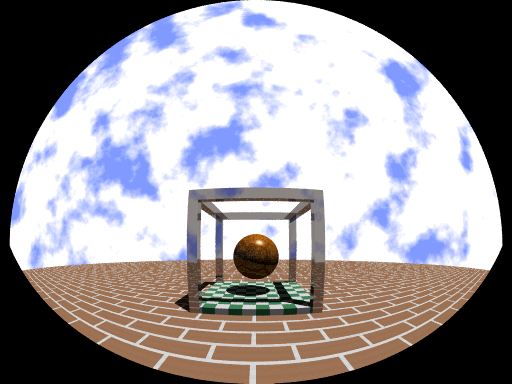
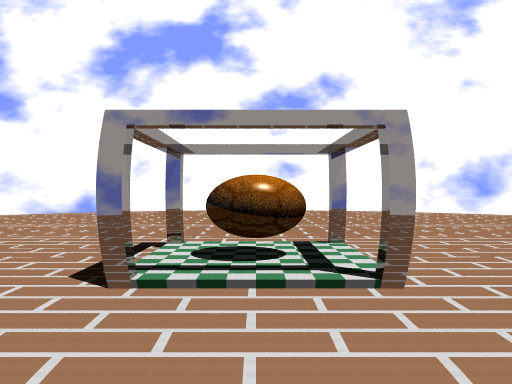
5.6-3 超広角(ultra_wide_angle)
この投影法は魚眼に多少似ているが、こちらは球ではなく長方形のイメージである。
※ 視角は angle によって設定する。
※ right、up、direction はパースペクティブ カメラと同様に働く。
図5.6-3 超広角(360°)カメラ
∇ POV-Rayソース: 図5.6-3 超広角(360°)カメラ
//------------- Fig. 5.6-3 ultra_wide_angle
#version 3.7
#include "colors.inc"
#include "textures.inc"
global_settings
{assumed_gamma 2.2}
//========================= other camera
camera{
// orthographic
// fisheye angle 180
ultra_wide_angle angle 360
// omnimax
// panoramic angle 180
// cylinder 1
// cylinder 2
// cylinder 3
// cylinder 4
location<0,-1.7,0.5>
sky<0,0,1>
right <-image_width/image_height,0,0>
look_at<0,5,0.5>
}
//---------------------------------------light / sky
light_source {<600,-500,2500> color 0.8}
sky_sphere{
pigment{
wrinkles
color_map{
[0.3 color rgb<0.5,0.6,1.1>]
[0.5 White]
}
scale 0.2
}
}
//---------------------------ground
disc{0,z,5
pigment{brick White*1.5, color rgb<0.55,0.4,0.3>*2 scale 0.05}
normal{brick 0.05 scale 0.01}
}
//---------------------------object
box{0,1 scale z*0.1 translate<-0.499,-0.499,-0.05>
pigment{checker White*1.5, color rgb<0.3,0.6,0.4>*1.5 scale 0.1}
}
sphere{0,0.22
pigment{color rgb<0.8,0.4,0>*1.7}
finish{phong 1 reflection 0.1 crand 0.3}
translate<0,0,0.4>
}
#declare pillar = object {box{0,<0.08,0.08,1>} }
#declare beam = object {box{0,<1,0.08,0.08>} }
union{
object{pillar translate<-0.5,-0.5,-0.08>}
object{pillar translate<0.42,-0.5,-0.08>}
object{pillar translate<-0.5,0.42,-0.08>}
object{pillar translate<0.42,0.42,-0.08>}
object{beam translate<-0.5,-0.5,0.84>}
object{beam translate<-0.5,0.42,0.84>}
object{beam rotate z*90 translate<0.5,-0.5,0.84>}
object{beam rotate z*90 translate<-0.42,-0.5,0.84>}
texture {New_Penny}
}
5.6-4 オムニマクス(omnimax)
この投影法は、視角が垂直方向に縮められた180°の魚眼である。実際にこの投影法は、ドーム形のオムニマクス劇場で見る映画に使われる。
※ angle は使用しない。
図5.6-4 オムニマクス カメラ
∇ POV-Rayソース: 図5.6-4 オムニマクス カメラ
//------------- Fig. 5.6-4 omnimax
#version 3.7
#include "colors.inc"
#include "textures.inc"
global_settings
{assumed_gamma 2.2}
//========================= other camera
camera{
// orthographic
// fisheye angle 180
// ultra_wide_angle angle 360
omnimax
// panoramic angle 180
// cylinder 1
// cylinder 2
// cylinder 3
// cylinder 4
location<0,-1.7,0.5>
sky<0,0,1>
right <-image_width/image_height,0,0>
look_at<0,5,0.5>
}
//---------------------------------------light / sky
light_source {<600,-500,2500> color 0.8}
sky_sphere{
pigment{
wrinkles
color_map{
[0.3 color rgb<0.5,0.6,1.1>]
[0.5 White]
}
scale 0.2
}
}
//---------------------------ground
disc{0,z,5
pigment{brick White*1.5, color rgb<0.55,0.4,0.3>*2 scale 0.05}
normal{brick 0.05 scale 0.01}
}
//---------------------------object
box{0,1 scale z*0.1 translate<-0.499,-0.499,-0.05>
pigment{checker White*1.5, color rgb<0.3,0.6,0.4>*1.5 scale 0.1}
}
sphere{0,0.22
pigment{color rgb<0.8,0.4,0>*1.7}
finish{phong 1 reflection 0.1 crand 0.3}
translate<0,0,0.4>
}
#declare pillar = object {box{0,<0.08,0.08,1>} }
#declare beam = object {box{0,<1,0.08,0.08>} }
union{
object{pillar translate<-0.5,-0.5,-0.08>}
object{pillar translate<0.42,-0.5,-0.08>}
object{pillar translate<-0.5,0.42,-0.08>}
object{pillar translate<0.42,0.42,-0.08>}
object{beam translate<-0.5,-0.5,0.84>}
object{beam translate<-0.5,0.42,0.84>}
object{beam rotate z*90 translate<0.5,-0.5,0.84>}
object{beam rotate z*90 translate<-0.42,-0.5,0.84>}
texture {New_Penny}
}
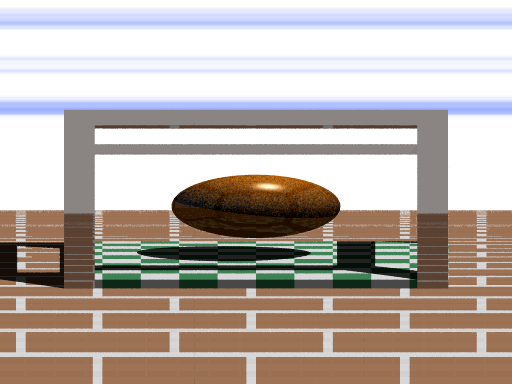
5.6-5 パノラマ(panoramic)
この投影法は、円筒状投影法を用いることによって視角を180°より大きくできる。
※ 視角は angle によって設定する。
※ up、rightはパースペクティブ カメラと同様に働く。
図5.6-5 パノラマ カメラ
∇ POV-Rayソース: 図5.6-5 パノラマ カメラ
//------------- Fig. 5.6-5 panoramic
#version 3.7
#include "colors.inc"
#include "textures.inc"
global_settings
{assumed_gamma 2.2}
//========================= other camera
camera{
// orthographic
// fisheye angle 180
// ultra_wide_angle angle 360
// omnimax
panoramic angle 180
// cylinder 1
// cylinder 2
// cylinder 3
// cylinder 4
location<0,-1.7,0.5>
sky<0,0,1>
right <-image_width/image_height,0,0>
look_at<0,5,0.5>
}
//---------------------------------------light / sky
light_source {<600,-500,2500> color 0.8}
sky_sphere{
pigment{
wrinkles
color_map{
[0.3 color rgb<0.5,0.6,1.1>]
[0.5 White]
}
scale 0.2
}
}
//---------------------------ground
disc{0,z,5
pigment{brick White*1.5, color rgb<0.55,0.4,0.3>*2 scale 0.05}
normal{brick 0.05 scale 0.01}
}
//---------------------------object
box{0,1 scale z*0.1 translate<-0.499,-0.499,-0.05>
pigment{checker White*1.5, color rgb<0.3,0.6,0.4>*1.5 scale 0.1}
}
sphere{0,0.22
pigment{color rgb<0.8,0.4,0>*1.7}
finish{phong 1 reflection 0.1 crand 0.3}
translate<0,0,0.4>
}
#declare pillar = object {box{0,<0.08,0.08,1>} }
#declare beam = object {box{0,<1,0.08,0.08>} }
union{
object{pillar translate<-0.5,-0.5,-0.08>}
object{pillar translate<0.42,-0.5,-0.08>}
object{pillar translate<-0.5,0.42,-0.08>}
object{pillar translate<0.42,0.42,-0.08>}
object{beam translate<-0.5,-0.5,0.84>}
object{beam translate<-0.5,0.42,0.84>}
object{beam rotate z*90 translate<0.5,-0.5,0.84>}
object{beam rotate z*90 translate<-0.42,-0.5,0.84>}
texture {New_Penny}
}
5.6-6 円筒投影(cylindrer)
この投影法はシーンを円筒に投影するものである。円筒の向きと視点の位置によって4つのタイプがあり、使用するカメラを番号で選択する。
cylinder 1:垂直円筒・固定視点(パースペクティブに近い) cylinder 2:水平円筒・固定視点( 〃 ) cylinder 3:垂直円筒・円筒の軸に沿って視点が移動する(正射影に近い) cylinder 4:水平円筒・円筒の軸に沿って視点が移動する( 〃 )
※ タイプ1、3では、円筒は up ベクトルに沿って位置し、幅は right ベクトルの長さによ って決定される(angle によって無視される場合もある)。
※ タイプ3ではupベクトルはイメージの高さを決定する。例えば、up 4*y のカメラを原 点に置いた場合は -2<y<2 の範囲が見える。すべての視線は y 軸に垂直である。
※ タイプ2、4 では、円筒は right ベクトルに沿って位置する。
※ タイプ4 では視線は right ベクトルに垂直である。
(a) cylinder 1
(b) cylinder 2
(c) cylinder 3
(d) cylinder 4
図5.6-6 円筒投影カメラ
∇ POV-Rayソース: 図5.6-6 円筒投影カメラ (a) cylinder 1
//------------- Fig. 5.6-6a cylinder 1
#version 3.7
#include "colors.inc"
#include "textures.inc"
global_settings
{assumed_gamma 2.2}
//========================= other camera
camera{
// orthographic
// fisheye angle 180
// ultra_wide_angle angle 360
// omnimax
// panoramic angle 180
cylinder 1
// cylinder 2
// cylinder 3
// cylinder 4
location<0,-1.7,0.5>
sky<0,0,1>
right <-image_width/image_height,0,0>
look_at<0,5,0.5>
}
//---------------------------------------light / sky
light_source {<600,-500,2500> color 0.8}
sky_sphere{
pigment{
wrinkles
color_map{
[0.3 color rgb<0.5,0.6,1.1>]
[0.5 White]
}
scale 0.2
}
}
//---------------------------ground
disc{0,z,5
pigment{brick White*1.5, color rgb<0.55,0.4,0.3>*2 scale 0.05}
normal{brick 0.05 scale 0.01}
}
//---------------------------object
box{0,1 scale z*0.1 translate<-0.499,-0.499,-0.05>
pigment{checker White*1.5, color rgb<0.3,0.6,0.4>*1.5 scale 0.1}
}
sphere{0,0.22
pigment{color rgb<0.8,0.4,0>*1.7}
finish{phong 1 reflection 0.1 crand 0.3}
translate<0,0,0.4>
}
#declare pillar = object {box{0,<0.08,0.08,1>} }
#declare beam = object {box{0,<1,0.08,0.08>} }
union{
object{pillar translate<-0.5,-0.5,-0.08>}
object{pillar translate<0.42,-0.5,-0.08>}
object{pillar translate<-0.5,0.42,-0.08>}
object{pillar translate<0.42,0.42,-0.08>}
object{beam translate<-0.5,-0.5,0.84>}
object{beam translate<-0.5,0.42,0.84>}
object{beam rotate z*90 translate<0.5,-0.5,0.84>}
object{beam rotate z*90 translate<-0.42,-0.5,0.84>}
texture {New_Penny}
}
∇ POV-Rayソース: 図5.6-6 円筒投影カメラ (b) cylinder 2
//------------- Fig. 5.6-6b cylinder 2
#version 3.7
#include "colors.inc"
#include "textures.inc"
global_settings
{assumed_gamma 2.2}
//========================= other camera
camera{
// orthographic
// fisheye angle 180
// ultra_wide_angle angle 360
// omnimax
// panoramic angle 180
// cylinder 1
cylinder 2
// cylinder 3
// cylinder 4
location<0,-1.7,0.5>
sky<0,0,1>
right <-image_width/image_height,0,0>
look_at<0,5,0.5>
}
//---------------------------------------light / sky
light_source {<600,-500,2500> color 0.8}
sky_sphere{
pigment{
wrinkles
color_map{
[0.3 color rgb<0.5,0.6,1.1>]
[0.5 White]
}
scale 0.2
}
}
//---------------------------ground
disc{0,z,5
pigment{brick White*1.5, color rgb<0.55,0.4,0.3>*2 scale 0.05}
normal{brick 0.05 scale 0.01}
}
//---------------------------object
box{0,1 scale z*0.1 translate<-0.499,-0.499,-0.05>
pigment{checker White*1.5, color rgb<0.3,0.6,0.4>*1.5 scale 0.1}
}
sphere{0,0.22
pigment{color rgb<0.8,0.4,0>*1.7}
finish{phong 1 reflection 0.1 crand 0.3}
translate<0,0,0.4>
}
#declare pillar = object {box{0,<0.08,0.08,1>} }
#declare beam = object {box{0,<1,0.08,0.08>} }
union{
object{pillar translate<-0.5,-0.5,-0.08>}
object{pillar translate<0.42,-0.5,-0.08>}
object{pillar translate<-0.5,0.42,-0.08>}
object{pillar translate<0.42,0.42,-0.08>}
object{beam translate<-0.5,-0.5,0.84>}
object{beam translate<-0.5,0.42,0.84>}
object{beam rotate z*90 translate<0.5,-0.5,0.84>}
object{beam rotate z*90 translate<-0.42,-0.5,0.84>}
texture {New_Penny}
}
∇ POV-Rayソース: 図5.6-6 円筒投影カメラ (c) cylinder 3
//------------- Fig. 5.6-6c cylinder 3
#version 3.7
#include "colors.inc"
#include "textures.inc"
global_settings
{assumed_gamma 2.2}
//========================= other camera
camera{
// orthographic
// fisheye angle 180
// ultra_wide_angle angle 360
// omnimax
// panoramic angle 180
// cylinder 1
// cylinder 2
cylinder 3
// cylinder 4
// spherical
location<0,-1.7,0.5>
sky<0,0,1>
// sky<0,0,-1> // spherical
right <-image_width/image_height,0,0>
look_at<0,5,0.5>
}
//---------------------------------------light / sky
light_source {<600,-500,2500> color 0.8}
sky_sphere{
pigment{
wrinkles
color_map{
[0.3 color rgb<0.5,0.6,1.1>]
[0.5 White]
}
scale 0.2
}
}
//---------------------------ground
disc{0,z,5
pigment{brick White*1.5, color rgb<0.55,0.4,0.3>*2 scale 0.05}
normal{brick 0.05 scale 0.01}
}
//---------------------------object
box{0,1 scale z*0.1 translate<-0.499,-0.499,-0.05>
pigment{checker White*1.5, color rgb<0.3,0.6,0.4>*1.5 scale 0.1}
}
sphere{0,0.22
pigment{color rgb<0.8,0.4,0>*1.7}
finish{phong 1 reflection 0.1 crand 0.3}
translate<0,0,0.4>
}
#declare pillar = object {box{0,<0.08,0.08,1>} }
#declare beam = object {box{0,<1,0.08,0.08>} }
union{
object{pillar translate<-0.5,-0.5,-0.08>}
object{pillar translate<0.42,-0.5,-0.08>}
object{pillar translate<-0.5,0.42,-0.08>}
object{pillar translate<0.42,0.42,-0.08>}
object{beam translate<-0.5,-0.5,0.84>}
object{beam translate<-0.5,0.42,0.84>}
object{beam rotate z*90 translate<0.5,-0.5,0.84>}
object{beam rotate z*90 translate<-0.42,-0.5,0.84>}
texture {New_Penny}
}
∇ POV-Rayソース: 図5.6-6 円筒投影カメラ (d) cylinder 4
//------------- Fig. 5.6-6d cylinder 4
#version 3.7
#include "colors.inc"
#include "textures.inc"
global_settings
{assumed_gamma 2.2}
//========================= other camera
camera{
// orthographic
// fisheye angle 180
// ultra_wide_angle angle 360
// omnimax
// panoramic angle 180
// cylinder 1
// cylinder 2
// cylinder 3
cylinder 4
location<0,-1.7,0.5>
sky<0,0,1>
right <-image_width/image_height,0,0>
look_at<0,5,0.5>
}
//---------------------------------------light / sky
light_source {<600,-500,2500> color 0.8}
sky_sphere{
pigment{
wrinkles
color_map{
[0.3 color rgb<0.5,0.6,1.1>]
[0.5 White]
}
scale 0.2
}
}
//---------------------------ground
disc{0,z,5
pigment{brick White*1.5, color rgb<0.55,0.4,0.3>*2 scale 0.05}
normal{brick 0.05 scale 0.01}
}
//---------------------------object
box{0,1 scale z*0.1 translate<-0.499,-0.499,-0.05>
pigment{checker White*1.5, color rgb<0.3,0.6,0.4>*1.5 scale 0.1}
}
sphere{0,0.22
pigment{color rgb<0.8,0.4,0>*1.7}
finish{phong 1 reflection 0.1 crand 0.3}
translate<0,0,0.4>
}
#declare pillar = object {box{0,<0.08,0.08,1>} }
#declare beam = object {box{0,<1,0.08,0.08>} }
union{
object{pillar translate<-0.5,-0.5,-0.08>}
object{pillar translate<0.42,-0.5,-0.08>}
object{pillar translate<-0.5,0.42,-0.08>}
object{pillar translate<0.42,0.42,-0.08>}
object{beam translate<-0.5,-0.5,0.84>}
object{beam translate<-0.5,0.42,0.84>}
object{beam rotate z*90 translate<0.5,-0.5,0.84>}
object{beam rotate z*90 translate<-0.42,-0.5,0.84>}
texture {New_Penny}
}
5.6-7 球投影(spherical)
球投影は魚眼レンズの投影法と似ている。魚眼では極座標系が使用されるが、球投影では直交座標系が使用されるところが異なっている。直交座標系であるため、球へのマッピングが容易になった。
< 球投影の構文 >
camera {
spherical
[angle HRIZONTAL [VERTICAL] ]
[CAMRA_ITEMS...]
}
spherical 球投影のキーワード
angle HRIZONTAL横方向の画角の設定 [デフォルト:360]
VERTICAL
省略すると、横方向の画角の1/2がディフォルトになる。
CAMRA_ITEMS...
必要なカメラ識別子の記述
図5.6-7 球投影カメラ (angle 180 90)
※ 右手系で球投影を使うと、カメラの設定でsky<0,0,-1>にする必要があった。
∇ POV-Rayソース: 図5.6-7 球投影カメラ (angle 180 90)
//------------- Fig. 5.6-7 spherical
#version 3.7
#include "colors.inc"
#include "textures.inc"
global_settings
{assumed_gamma 2.2}
//========================= other camera
camera{
// orthographic
// fisheye angle 180
// ultra_wide_angle angle 360
// omnimax
// panoramic angle 180
// cylinder 1
// cylinder 2
// cylinder 3
// cylinder 4
spherical
location<0,-1.7,0.5>
// sky<0,0,1>
sky<0,0,-1> // spherical
right <-image_width/image_height,0,0>
look_at<0,5,0.5>
}
//---------------------------------------light / sky
light_source {<600,-500,2500> color 0.8}
sky_sphere{
pigment{
wrinkles
color_map{
[0.3 color rgb<0.5,0.6,1.1>]
[0.5 White]
}
scale 0.2
}
}
//---------------------------ground
disc{0,z,5
pigment{brick White*1.5, color rgb<0.55,0.4,0.3>*2 scale 0.05}
normal{brick 0.05 scale 0.01}
}
//---------------------------object
box{0,1 scale z*0.1 translate<-0.499,-0.499,-0.05>
pigment{checker White*1.5, color rgb<0.3,0.6,0.4>*1.5 scale 0.1}
}
sphere{0,0.22
pigment{color rgb<0.8,0.4,0>*1.7}
finish{phong 1 reflection 0.1 crand 0.3}
translate<0,0,0.4>
}
#declare pillar = object {box{0,<0.08,0.08,1>} }
#declare beam = object {box{0,<1,0.08,0.08>} }
union{
object{pillar translate<-0.5,-0.5,-0.08>}
object{pillar translate<0.42,-0.5,-0.08>}
object{pillar translate<-0.5,0.42,-0.08>}
object{pillar translate<0.42,0.42,-0.08>}
object{beam translate<-0.5,-0.5,0.84>}
object{beam translate<-0.5,0.42,0.84>}
object{beam rotate z*90 translate<0.5,-0.5,0.84>}
object{beam rotate z*90 translate<-0.42,-0.5,0.84>}
texture {New_Penny}
}
5.7 メッシュ カメラ
メッシュ カメラは実験的な機能(バージョン3.7ベータ39で導入)であり、テクスチャ ベイクなどにも使用できるが、ここでは省略する。
(End) 5.カメラ