8. メディア
メディア(media)は、水や空気に浮いている微粒子(霧、霞、塵など)を表現するときに使用する。この効果の計算にはモンテカルロ法などが使用されている。メディアには、次の2種類がある。
大気メディア
大気(空気)を意味するメディアであり、霧、ちり、もや、目に見えるガスなど
の効果が表現できる。また、スポットライトなどの光線が空中を透過する様子を
目に見える状態にすることもできる。
物体メディア
物体内部に適用するメディアであり、インテリアの一部分として使用する。メデ
ィアそのものの機能は大気メディアと同じである。物体メディアを使用するとき
は、物体を中空の状態(hollow)にしておく必要がある。物体を透明や半透明に
すると、外から見ることができ物体メディアの効果が確認しやすい。
< media の構文 >
media {
[ MEDIA_IDENTIFIER ]
[ scattering { TYPE, <COLOR> [eccentricity VALUE] [extinction VALUE] }
| absorption <COLOR>
| emission <COLOR> ]
[ method NUMBER ]
[ intervals NUMBER ]
[ samples MIN, MAX ]
[ confidence VALUE ]
[ variance VALUE ]
[ ratio VALUE ]
[ aa_level VALUE ]
[ aa_threshold VALUE ]
[ density { [DENSITY_IDENTIFIER] [PATTERN_TYPE] [DENSITY_MODIFIER...] } ]
[ TRANSFORMATIONS ]
}
media メディアのキーワード
MEDIA_IDENTIFIER
識別子の名前を設定(40文字以下)
scattering 透過光の散乱設定 [デフォルト:散乱なし] ▷「8.1 散乱」 参照
absorption <COLOR>メディアが吸収する光の色を設定 [デフォルト:<0,0,0> ] ▷「8.2 吸収」
emission <COLOR> メディアの微粒子から発光する光の色を設定 [デフォルト:<0,0,0> ] ▷「8.3 発光」 参照
method NUMBERサンプリング方法の設定、1、2、3 の3タイプから選択 [デフォルト:3 ]
intervals NUMBER区間の数を設定、整数値 [デフォルト:1 ] ▷「8.4-1 区間数」 参照
samples MIN, MAX各区間におけるサンプルの数、最小値、最大値を整数で設定 [デフォルト:samples 1,1 ] ▷「8.4-2 サンプル数」 参照
confidence VALUE信頼度の設定で、0~1 の範囲で設定 [デフォルト:0.9 ]
variance VALUE分散の設定 [デフォルト値:1.0/128 ]
ratio VALUE照明区間数と非照明区間数の配分比率の設定 [デフォルト:0.9 ] ▷「8.4-3 区間数比」 参照
aa_level VALUEアンチエイリアシングの再帰深さの設定 [デフォルト:4 ]
aa_threshold VALUEアンチエイリアシング閾値の設定 [デフォルト:0.4 ]
density メディア密度の設定(パターンタイプなどを使用するとメディアに濃淡の模様が現れる。)▷「8.5 密度」 参照
※ メディアそれぞれの機能はオプション選択であり、設定の順番は特に決まっていない。
※ density や transformation を除くメディアのパラメータは、デフォルト値や前もって設定された値より優先される。
※ メディアの中に存在する物体において、その物体の透明感を設定しする場合、transmitを使うと影がなくなり、filterを使用すると影が生ずる。次にその例を示す。
object{MyObject pigment{rgbt 1.0} interior{media{MyMedia}}} //影なし
object{MyObject pigment{rgbf 1.0} interior{media{MyMedia}}} //影あり
※ メディアには、次のような3つのタイプある。タイプを設定すると、メディアの特性が決定される。
散乱(scattering)
これらのタイプは、3種類同時に設定可能である。タイプ設定のパラメータは、散乱では色の設定のほか3つの設定ができ、吸収・発光では色の設定だけでよい。これらの色の設定では、filter や transmit は使用できない。
※ 物体メディアを使用するときは、メディアはインテリアの中に記述する。
例)
interior{
media{ scattering { 1, rgb 0.05 } }
}
★メディア文のディフォルト値(省略すると自動的に使用される値)
media{
scattering{
color <0,0,0>
eccentricity 0.0
extinction 1.0
}
absorption <0,0,0>
emission <0,0,0>
aa_level 3
aa_threshold 0.1
confidence 0.9
intervals 1
jitter 0.0
method 3
ratio 0.9
samples 1,1
variance 1/128
}
8.1 散乱(scattering)
メディアに光を散乱させる性質を与える。透過光を散乱させることで、透過光の軌跡などが表現できる。物体は散乱しなかった光で照明されることになる。デフォルト値は、rgb < 0, 0, 0 >で、散乱なしとなっている。
< scattering の構文 >
scattering {
TYPE, <COLOR>
[ eccentricity VALUE ]
[ extinction VALUE ]
}
TYPE
散乱タイプの番号、1~5の整数値で設定
<COLOR>
散乱する光の色 [デフォルト:<0,0,0> ]
eccentricity VALUE離心率の設定(散乱タイプ5の場合に設定してもよい。その他の場合に設定するとエラーになる。)[デフォルト:0.0 ]
extinction VALUE消散係数の設定、値が小さいほど透過光の消散量が小さくなる。[デフォルト:1.0 ] ▷「8.1-6 消散係数」 参照
※ 光がメディアを通過するとき、散乱効果を使用しその様子を表現できる。散乱では設定の光が反射がされ目に見えるようになり、その他の光が通過する。
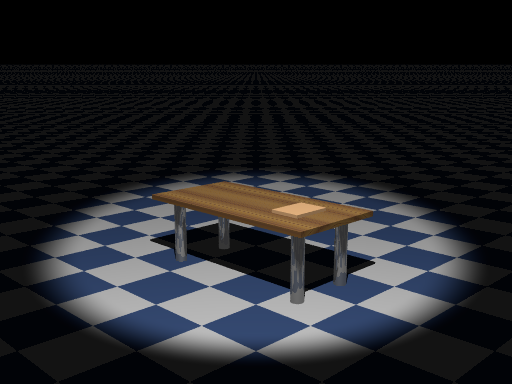
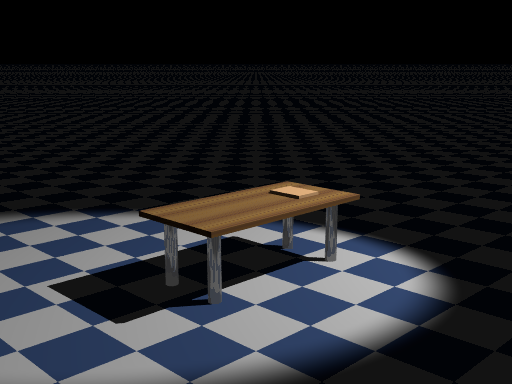
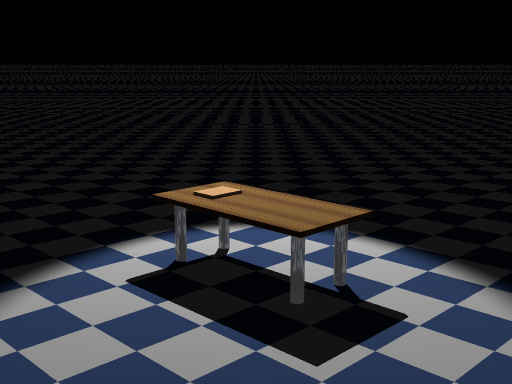
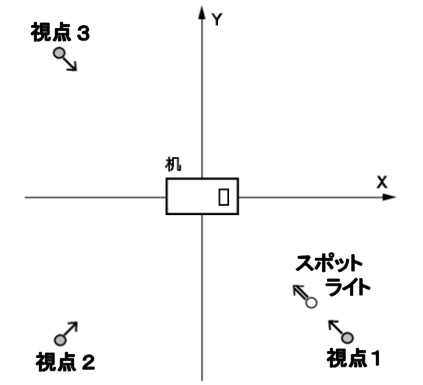
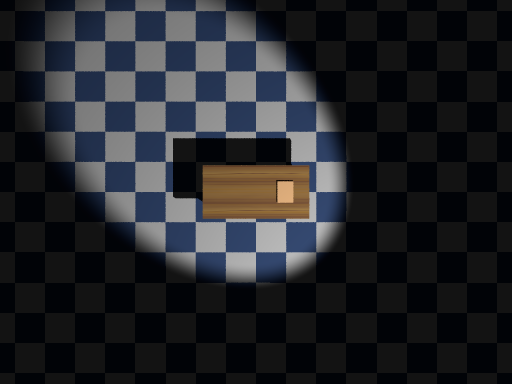
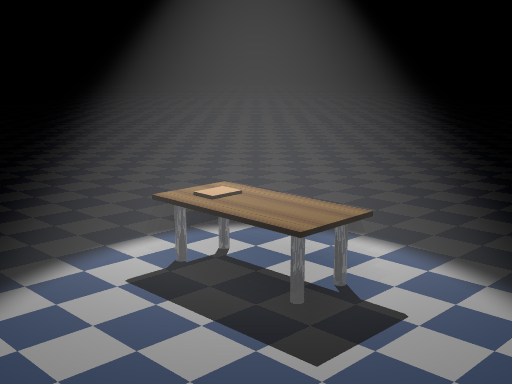
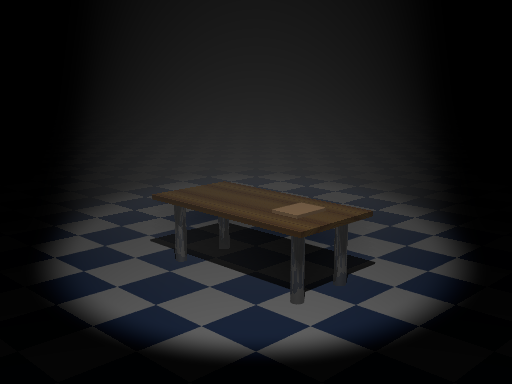
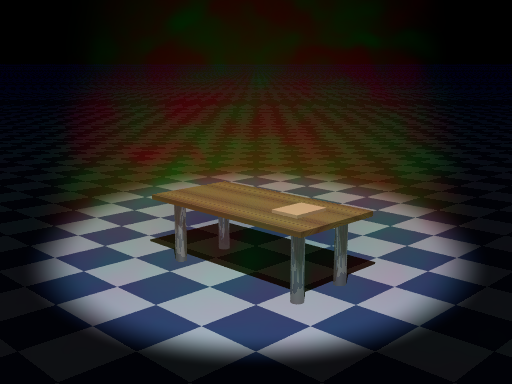
以下に、散乱タイプ1~5による違いを、同じモデルを用いて3方向から見た画像により示す。モデルは長方形の机を斜め上からスポットライトで照明している。
(a) モデルの配置と3つの視点
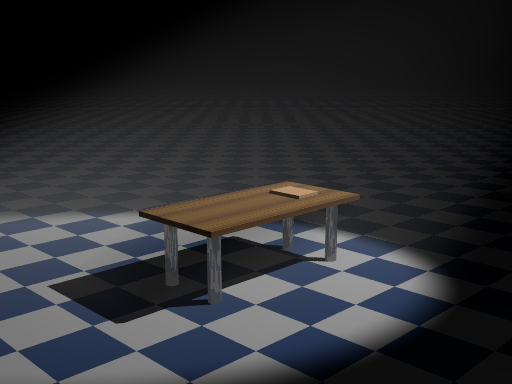
(b) 上方からみたモデルと照明
図8-1 モデル・照明と視点の位置
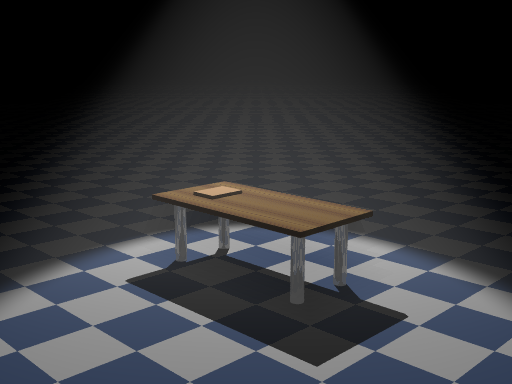
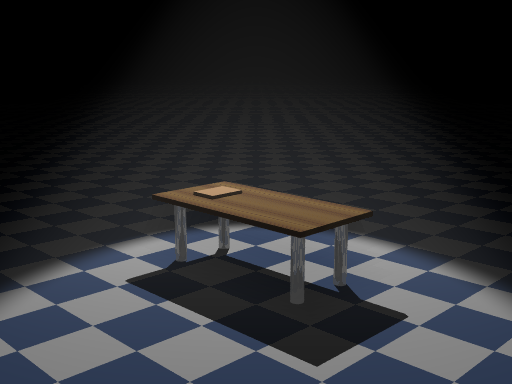
図8-2 メディアが無い状態の光景
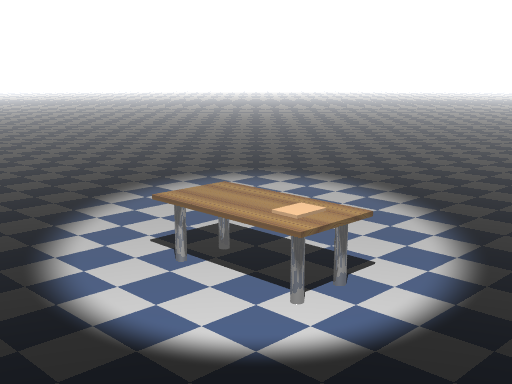
上図8-1(a) は、机のモデル・スポットライト照射方向・3方向の視点の位置関係を示している。画像は、透過光を散乱するメディアがない澄み切った空気の場合である。
∇ POV-Rayソース: 図8-1 (b) 、図8-2 メディアが無い状態の光景
//--------------------- Fig. 8-1b view from above
#version 3.7
#include "colors.inc"
#include "textures.inc"
#include "Woods.inc"
global_settings
{assumed_gamma 2.2}
//---------------------camera
camera{
location<0,-0.01,12> // above eye position
// location< 4,-4,2> //------------ front eye1
// location<-4,-4,2> //------------ side eye2
// location<-4 ,4,2> //------------ back eye3
sky<0,0,1>
right <-image_width/image_height,0,0>
look_at<0,0,0.8>
angle 46
}
//---------------------spot light
light_source{<3,-3,5> color 1.2
spotlight
point_at z*0.7
radius 15
falloff 20
}
//--------------------- floor
plane{z,0
pigment{checker color rgb<1,1,1>,
color rgb<0.3,0.4,0.6> scale 0.6}
}
//----------------------desk
#declare dleg = object{
cylinder{0,z*0.65,0.06
texture {finish {Metal} pigment{White} }
}
}
box{<-1,-0.5,0.65>,<1,0.5,0.7>
texture {T_Wood7 rotate y*90}
}
object{ dleg translate <-0.8,-0.3,0> }
object{ dleg translate <0.8,-0.3,0> }
object{ dleg translate <-0.8,0.3,0> }
object{ dleg translate <0.8,0.3,0> }
//-----------book
box{<0.7,0.2,0.7>,<0.4,-0.2,0.73>
pigment{color rgb<0.9,0.7,0.5>*1.5 }
}
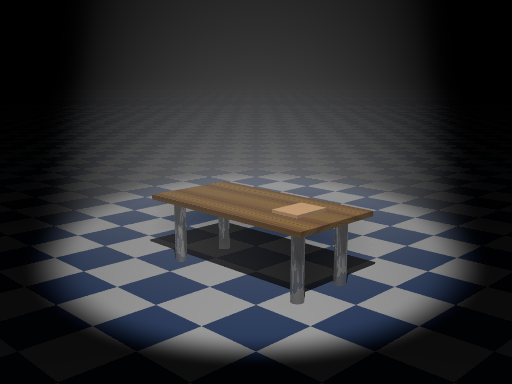
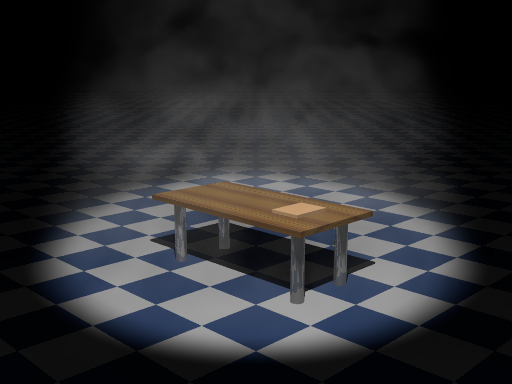
8.1-1 等方性散乱(散乱タイプ1)
光が全方向へ等しく散乱する。最もシンプルな散乱である。どの方向からみても散乱光は同じ強さで発生する。しかし、見る位置などにより光が通過するメディアの厚さが異なると、散乱光によるメディアの明るさは違って見える。
図8.1-1 等方性散乱(散乱タイプ1)
上図8.1-1 は等方性散乱のメディアを3方向から見た様子である。見る方向により光が通過するメディアの厚さが少しずつ異なるので、光の散乱する様子も少しづつ違って見える。
∇ POV-Rayソース: 図8.1-1 等方性散乱(散乱タイプ1)
//--------------- Fig. 8.1-1 scattering 1
// eye position 1,2,3
#version 3.7
#include "colors.inc"
#include "textures.inc"
#include "Woods.inc"
global_settings
{assumed_gamma 2.2}
//========================================== media
media{ scattering { 1, rgb 0.05 } }
// media{ scattering { 2, rgb 0.05 } }
// media{ scattering { 3, rgb 0.05 } }
// media{ scattering { 4, rgb 0.05 } }
// media{ scattering { 5, rgb 0.05 eccentricity 0.2 } }
// media{ scattering { 5, rgb 0.05 eccentricity -0.2 } }
// media{ absorption rgb< 0.04, 0.08, 0.08> }
// media{ emission rgb 0.015 }
//---------------------camera
camera{
location< 4,-4,2> //------------ front eye1
// location<-4,-4,2> //------------ side eye2
// location<-4 ,4,2> //------------ back eye3
sky<0,0,1>
right <-image_width/image_height,0,0>
look_at<0,0,0.8>
angle 46
}
//---------------------spot light
light_source{<3,-3,5> color 1.2
spotlight
point_at z*0.7
radius 15
falloff 20
}
//--------------------- floor
plane{z,0
pigment{checker color rgb<1,1,1>,
color rgb<0.3,0.4,0.6> scale 0.6}
}
//----------------------desk
#declare dleg = object{
cylinder{0,z*0.65,0.06
texture {finish {Metal} pigment{White} }
}
}
box{<-1,-0.5,0.65>,<1,0.5,0.7>
texture {T_Wood7 rotate y*90}
}
object{ dleg translate <-0.8,-0.3,0> }
object{ dleg translate <0.8,-0.3,0> }
object{ dleg translate <-0.8,0.3,0> }
object{ dleg translate <0.8,0.3,0> }
//-----------book
box{<0.7,0.2,0.7>,<0.4,-0.2,0.73>
pigment{color rgb<0.9,0.7,0.5>*1.5 }
}
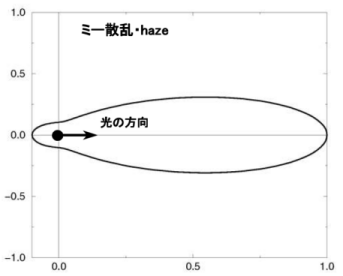
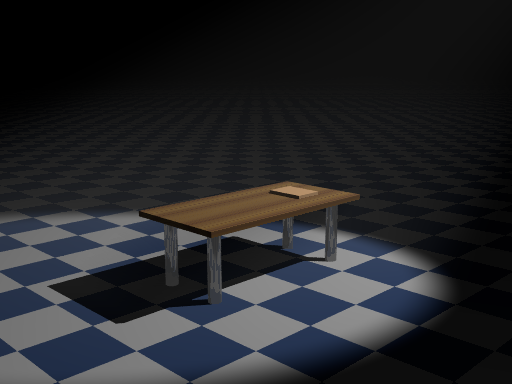
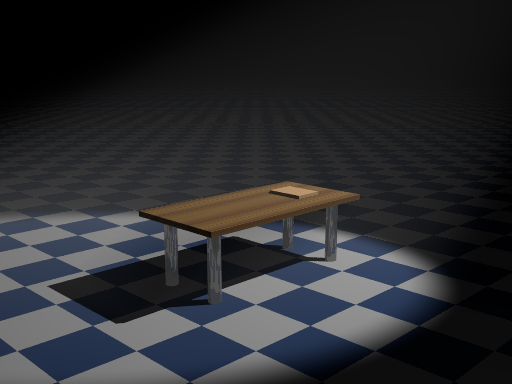
8.1-2 ミー散乱・haze(散乱タイプ2)
霧や雲などの微小な水滴、汚れた空の微小な汚染物質などによる散乱を表す。強い前方散乱の指向性がある。透過光が視線方向と向かい合っているときに散乱が強く見える。
図8.1-2a ミー散乱・haze(散乱タイプ2)の散乱指向性
図8.1-2b ミー散乱・haze(散乱タイプ2)
このメディアは光の前方散乱の性質がある。上図8.1-2b の視点3は、スポットライトの方向を見ているので、一番強い散乱光となっている。
∇ POV-Rayソース: 図8.1-2b ミー散乱・haze(散乱タイプ2)
//--------------- Fig. 8.1-2b scattering 2
// eye position 1,2,3
#version 3.7
#include "colors.inc"
#include "textures.inc"
#include "Woods.inc"
#include "stones.inc"
global_settings
{assumed_gamma 2.2}
//========================================== media
// media{ scattering { 1, rgb 0.05 } }
media{ scattering { 2, rgb 0.05 } }
// media{ scattering { 3, rgb 0.05 } }
// media{ scattering { 4, rgb 0.05 } }
// media{ scattering { 5, rgb 0.05 eccentricity 0.2 } }
// media{ scattering { 5, rgb 0.05 eccentricity -0.2 } }
// media{ absorption rgb< 0.04, 0.08, 0.08> }
// media{ emission rgb 0.015 }
//---------------------camera
camera{
location< 4,-4,2> //------------ front eye1
// location<-4,-4,2> //------------ side eye2
// location<-4 ,4,2> //------------ back eye3
sky<0,0,1>
right <-image_width/image_height,0,0>
look_at<0,0,0.8>
angle 46
}
//---------------------spot light
light_source{<3,-3,5> color 1.2
spotlight
point_at z*0.7
radius 15
falloff 20
}
//--------------------- floor
plane{z,0
pigment{checker color rgb<1,1,1>,
color rgb<0.3,0.4,0.6> scale 0.6}
}
//----------------------desk
#declare dleg = object{
cylinder{0,z*0.65,0.06
texture {finish {Metal} pigment{White} }
}
}
box{<-1,-0.5,0.65>,<1,0.5,0.7>
texture {T_Wood7 rotate y*90}
}
object{ dleg translate <-0.8,-0.3,0> }
object{ dleg translate <0.8,-0.3,0> }
object{ dleg translate <-0.8,0.3,0> }
object{ dleg translate <0.8,0.3,0> }
//-----------book
box{<0.7,0.2,0.7>,<0.4,-0.2,0.73>
pigment{color rgb<0.9,0.7,0.5>*1.5 }
}
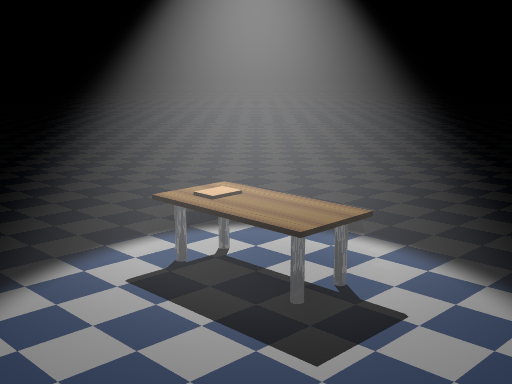
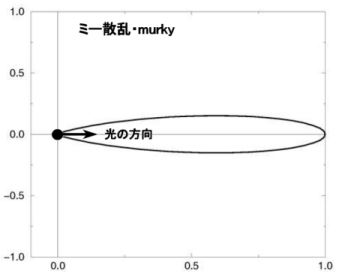
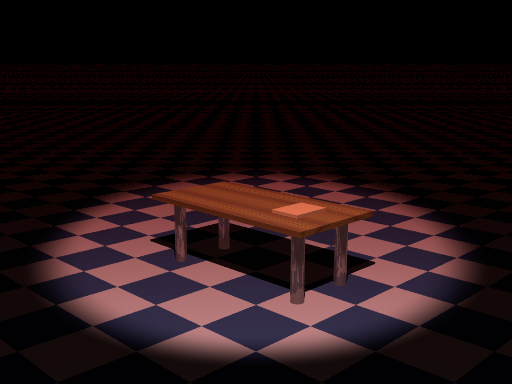
8.1-3 ミー散乱・murky(散乱タイプ3)
タイプ2と同様であるが、さらに前方散乱の指向性が強くなる。
図8.1-3a ミー散乱・murky(散乱タイプ3)の散乱指向性
図8.1-3b ミー散乱・murky(散乱タイプ3)
このメディアは光の強い前方散乱の性質がある。上図8.1-3b の視点3は、スポットライトの方向を見ているが、強い指向性のため、スポットライト付近だけが強い散乱光となっている。
∇ POV-Rayソース: 図8.1-3b ミー散乱・murky(散乱タイプ3)
//--------------- Fig. 8.1-3b scattering 3
// eye position 1,2,3
#version 3.7
#include "colors.inc"
#include "textures.inc"
#include "Woods.inc"
#include "stones.inc"
global_settings
{assumed_gamma 2.2}
//========================================== media
// media{ scattering { 1, rgb 0.05 } }
// media{ scattering { 2, rgb 0.05 } }
media{ scattering { 3, rgb 0.05 } }
// media{ scattering { 4, rgb 0.05 } }
// media{ scattering { 5, rgb 0.05 eccentricity 0.2 } }
// media{ scattering { 5, rgb 0.05 eccentricity -0.2 } }
// media{ absorption rgb< 0.04, 0.08, 0.08> }
// media{ emission rgb 0.015 }
//---------------------camera
camera{
location< 4,-4,2> //------------ front eye1
// location<-4,-4,2> //------------ side eye2
// location<-4 ,4,2> //------------ back eye3
sky<0,0,1>
right <-image_width/image_height,0,0>
look_at<0,0,0.8>
angle 46
}
//---------------------spot light
light_source{<3,-3,5> color 1.2
spotlight
point_at z*0.7
radius 15
falloff 20
}
//--------------------- floor
plane{z,0
pigment{checker color rgb<1,1,1>,
color rgb<0.3,0.4,0.6> scale 0.6}
}
//----------------------desk
#declare dleg = object{
cylinder{0,z*0.65,0.06
texture {finish {Metal} pigment{White} }
}
}
box{<-1,-0.5,0.65>,<1,0.5,0.7>
texture {T_Wood7 rotate y*90}
}
object{ dleg translate <-0.8,-0.3,0> }
object{ dleg translate <0.8,-0.3,0> }
object{ dleg translate <-0.8,0.3,0> }
object{ dleg translate <0.8,0.3,0> }
//-----------book
box{<0.7,0.2,0.7>,<0.4,-0.2,0.73>
pigment{color rgb<0.9,0.7,0.5>*1.5 }
}
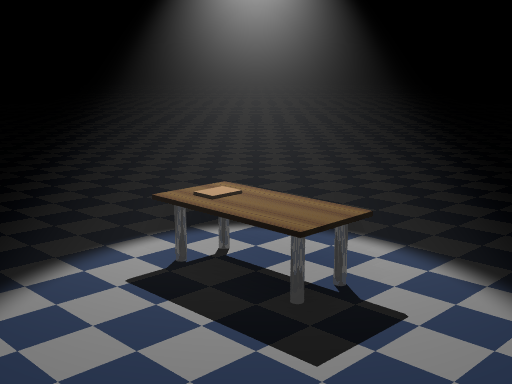
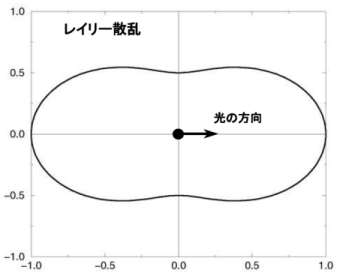
8.1-4 レイリー散乱(散乱タイプ4)
空気の分子のような大変小さい微粒子による散乱を表す。晴れた日の青空はレイリー散乱により太陽光線が散乱されたものである。光の進行方向に対して直角方向から見たとき、散乱が一番小さく見えるが、ミー散乱より指向性は弱い。
図8.1-4a レイリー散乱(散乱タイプ4)の散乱指向性
図8.1-4b レイリー散乱(散乱タイプ4)
上図8.1-4b に見るようにあまり指向性は強くないが、前方散乱と後方散乱があるため、視点2の横から見ている場合が、散乱光が小さくなっている。
∇ POV-Rayソース: 図8.1-4b レイリー散乱(散乱タイプ4)
//--------------- Fig. 8.1-4b scattering 4
// eye position 1,2,3
#version 3.7
#include "colors.inc"
#include "textures.inc"
#include "Woods.inc"
#include "stones.inc"
global_settings
{assumed_gamma 2.2}
//========================================== media
// media{ scattering { 1, rgb 0.05 } }
// media{ scattering { 2, rgb 0.05 } }
// media{ scattering { 3, rgb 0.05 } }
media{ scattering { 4, rgb 0.05 } }
// media{ scattering { 5, rgb 0.05 eccentricity 0.2 } }
// media{ scattering { 5, rgb 0.05 eccentricity -0.2 } }
// media{ absorption rgb< 0.04, 0.08, 0.08> }
// media{ emission rgb 0.015 }
//---------------------camera
camera{
location< 4,-4,2> //------------ front eye1
// location<-4,-4,2> //------------ side eye2
// location<-4 ,4,2> //------------ back eye3
sky<0,0,1>
right <-image_width/image_height,0,0>
look_at<0,0,0.8>
angle 46
}
//---------------------spot light
light_source{<3,-3,5> color 1.2
spotlight
point_at z*0.7
radius 15
falloff 20
}
//--------------------- floor
plane{z,0
pigment{checker color rgb<1,1,1>,
color rgb<0.3,0.4,0.6> scale 0.6}
}
//----------------------desk
#declare dleg = object{
cylinder{0,z*0.65,0.06
texture {finish {Metal} pigment{White} }
}
}
box{<-1,-0.5,0.65>,<1,0.5,0.7>
texture {T_Wood7 rotate y*90}
}
object{ dleg translate <-0.8,-0.3,0> }
object{ dleg translate <0.8,-0.3,0> }
object{ dleg translate <-0.8,0.3,0> }
object{ dleg translate <0.8,0.3,0> }
//-----------book
box{<0.7,0.2,0.7>,<0.4,-0.2,0.73>
pigment{color rgb<0.9,0.7,0.5>*1.5 }
}
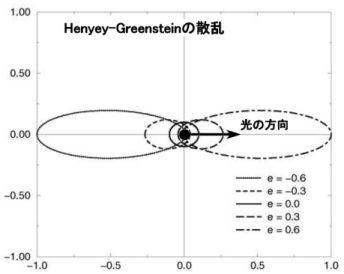
8.1-5 Henyey-Greenstein の散乱(散乱タイプ5)
Henyey-Greenstein位相関数により近似される散乱である。散乱の指向性は、離心率(eccentricity)の値で設定する。離心率のデフォルト値は0であり、この場合は等方性散乱となる。値により指向性が変化し、正の値のときは前方散乱、負の値のときは後方散乱となる。
図8.1-5a Henyey-Greenstein の散乱(散乱タイプ5)の散乱指向性
図8.1-5b Henyey-Greenstein の散乱(散乱タイプ5)離心率+
このメディアは、離心率が + のとき前方散乱なので、上図8.1-5bのスポットライトの光が向かってくる視点3が、一番強い散乱光となっている。
∇ POV-Rayソース: 図8.1-5b Henyey-Greenstein の散乱(散乱タイプ5)離心率+
//--------------- Fig. 8.1-5b scattering 5+
// eye position 1,2,3
#version 3.7
#include "colors.inc"
#include "textures.inc"
#include "Woods.inc"
#include "stones.inc"
global_settings
{assumed_gamma 2.2}
//========================================== media
// media{ scattering { 1, rgb 0.05 } }
// media{ scattering { 2, rgb 0.05 } }
// media{ scattering { 3, rgb 0.05 } }
// media{ scattering { 4, rgb 0.05 } }
media{ scattering { 5, rgb 0.05 eccentricity 0.2 } }
// media{ scattering { 5, rgb 0.05 eccentricity -0.2 } }
// media{ absorption rgb< 0.04, 0.08, 0.08> }
// media{ emission rgb 0.015 }
//---------------------camera
camera{
location< 4,-4,2> //------------ front eye1
// location<-4,-4,2> //------------ side eye2
// location<-4 ,4,2> //------------ back eye3
sky<0,0,1>
right <-image_width/image_height,0,0>
look_at<0,0,0.8>
angle 46
}
//---------------------spot light
light_source{<3,-3,5> color 1.2
spotlight
point_at z*0.7
radius 15
falloff 20
}
//--------------------- floor
plane{z,0
pigment{checker color rgb<1,1,1>,
color rgb<0.3,0.4,0.6> scale 0.6}
}
//----------------------desk
#declare dleg = object{
cylinder{0,z*0.65,0.06
texture {finish {Metal} pigment{White} }
}
}
box{<-1,-0.5,0.65>,<1,0.5,0.7>
texture {T_Wood7 rotate y*90}
}
object{ dleg translate <-0.8,-0.3,0> }
object{ dleg translate <0.8,-0.3,0> }
object{ dleg translate <-0.8,0.3,0> }
object{ dleg translate <0.8,0.3,0> }
//-----------book
box{<0.7,0.2,0.7>,<0.4,-0.2,0.73>
pigment{color rgb<0.9,0.7,0.5>*1.5 }
}
図8.1-5c Henyey-Greenstein の散乱(散乱タイプ5)離心率-
このメディアは、離心率が - のとき後方散乱なので、上図8.1-5c のスポットライトの光が差す方向を見ている視点1が、一番強い散乱光となっている。
∇ POV-Rayソース: 図8.1-5c Henyey-Greenstein の散乱(散乱タイプ5)離心率-
//--------------- Fig. 8.1-5c scattering 5-
// eye position 1,2,3
#version 3.7
#include "colors.inc"
#include "textures.inc"
#include "Woods.inc"
#include "stones.inc"
global_settings
{assumed_gamma 2.2}
//========================================== media
// media{ scattering { 1, rgb 0.05 } }
// media{ scattering { 2, rgb 0.05 } }
// media{ scattering { 3, rgb 0.05 } }
// media{ scattering { 4, rgb 0.05 } }
// media{ scattering { 5, rgb 0.05 eccentricity 0.2 } }
media{ scattering { 5, rgb 0.05 eccentricity -0.2 } }
// media{ absorption rgb< 0.04, 0.08, 0.08> }
// media{ emission rgb 0.015 }
//---------------------camera
camera{
location< 4,-4,2> //------------ front eye1
// location<-4,-4,2> //------------ side eye2
// location<-4 ,4,2> //------------ back eye3
sky<0,0,1>
right <-image_width/image_height,0,0>
look_at<0,0,0.8>
angle 46
}
//---------------------spot light
light_source{<3,-3,5> color 1.2
spotlight
point_at z*0.7
radius 15
falloff 20
}
//--------------------- floor
plane{z,0
pigment{checker color rgb<1,1,1>,
color rgb<0.3,0.4,0.6> scale 0.6}
}
//----------------------desk
#declare dleg = object{
cylinder{0,z*0.65,0.06
texture {finish {Metal} pigment{White} }
}
}
box{<-1,-0.5,0.65>,<1,0.5,0.7>
texture {T_Wood7 rotate y*90}
}
object{ dleg translate <-0.8,-0.3,0> }
object{ dleg translate <0.8,-0.3,0> }
object{ dleg translate <-0.8,0.3,0> }
object{ dleg translate <0.8,0.3,0> }
//-----------book
box{<0.7,0.2,0.7>,<0.4,-0.2,0.73>
pigment{color rgb<0.9,0.7,0.5>*1.5 }
}
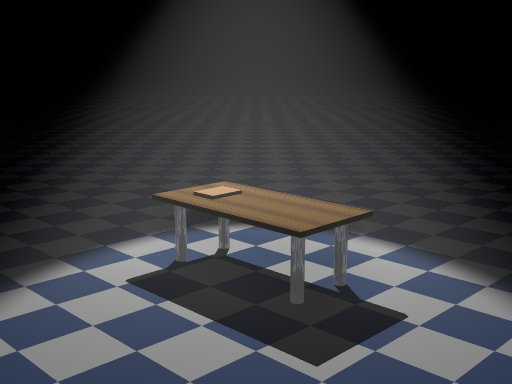
8.1-6 消散係数(extinction)
消散係数を設定すると、透過光の散乱量を調節できる。値が小さいほど透過光の消散が小さくなるので、物体が明るく照明されるようになる。ディフォルト値は extinction 1.0 である。次に消散係数を設定した例を示す。
(a) extinction 1.0(デフォルト)
(b) extinction 3.0
図8.1-6 消散係数
上図図8.1-6 の (a) はデフォルトの 1.0 の場合で、(b) は extinction 3.0 を設定している。(b) では光の消散が大きくなるので、透過光が少なくなり、暗くなっている。
∇ POV-Rayソース: 図8.1-6 消散係数
//--------------- Fig. 8.1-6a/6b extinction
// eye position 1,2,3
#version 3.7
#include "colors.inc"
#include "textures.inc"
#include "Woods.inc"
#include "stones.inc"
global_settings
{assumed_gamma 2.2}
//========================================== media
// media{ scattering { 1, rgb 0.05 } }
// media{ scattering { 2, rgb 0.05 } }
// media{ scattering { 3, rgb 0.05 } }
// media{ scattering { 4, rgb 0.05 } }
// media{ scattering { 5, rgb 0.05 eccentricity 0.2 } }
// media{ scattering { 5, rgb 0.05 eccentricity -0.2 } }
// media{ scattering { 1, rgb 0.05 } }
// media{ scattering { 5, rgb 0.05} } // <<<---(6a) default (extinction 1)
media{ scattering { 5, rgb 0.05 extinction 3} } // <<<--(6b) (extinction 3)
// media{ absorption rgb< 0.04, 0.08, 0.08> }
// media{ emission rgb 0.015 }
//---------------------camera
camera{
location< 4,-4,2> //------------ front eye1
// location<-4,-4,2> //------------ side eye2
// location<-4 ,4,2> //------------ back eye3
sky<0,0,1>
right <-image_width/image_height,0,0>
look_at<0,0,0.8>
angle 46
}
//---------------------spot light
light_source{<3,-3,5> color 1.2
spotlight
point_at z*0.7
radius 15
falloff 20
}
//--------------------- floor
plane{z,0
pigment{checker color rgb<1,1,1>,
color rgb<0.3,0.4,0.6> scale 0.6}
}
//----------------------desk
#declare dleg = object{
cylinder{0,z*0.65,0.06
texture {finish {Metal} pigment{White} }
}
}
box{<-1,-0.5,0.65>,<1,0.5,0.7>
texture {T_Wood7 rotate y*90}
}
object{ dleg translate <-0.8,-0.3,0> }
object{ dleg translate <0.8,-0.3,0> }
object{ dleg translate <-0.8,0.3,0> }
object{ dleg translate <0.8,0.3,0> }
//-----------book
box{<0.7,0.2,0.7>,<0.4,-0.2,0.73>
pigment{color rgb<0.9,0.7,0.5>*1.5 }
}
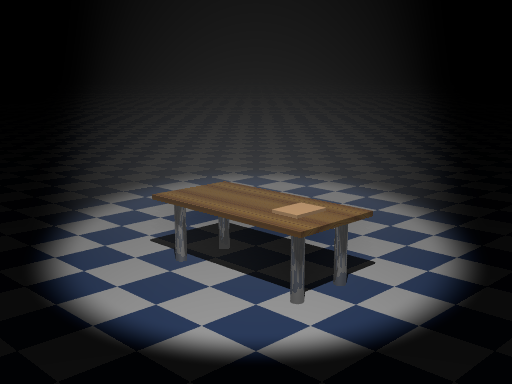
8.2 吸収(absorption)
「吸収」は、メディアに光を吸収する特性を与える。メディアを透過する光について、設定された色の光が吸収され、残りの光が目に見える結果となる。パラメータとして吸収する光の色を設定する。absorption のデフォルト値は rgb 0 で、光は全く吸収されないですべて透過する。
図8.2 吸収 absorption rgb< 0, 0.08, 0.08>
上図8.2 は、メディアに照明光を green 8%、blue 8% 吸収させた例である。透過光は白色光線であるが、この設定では赤色成分 red は吸収されないので、メディアを通して見る物体は赤っぽい光線で照らされることになる。
∇ POV-Rayソース: 図8.2 吸収 absorption rgb< 0, 0.08, 0.08>
//--------------- Fig. 8.2 absorption
#version 3.7
#include "colors.inc"
#include "textures.inc"
#include "Woods.inc"
#include "stones.inc"
global_settings
{assumed_gamma 2.2}
//========================================== media
// media{ scattering { 1, rgb 0.05 } }
// media{ scattering { 2, rgb 0.05 } }
// media{ scattering { 3, rgb 0.05 } }
// media{ scattering { 4, rgb 0.05 } }
// media{ scattering { 5, rgb 0.05 eccentricity 0.2 } }
// media{ scattering { 5, rgb 0.05 eccentricity -0.2 } }
// media{ scattering { 1, rgb 0.05 } }
// media{ scattering { 1, rgb 0.05 extinction 0} }
// media{ scattering { 1, rgb 0.05 extinction 2} }
media{ absorption rgb< 0.0, 0.08, 0.08> }
// media{ emission rgb 0.02 }
//---------------------camera
camera{
location< 4,-4,2> //------------ front eye1
// location<-4,-4,2> //------------ side eye2
// location<-4 ,4,2> //------------ back eye3
sky<0,0,1>
right <-image_width/image_height,0,0>
look_at<0,0,0.8>
angle 46
}
//---------------------spot light
light_source{<3,-3,5> color 1.2
spotlight
point_at z*0.7
radius 15
falloff 20
}
//--------------------- floor
plane{z,0
pigment{checker color rgb<1,1,1>,
color rgb<0.3,0.4,0.6> scale 0.6}
}
//----------------------desk
#declare dleg = object{
cylinder{0,z*0.65,0.06
texture {finish {Metal} pigment{White} }
}
}
box{<-1,-0.5,0.65>,<1,0.5,0.7>
texture {T_Wood7 rotate y*90}
}
object{ dleg translate <-0.8,-0.3,0> }
object{ dleg translate <0.8,-0.3,0> }
object{ dleg translate <-0.8,0.3,0> }
object{ dleg translate <0.8,0.3,0> }
//-----------book
box{<0.7,0.2,0.7>,<0.4,-0.2,0.73>
pigment{color rgb<0.9,0.7,0.5>*1.5 }
}
8.3 発光 (emission)
「発光」は、メディアに光を射出する性質を与える。パラメータとして発光する色を与える。照明なしでも、メディアの発光により物体が見えるようになる。これは、強い環境光を与えた場合の効果と似ている。emission のデフォルト値は 0 で、発光は無しである。
図8.3 発光 emission rgb 0.02
上図8.3 は、メディアに 2% の発光を与えた例である。照明はスポットライトだけであるが、メディア自体が発光しているため全体が明るくなっている。
∇ POV-Rayソース: 図8.3 発光 emission rgb 0.02
//--------------- Fig. 8.3 emission
#version 3.7
#include "colors.inc"
#include "textures.inc"
#include "Woods.inc"
#include "stones.inc"
global_settings
{assumed_gamma 2.2}
//========================================== media
// media{ scattering { 1, rgb 0.05 } }
// media{ scattering { 2, rgb 0.05 } }
// media{ scattering { 3, rgb 0.05 } }
// media{ scattering { 4, rgb 0.05 } }
// media{ scattering { 5, rgb 0.05 eccentricity 0.2 } }
// media{ scattering { 5, rgb 0.05 eccentricity -0.2 } }
// media{ scattering { 1, rgb 0.05 } }
// media{ scattering { 1, rgb 0.05 extinction 0} }
// media{ scattering { 1, rgb 0.05 extinction 2} }
// media{ absorption rgb< 0, 0.08, 0.08> }
media{ emission rgb 0.02 }
//---------------------camera
camera{
location< 4,-4,2> //------------ front eye1
// location<-4,-4,2> //------------ side eye2
// location<-4 ,4,2> //------------ back eye3
sky<0,0,1>
right <-image_width/image_height,0,0>
look_at<0,0,0.8>
angle 46
}
//---------------------spot light
light_source{<3,-3,5> color 1.2
spotlight
point_at z*0.7
radius 15
falloff 20
}
//--------------------- floor
plane{z,0
pigment{checker color rgb<1,1,1>,
color rgb<0.3,0.4,0.6> scale 0.6}
}
//----------------------desk
#declare dleg = object{
cylinder{0,z*0.65,0.06
texture {finish {Metal} pigment{White} }
}
}
box{<-1,-0.5,0.65>,<1,0.5,0.7>
texture {T_Wood7 rotate y*90}
}
object{ dleg translate <-0.8,-0.3,0> }
object{ dleg translate <0.8,-0.3,0> }
object{ dleg translate <-0.8,0.3,0> }
object{ dleg translate <0.8,0.3,0> }
//-----------book
box{<0.7,0.2,0.7>,<0.4,-0.2,0.73>
pigment{color rgb<0.9,0.7,0.5>*1.5 }
}
8.4 サンプリング
サンプリングに関係したパラメータには、[ method ][ intervals ][ samples ][ confidence ][ variance ][ ratio ][ aa_level ][ aa_threshold ] がある。通常の場合ほぼ変更する必要はないと思われるので、主なものを簡単に示す。
8.4-1 区間数(intervals)
区間数(intervals)は追跡光線をサンプリングする区間数の設定に使用する。区間数は全区間の分割数である。物体メディアでは、追跡光線が物体を通過する入口から出口の間までが全区間である。大気メディアでは、追跡光線が出発点から物体と交差するまでの全体の長さが全区間である。この値を大きすると滑らかな表現になるが、計算時間は増大する。(デフォルト intervals 1 )
8.4-2 サンプル数(samples)
各区間で行われるサンプリングの最大、最小値を設定する。このサンプリングはモンテカルロ法により行われる。メディア効果は追跡光線上のメディアのサンプリングから計算される。値を大きくするとより高画質になる。(デフォルト samples 1,1 )
8.4-3 区間数比(ratio)
スポットライトや円柱光などの光源では光が照射されている空間とそうでない空間がある。区間でも同様で、分割された区間ではこのような場合、照明区間と非照明区間が存在する。区間数比(ratio)は照明区間数と非照明区間数の配分比率を表す。ratioの値は通常は照明区間に比率を重くして使用する。照明区間数を非照明区間数より多く配分し、主として照明区間よりサンプルを得るようになっている。(デフォルト ratio 0.9 )
8.5 密度(density)
メディアの微粒子は通常、一定の密度である。しかし、テキスチャのパターンタイプなどを密度に使用し、メディアを一様でない密度に変えることができる。このような設定を行うと、メディアに濃淡の模様ができる。密度のディフォルト値は、1.0の一様密度となっている。
< density の構文 >
density { [DENSITY_IDENTIFIER]
[PATTERN_TYPE]
[DENSITY_MODIFIER...]
}
density 密度のキーワード
DENSITY_IDENTIFIER
識別子の名前(40文字以下)
DENSITY_TYPE
パターンタイプまたは色のどちらかを設定する。パターンタイプは 0.0 ~ 1.0 値の設定、density_map は 色の設定
DENSITY_MODIFIER
密度の変更方法:カラーマップ(color_map)または、密度マップ (density_map)の設定 ▷「12.1-3 カラーマップ」 参照
(a) 無彩色の密度
(b) カラーの密度
図8.5 メディア密度の相違による変化
上図8.5 は、メディアにカラーマップにを使用して密度の変化を与えたものである。(a) は、白色での密度変化、(b) は rgb 成分で密度変化を与えている。メディア密度の濃淡による光の散乱が表現されている。
∇ POV-Rayソース: 図8.5 密度の値によるメディアの相違 (a) 無彩色の密度
//--------------- Fig. 8.5a density mono
#version 3.7
#include "colors.inc"
#include "textures.inc"
#include "Woods.inc"
#include "stones.inc"
global_settings
{assumed_gamma 2.2}
//========================================== media
media{ intervals 50
samples 5,10
scattering {1, rgb 0.05 }
density { agate
color_map{
[0.2 color White*0.3]
[0.7 color White*1.2]
}
}
}
//---------------------camera
camera{
location< 4,-4,2> //------------ front eye1
// location<-4,-4,2> //------------ side eye2
// location<-4 ,4,2> //------------ back eye3
sky<0,0,1>
right <-image_width/image_height,0,0>
look_at<0,0,0.8>
angle 46
}
//---------------------spot light
light_source{<3,-3,5> color 1.2
spotlight
point_at z*0.7
radius 15
falloff 20
}
//--------------------- floor
plane{z,0
pigment{checker color rgb<1,1,1>,
color rgb<0.3,0.4,0.6> scale 0.6}
}
//----------------------desk
#declare dleg = object{
cylinder{0,z*0.65,0.06
texture {finish {Metal} pigment{White} }
}
}
box{<-1,-0.5,0.65>,<1,0.5,0.7>
texture {T_Wood7 rotate y*90}
}
object{ dleg translate <-0.8,-0.3,0> }
object{ dleg translate <0.8,-0.3,0> }
object{ dleg translate <-0.8,0.3,0> }
object{ dleg translate <0.8,0.3,0> }
//-----------book
box{<0.7,0.2,0.7>,<0.4,-0.2,0.73>
pigment{color rgb<0.9,0.7,0.5>*1.5 }
}
∇ POV-Rayソース: 図8.5 密度の値によるメディアの相違 (b) カラーの密度
//--------------- Fig. 8.5b density color
#version 3.7
#include "colors.inc"
#include "textures.inc"
#include "Woods.inc"
#include "stones.inc"
global_settings
{assumed_gamma 2.2}
//========================================== media
media{ intervals 50
samples 5,10
scattering {1, rgb 0.05 }
density { agate
color_map{
[0.2 color Green]
[0.7 color Red*1.2]
}
}
}
//---------------------camera
camera{
location< 4,-4,2> //------------ front eye1
// location<-4,-4,2> //------------ side eye2
// location<-4 ,4,2> //------------ back eye3
sky<0,0,1>
right <-image_width/image_height,0,0>
look_at<0,0,0.8>
angle 46
}
//---------------------spot light
light_source{<3,-3,5> color 1.2
spotlight
point_at z*0.7
radius 15
falloff 20
}
//--------------------- floor
plane{z,0
pigment{checker color rgb<1,1,1>,
color rgb<0.3,0.4,0.6> scale 0.6}
}
//----------------------desk
#declare dleg = object{
cylinder{0,z*0.65,0.06
texture {finish {Metal} pigment{White} }
}
}
box{<-1,-0.5,0.65>,<1,0.5,0.7>
texture {T_Wood7 rotate y*90}
}
object{ dleg translate <-0.8,-0.3,0> }
object{ dleg translate <0.8,-0.3,0> }
object{ dleg translate <-0.8,0.3,0> }
object{ dleg translate <0.8,0.3,0> }
//-----------book
box{<0.7,0.2,0.7>,<0.4,-0.2,0.73>
pigment{color rgb<0.9,0.7,0.5>*1.5 }
}
8.6 インテリア(interior)
インテリア(interior)は、物体の内部の特性を表すもので、ガラスなどの屈折や簡易的な集光の表現ができる。集光や分散などのより正確な光の表現はフォトンマッピング を使う必要がある。旧バージョン互換のために屈折率の設定はfinishでもできるが、使用しないこと。
注意:インテリアはテクスチャと独立 した存在であり、テクスチャ文の中に記述はできない。マテリアル文の中であればテクスチャとインテリアの両方記述することができる。 ▷「11.4-8 マテリアル(material)」 参照
< interior の構文 >
interior { [INTERIOR_IDENTIFIER]
ior VALUE
caustics VALUE
dispersion VALUE
dispersion_samples SAMPLES
fade_distanse DISTANCE
fade_power POWER
fade_color <COLOR>
}
interior インテリアのキーワード
INTERIOR_IDENTIFIER
識別子の名前(40文字以下)
ior VALUE屈折率の設定、水1.33、ガラス1.5、ダイヤモンド2.4程度である。※ 標準インクルードファイルの consts.inc に値が定義されている。[デフォルト:1.0](屈折なし) ▷「8.6-1 屈折」 参照
caustics VALUE透明物体の屈折により生じる集光を簡易的に表現する。通常0~1程度の値を設定する。値に反比例して集光部分の大きさが変化する。この効果は透明物体の影の範囲にしか生じない。[デフォルト:0.0] ▷「8.6-2 集光(caustics)」 参照、正確な表現は ▷「9. フォトンマッピング」 参照
dispersion VALUE透過光の分散(波長による屈折率の変化で起こる光の色分解)強度、適切な値は 1.01~1.1程度である。[デフォルト:1.0] ▷「8.6-3 分散」 参照、正確な表現は ▷「9. フォトンマッピング」 参照
dispersion_samples SAMPLES透過光の色分解のコントロール値、2以上の値で、大きな値ほど滑らかになる。[デフォルト:7]
fade_distanse DISTANCE 透過光が減衰する距離の設定、光の強度が1/2になる距離を設定する。[デフォルト:0.0]
fade_power POWER透過光の減衰特性の設定、光がどれだけ早く減衰するかを設定する。現実的な値は1~2である。[デフォルト:0.0]
fade_color <COLOR>透過光が減衰したときの色 [デフォルト:<0,0,0> ]
インテリアは透明な物体に有効な機能である。不透明な物体にはインテリアの設定は不必要である。
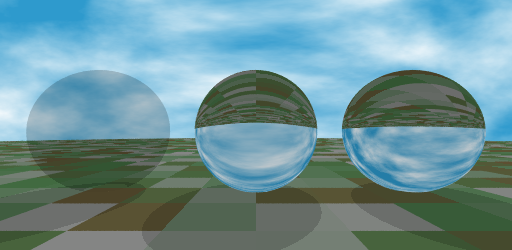
8.6-1 屈折 (ior)
光が空間から透明な物体へ入ると、光の進行方向が変化する。このような変化は屈折と呼ばれている。光の屈折率は、物質の密度により決定される。屈折率は、空気(1.0)、水(1.33)、カラス(1.5)、ダイヤモン(2.4)である。インテリアでは、屈折を設定するためにior(屈折率)が使われる。
次の図8.6-1は、透明球体の屈折率の設定による違いを表している。
ior 1.0 ior 1.33 ior 1.51
図8.6-1 屈折率 (ior)
∇ POV-Rayソース: 図8.6-1 屈折率 (ior)
//-------------------- Fig. 8.6-1 ior
// comman line input
// +W512 +H250 +A
#version 3.7
#include "colors.inc"
#include "textures.inc"
global_settings
{assumed_gamma 2.2}
camera{
location<0,-4.2,0>
sky<0,0,1>
right <-image_width/image_height,0,0>
look_at<0,0,0.1>
}
light_source {<200,1000,1000> color White*1}
//================================== ior (sphere)
sphere{0,1
pigment{White*0.9 filter 1.0}
interior{ ior 1} // <<<----------- ior 1.0
translate x*-2.5
}
sphere{0,1
pigment{White*0.9 filter 1.0}
interior{ ior 1.33} // <<<---------- ior 1.33
translate x*0
}
sphere{0,1
pigment{White*0.9 filter 1.0}
interior{ ior 1.51} // <<<---------- ior 1.51
translate x*2.5
}
//---------------------------------ground
#declare T1=
texture{
pigment{
cells
color_map{
[0.0 color rgb<0.7,0.6,0.4>*1]
[0.4 color rgb<0.5,0.8,0.5>*1]
[1.0 color rgb 1]
}
scale 0.6
}
}
disc{z*0.05,z,30
texture {T1 scale 1.5} translate z*-1
}
//--------------------------sky
sky_sphere{
pigment{
wrinkles
color_map{
[ 0.3 SkyBlue]
[ 0.9 White ]
}
scale <1, 0.2, 0.2>
}
}
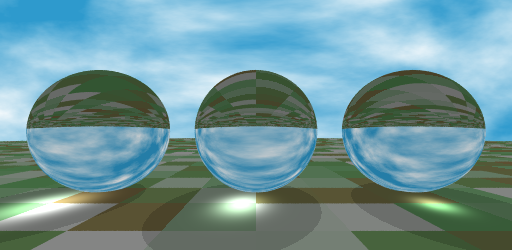
8.6-2 簡易集光(caustics)
集光は、透明物体を透過するときにレンズ効果により集光される光である。水の入ったグラスに光があたると、影できるが、その影の明るさは一様でなく集光されて明るくなる部分も生じる。簡易集光は屈折率を利用した極めて簡易的なものである。この効果は透明物体の影の範囲にしか生じない。値が大きくなるにつれて、集光部分が小さくなる。正確な集光はフォトンマッピング を使用する。
次の図8.6-2は、ガラス球の透過光が集光される様子を簡易的に表している。caustics の値が大きいほど、集光部分が小さくなっている。
caustics 0.2 caustics 0.4 caustics 0.8
図8.6-2 簡易集光 (caustics)
∇ POV-Rayソース: 図8.6-2 簡易集光 (caustics)
//-------------------- Fig. 8.6-2 caustics
// comman line input
// +W512 +H250 +A
#version 3.7
#include "colors.inc"
#include "textures.inc"
global_settings
{assumed_gamma 2.2}
camera{
location<0,-4.2,0>
sky<0,0,1>
right <-image_width/image_height,0,0>
look_at<0,0,0.1>
}
light_source {<200,1000,1000> color White*1}
//================================ caustics (sphere)
sphere{0,1
pigment{White*0.9 filter 1.0}
interior{ ior 1.51 caustics 0.2} // <<<---- 0.2
translate x*-2.5
}
sphere{0,1
pigment{White*0.9 filter 1.0}
interior{ ior 1.51 caustics 0.4} // <<<---- 0.4
translate x*0
}
sphere{0,1
pigment{White*0.9 filter 1.0}
interior{ ior 1.51 caustics 0.8} // <<<--- 0.8
translate x*2.5 }
//---------------------------------ground
#declare T1=
texture{
pigment{
cells
color_map{
[0.0 color rgb<0.7,0.6,0.4>*1]
[0.4 color rgb<0.5,0.8,0.5>*1]
[1.0 color rgb 1]
}
scale 0.6
}
}
disc{z*0.05,z,30
texture {T1 scale 1.5} translate z*-1
}
//--------------------------sky
sky_sphere{
pigment{
wrinkles
color_map{
[ 0.3 SkyBlue]
[ 0.9 White ]
}
scale <1, 0.2, 0.2>
}
}
8.6-3 分散(dispersion)
光の屈折率は波長により異なり、波長の短い方が長い方より屈折率が大きい。太陽光線は白色光線で、可視光線の全波長が含まれている。このため、光線がガラスなどを通過すると光の分散がおこる。太陽光線はプリズムを通すと虹色に分かれる。同様に太陽光線が空気中の水分で屈折し、虹が発生する。ここでは、プリズムによる光の分散の様子をフォトンマッピング により処理した例を示す。
図8.6-3a プリズム(分散 dispersion 無)
∇ POV-Rayソース: 図8.6-3a プリズム(分散 dispersion 無)
//----------------- Fig. 8.6-3a no dispersion
// photon mapping
#version 3.7
#include "colors.inc"
#include "textures.inc"
#include "glass.inc"
global_settings {
assumed_gamma 2.2
photons {spacing 0.02 }
}
camera {
location < 10,-30,30>
sky<0,0,1>
right <-image_width/image_height,0,0>
look_at < 0, 0,0.2>
angle 5
}
light_source {
<0,0, 40>, color White*0.8
parallel
point_at 0
photons {refraction on reflection on}
}
//========================== prism (no dispersion)
prism {
linear_sweep
0,1
3
0,<0,1> <0.87,0.5>
material{
texture{pigment{ color Clear }
finish { F_Glass1 } }
interior{I_Glass1 fade_color rgb 0.7
// dispersion 1.1
// dispersion_samples 20
}
}
photons {
target
collect off
reflection on
}
}
//---------------------------floor
plane {z,-1 pigment {White} }
//----------------sky
sky_sphere{
pigment{
wrinkles
color_map{
[ 0.3 SkyBlue]
[ 0.9 White ]
}
scale <1, 0.2, 0.2>
}
}
図8.6-3b プリズム(分散 dispersion 有)
上図8.6-3b は、三角柱ガラスであるプリズムに 分散(dispersion)を設定している。照射されている白色光線を波長に応じて分光している。フォトンマッピングを使用している。
∇ POV-Rayソース: 図8.6-3b プリズム(分散 dispersion 有)
//----------------- Fig. 8.6-3b dispersion
// photon mapping
#version 3.7
#include "colors.inc"
#include "textures.inc"
#include "glass.inc"
global_settings {
assumed_gamma 2.2
photons {spacing 0.02 }
}
camera {
location < 10,-30,30>
sky<0,0,1>
right <-image_width/image_height,0,0>
look_at < 0, 0,0.2>
angle 5
}
light_source {
<0,0, 40>, color White*0.8
parallel
point_at 0
photons {refraction on reflection on}
}
//========================== prism (dispersion)
prism {
linear_sweep
0,1
3
0,<0,1> <0.87,0.5>
material{
texture{pigment{ color Clear }
finish { F_Glass1 } }
interior{I_Glass1 fade_color rgb 0.7
dispersion 1.1
dispersion_samples 20
}
}
photons {
target
collect off
reflection on
}
}
//-------------------------floor
plane {z,-1 pigment {White} }
//----------------sky
sky_sphere{
pigment{
wrinkles
color_map{
[ 0.3 SkyBlue]
[ 0.9 White ]
}
scale <1, 0.2, 0.2>
}
}
(End) 8.メディア