▷ 前を見る
11.3 CSG
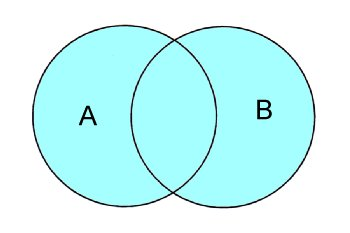
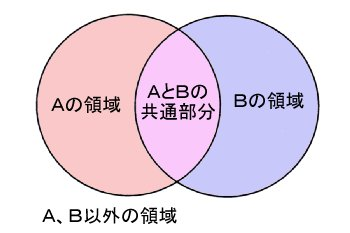
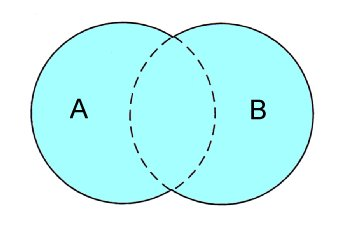
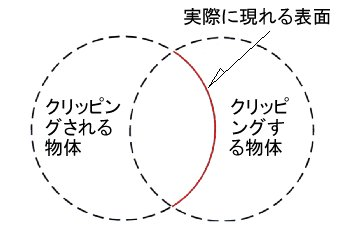
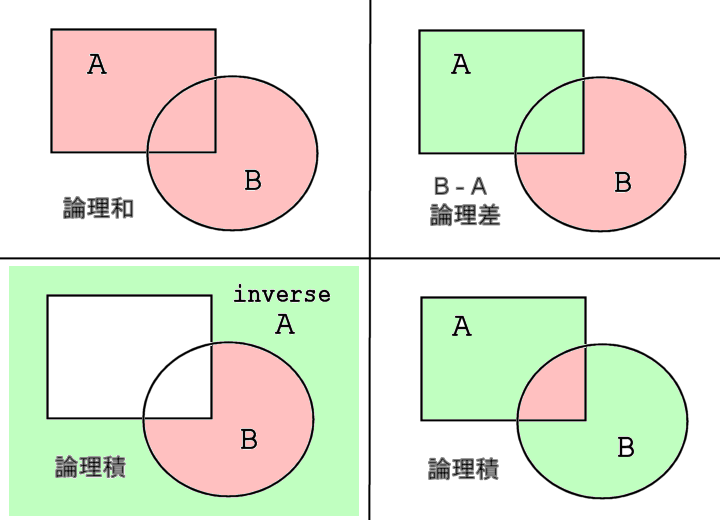
CSG は Constructive Solid Geometry の略で、複数の形状を組み合わせて1つの物体として扱う機能である。物体には内側と外側の領域があり、下記の図は、例として重なり合った物体 A と物体 B の関係を表したものである。空間には、A だけに含まれる領域、B だけに含まれる領域、A と B 両方に含まれる領域、A にも B にも含まれない領域の4つがある。
図11.3 空間の4つの領域
CSG では上記の物体の内側・外側の領域を利用して論理演算を行う。POV-Ray では、それらは下記の4種類がある。
▷論理和 (union):複数の物体の結合▷論理積 (intersection):複数の物体の共通部分▷論理差 (difference):ある物体から別の物体との共通部分を取り除く▷マージ (merge):物体の融合(論理和による物体の内側の境界を取り除く)
CSG が使用できる物体は立体(内側が定義できる物体)だけである。CSG で組み合わせた物体は単体として移動、回転、スケーリングを行うことがでる。また、CSG を構成する各プリミティブにおいても、個別に変形が可能である。さまざまな形状を CSG によって組み合わせると、複雑な物体を作ることができる。
CSG のテクスチャ設定は、要素となる各物体の個別のテクスチャ設定が優先される。テクスチャ設定がない物体に、論理演算で設定されたテクスチャが適用される。
< 内側と外側 >
CSGが使用できる物体は、POV-Ray では有限ソリッドプリミティブと無限パッチプリミティブである。球やボックスなどの立体はほとんどの形状には内側と外側がある。無限平面(plane)は、法線ベクトルが指す方向が外側である定義されている。しかし、ベジエ曲面やメッシュなど三角形で構成される有限パッチプリミティブは内側がはっきり定義できないため、CSGでは使用できない場合がある。
▷内側と外側の反転 inverse : 物体の記述に inverse のキーワードを追加すると、その物体の内側と外側を逆にすることができる。
11.3-1 論理和(union)
論理和は立体を結合する演算である。物体は重なり合っていてもいなくてもよい。論理和による形状は1つの物体として移動、回転、スケーリングを行うことができる。各物体にテクスチャ設定がなければ、union として設定されたテクスチャが適用される。
図11.3-1a 論理和 [A+B]
< union の構文 >
union {
OBJECT_A
OBJECT_B
...
[ texture { ... } ]
[ MODFIERS ... ]
}
union 論理和のキーワード
OBJECT_A
要素となる物体の設定、物体ごとにテクスチャや変形などが設定できる。
texture { ... }全体のテクスチャの設定
MODFIERS ...
変形(スケーリング、回転、移動)などの設定
※ 論理和では内側の境界は取り除かれないため、透明物体などでは不自然に見えることがある。内側の境界を取り除きたい場合はマージを使用する。
図11.3-1b 論理和
∇ POV-Rayソース: 図11.3-1b 論理和
//--------------- Fig. 11.3-1a union
#version 3.7
#include "colors.inc"
#include "textures.inc"
#include "Woods.inc"
#include "stones.inc"
global_settings
{assumed_gamma 2.2}
camera{
location<10,-40,15>
sky<0,0,1>
right <-image_width/image_height,0,0>
look_at<3,0,1>
angle 10
}
light_source{<100,-150,85> color rgb 2}
//================================== union object
union{
box{0,1 scale <4,4,1>
pigment { DMFWood4 scale 3}
}
sphere{<0,0,0>,1.5
texture {pigment { Red_Marble}
finish{Shiny} }
translate<3.5,2,0.5>
}
}
//----------------------------- FLOOR
plane{z,-4
pigment{ hexagon
color rgb<1,1,0.6>*1.3,
color rgb<0.6,1,0.6>*1.3,
color rgb<0.6,1,1>*1.3
scale 0.3 rotate 90*x
}
}
11.3-2 論理積(intersection)
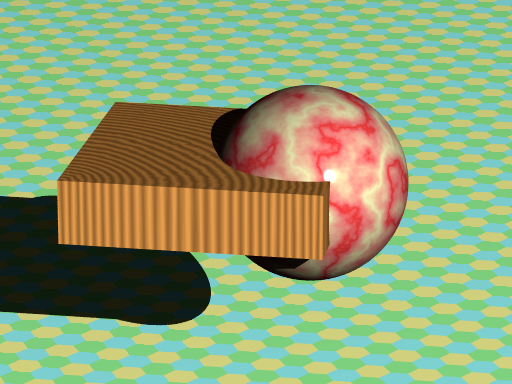
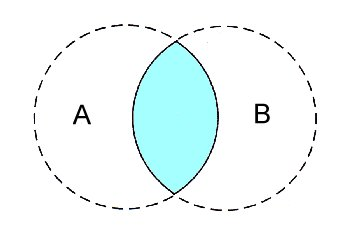
論理積は複数の物体の共通部分が取り出される。物体が重なり合っていないと論理積部分はなくなる。各物体にテクスチャ設定がなければ、intersection として設定されたテクスチャが適用される。
図11.3-2a 論理積 [AとBの共通部分]
< intersection の構文 >
intersection {
OBJECT_A
OBJECT_B
...
[ texture { ... } ]
[ MODFIERS ... ]
}
intersection 論理積のキーワード
OBJECT_A
要素となる物体の設定、物体ごとにテクスチャや変形などが設定できる。
texture { ... }全体のテクスチャの設定
MODFIERS ...
変形(スケーリング、回転、移動)などの設定
図11.3-2b 論理積
∇ POV-Rayソース: 図11.3-2b 論理積
//--------------- Fig. 11.3-2b intersection
#version 3.7
#include "colors.inc"
#include "textures.inc"
#include "Woods.inc"
#include "stones.inc"
global_settings
{assumed_gamma 2.2}
camera{
location<10,-40,15>
sky<0,0,1>
right <-image_width/image_height,0,0>
look_at<3,0,1>
angle 10
}
light_source{<100,-150,85> color rgb 2}
//======================= intersection object
intersection{
box{0,1 scale <4,4,1>
pigment { DMFWood4 scale 3}
}
sphere{<0,0,0>,1.5
texture {pigment { Red_Marble}
finish{Shiny} }
translate<3.5,2,0.5>
}
}
//----------------------------- FLOOR
plane{z,-4
pigment{ hexagon
color rgb<1,1,0.6>*1.3,
color rgb<0.6,1,0.6>*1.3,
color rgb<0.6,1,1>*1.3
scale 0.3 rotate 90*x
}
}
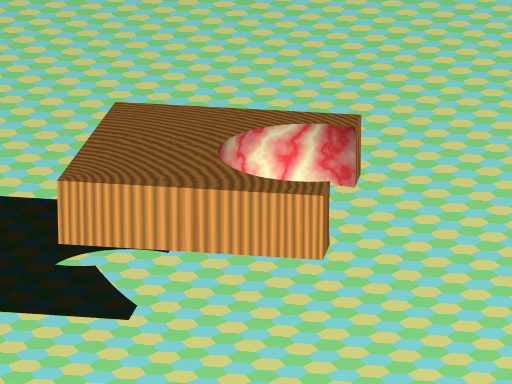
11.3-3 論理差(difference)
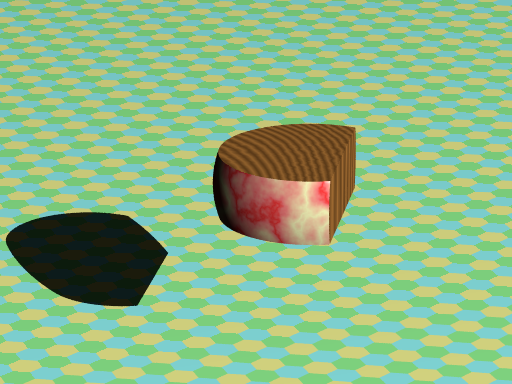
論理差は、ある物体 A から別の物体 B との共通部分を切り取った形状を作る。物体が重なり合っていないと物体 A は変化しない。各物体にテクスチャ設定がなければ、difference として設定されたテクスチャが適用される。
図11.3-3a 論理差 [A-B]
< difference の構文 >
difference {
OBJECT_A
OBJECT_B
...
[ texture { ... } ]
[ MODFIERS ... ]
}
difference 論理差のキーワード
OBJECT_A
要素となる物体の設定、物体ごとにテクスチャや変形などが設定できる。最初に設定した物体から、その後に設定した物体との共通部分が切り取られる。
texture { ... }全体のテクスチャの設定
MODFIERS ...
変形(スケーリング、回転、移動)などの設定
図11.3-3b 論理差
∇ POV-Rayソース: 図11.3-3b 論理差
//--------------- Fig. 11.3-3b differenc
#version 3.7
#include "colors.inc"
#include "textures.inc"
#include "Woods.inc"
#include "stones.inc"
global_settings
{assumed_gamma 2.2}
camera{
location<10,-40,15>
sky<0,0,1>
right <-image_width/image_height,0,0>
look_at<3,0,1>
angle 10
}
light_source{<100,-150,85> color rgb 2}
//============================ differenc object
difference{
box{0,1 scale <4,4,1>
pigment { DMFWood4 scale 3}
}
sphere{<0,0,0>,1.5
texture {pigment { Red_Marble}
finish{Shiny} }
translate<3.5,2,0.5>
}
}
//----------------------------- FLOOR
plane{z,-4
pigment{ hexagon
color rgb<1,1,0.6>*1.3,
color rgb<0.6,1,0.6>*1.3,
color rgb<0.6,1,1>*1.3
scale 0.3 rotate 90*x
}
}
11.3-4 マージ(merge)
マージは論理和と同様に物体を結合する。論理和では物体を単純に結合するが、マージは物体同士を融合するので、マージされると物体の内側の境界が取り除かれる。不透明物体と透明物体のマージは、重なり合っている部分は、透明物体のテクスチャが適用される。
図11.3-4a マージ [AとBの融合]
< merge の構文 >
merge {
OBJECT_A
OBJECT_B
...
[ texture { ... } ]
[ MODFIERS ... ]
}
merge マージのキーワード
OBJECT_A
要素となる物体の設定、物体ごとにテクスチャや変形などを設定できる。
texture { ... }全体のテクスチャの設定
MODFIERS ...
変形(スケーリング、回転、移動)などの設定
論理和(union)とマージ(merge)の違い
不透明物体の場合は、論理和(union)とマージ(merge)はクリッピングすると、その違いが出てくる。しかし、外部から内側も見えるガラスのような透明物体の場合は、論理和とマージでは異なって見えるので注意する。
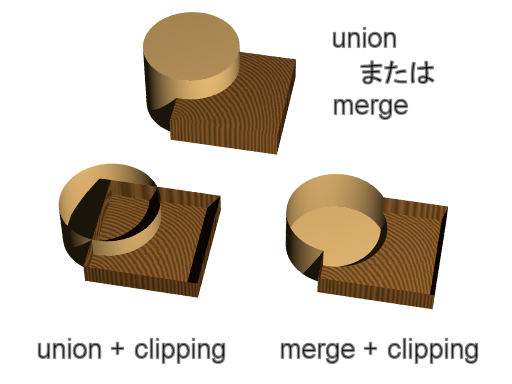
図11.3-4b は、不透明物体の論理和とマージの違いを示したものである。クリッピングしなければその違いはない。
図11.3-4b 不透明物体の論理和とマージの違い
∇ POV-Rayソース: 図11.3-4b 不透明物体の論理和とマージの違い
//--------------- Fig. 11.3-5b merge-clip
#version 3.7
#include "colors.inc"
#include "textures.inc"
#include "Woods.inc"
global_settings
{assumed_gamma 2.2}
camera{
location<10,-40,50>
sky<0,0,1>
right <-image_width/image_height,0,0>
look_at<2,2.5,-0.5>
angle 16
}
light_source {<13,-15,20> color White*1.2
}
background{color rgb 1}
//===================== object define
#declare aaa=
box{0,1 scale <4,4,1>
pigment { DMFWood4 scale 3}
}
#declare bbb=
cylinder{z*-1.5,z*1.5,1.8
pigment{color rgb<1,0.8,0.5>*1.3}
finish{Shiny}
translate<0.2,3,0.5>
}
//========================== union vs merge
union { object{aaa}
object{bbb}
translate<-1.5,4,0>
}
union { object{aaa}
object{bbb}
clipped_by{plane{z,0.8}}
translate<-3,-3,0>
}
merge { object{aaa}
object{bbb}
clipped_by{plane{z,0.8}}
translate<5,-2,0>
}
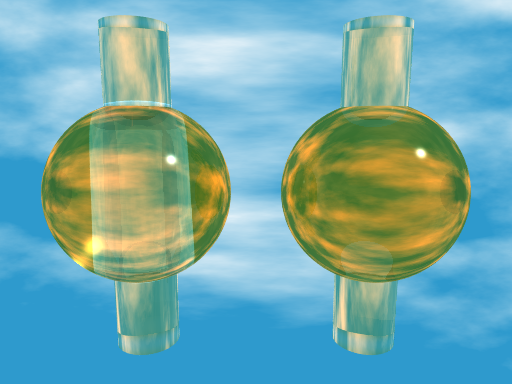
図11.3-4c はガラスの円柱と球を結合したものである。左は論理和によるもので、球の内部に円柱の表面が現れる。しかし右のマージによる結合では内側の境界がなくなり、より自然に見える。
図11.3-4c 透明物体の論理和とマージ
∇ POV-Rayソース: 図11.3-4c 透明物体の論理和とマージ
//--------------- Fig. 11.3-4c merge
#version 3.7
#include "colors.inc"
#include "glass.inc"
global_settings
{assumed_gamma 2.2}
camera{
location<0,-6,1>
sky<0,0,1>
right <-image_width/image_height,0,0>
look_at<0,0,0>
}
light_source {<1000,-500,1000> color White*1.2
area_light -1,1,6,6 adaptive 0 jitter
}
//======================= glass object define
#declare SP_1=
sphere{0,1.4
material { texture { pigment { color Clear } finish { F_Glass1 } }
interior { I_Glass1 fade_color Col_Orange } }}
#declare SP_2=
cylinder{-z*2.5,z*2.5,0.5
material { texture { pigment { color Clear } finish { F_Glass1 } }
interior { I_Glass1 fade_color Col_Orange } }}
//======================== glass union vs merge
union{
object{SP_1}
object{SP_2}
translate -x*1.8
}
merge{
object{SP_1}
object{SP_2}
translate x*1.8
}
//----------------sky
sky_sphere{
pigment{
wrinkles
color_map{
[ 0.4 SkyBlue]
[ 0.9 White ]
}
scale <1, 0.2, 0.2>
}
}
11.4 物体のオプション
物体にオプションを設定し、物体にさまざまな効果を与えることができる。使用できる主なオプションには以下のものがある。
●▷クリッピング (clipped_by)▷バウンディング (bounded_by)▷中空(hollow) ▷物体の影スイッチ (no_shadow)▷物体のイメージスイッチ (no_image)▷物体の鏡面反射スイッチ (no_reflection)▷両面照明 (double_illuminate)▷マテリアル (material)▷インバース (inverse)▷曲面の高精度計算 (sturm)▷「8.6 インテリア」 ▷「12. テクスチャ1」 ▷「12.9 インテリアテクスチャ」 ▷「12.1 ピグメント」 ▷「12.2 ノーマル」 ▷「12.3 フィニッシュ」 ▷「9. フォトンマッピング」
11.4-1 クリッピング(clipped_by)
クリッピングとはある物体の一部を切り取ることである。現れる形状はCSGの論理積(intersection)による物体を中空にしたものである。
クリッピングはすべて形状に適用できる。多くの場合、他の方法で形状を変えるよりもレンダリングは速い。
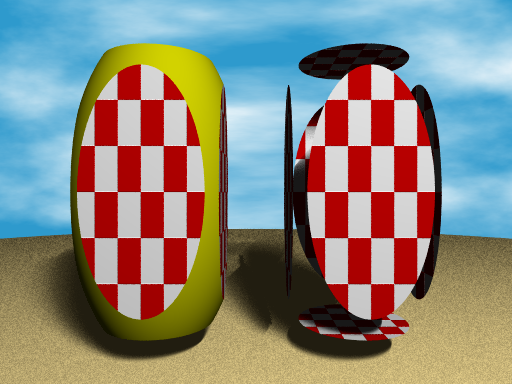
図11.4-1a 論理積(左側)とクリッピング(右側)
上図11.4-1a の左側の図形は直方体と楕円体の論理積の結果であり、右側の図形は直方体を楕円体でクリッピングしたものである。このクリッピングでは、楕円体の内側にあった直方体部分が残っている。
∇ POV-Rayソース: 図11.4-1a 論理積(左側)とクリッピング(右側)
//-------------------- Fig. 11.4-1a clipped_by
#version 3.7
#include "colors.inc"
global_settings
{assumed_gamma 2.2}
camera{
location<0,-6,0>
sky<0,0,1>
right <-image_width/image_height,0,0>
look_at<0,0,0>
}
light_source {<3,-10,6> color White*1.2
area_light -1,1,6,6
adaptive 0
jitter
}
//---------------------------------------box
#declare OBJECT_A=
box{-1,1
pigment{checker White*1.2, Red scale 0.3}
normal{checker 0.1 scale 0.3}
scale z*2
}
//---------------------------------- intersection
intersection{
object{OBJECT_A}
sphere{0,1.3 scale z*2}
pigment{Yellow}
translate x*-1.5
}
//==================================== clipped_by
object{OBJECT_A
clipped_by{sphere{0,1.3 scale z*2}}
translate x*1.5
}
//----------------ground
disc{z*-2.5,z,20
pigment{color rgb<1,0.9,0.6>*1.5}
finish{crand 0.1}
}
//----------------sky
sky_sphere{
pigment{
wrinkles
color_map{
[ 0.4 SkyBlue]
[ 0.9 White ]
}
scale <1, 0.2, 0.2>
}
}
図11.4-1b クリッピング
< clipped_by の構文 >
object {
OBJECT
clipped_by { CLIPPING_OBJECT } | clipped_by { bounded_by }
}
object 物体のキーワード、物体識別子を使うとき以外は省略可
OBJECT
クリッピングされる物体の設定
clipped_by クリッピングのキーワード
CLIPPING_OBJECT
クリッピング形状の設定▷「11.1 プリミティブ」 参照
bounded_by バウンディング物体をクリッピングに使用する設定
※ バウンディング物体をクリッピングに使用する(クリッピングとバウンディングに同じ物体を使用したい)場合は、次のようにする。
object {
cylinder { <-5,0.5,0.5>, <5,0.5,0.5>, 0.3 pigment{color rgb 0.8} }
bounded_by { box { <0,0,0>, <1,1,1> pigment{color rgb 0.5} } }
clipped_by { bounded_by }
}
11.4-2 バウンディング(bounded_by)
バウンディングは、レンダリングの高速化を目的とし、単純な形状の物体で複雑な物体を包み込むことを行う。
< bounded_by の構文 >
object {
OBJECT
bounded_by { BOUNDING_OBJECT } | bounded_by { clipped_by }
}
object 物体のキーワード、物体識別子を使うとき以外は省略できる。
OBJECT
バウンディングされる物体の設定
bounded_by バウンディングのキーワード
BOUNDING_OBJECT
バウンディング形状の設定、球やボックスなど単純な形状▷「11.1 プリミティブ」 参照
bounded_by クリッピング物体をバウンディングに使用する設定
通常、有限物体は自動的にバウンディングされるので特に設定する必要はない。しかし、複雑な形状の物体では、光線が物体に当たったかどうかテストするための計算はかなりの時間を要する場合がある。そのような形状をバウンディングすることによって、光線は最初に単純なバウンディング形状に対してテストされ、それに当たればその内側の複雑な物体に対してさらにテストされる。そうでなければ複雑な物体は無視されるため、レンダリングは速くなる。
CSG形状は自動的にバウンディングされるが、その形状は常に論理和の形状(すべての要素物体を含んだ形状)の大きさになる。このため、論理積、論理差、マージでは結果の物体のサイズとバウンディング形状のサイズに大きな差が生じ効率的ではないので、自分でバウンディングを行うほうがよい。
バウンディング形状が小さすぎたり不正確に配置されたりすると、定義されていない方法で物体が切り取られたり、物体が全く現れない場合がある。
※ クリッピング物体をバウンディングに使用する(クリッピングとバウンディングに同じ物体を使用したい)場合は、次のようにする。
object {
cylinder { <-5,0.5,0.5>, <5,0.5,0.5>, 0.3 pigment{color rgb 0.8} }
clipped_by { box { <0,0,0>, <1,1,1> pigment{color rgb 0.5} } }
bounded_by { clipped_by }
}
11.4-3 中空(hollow)
物体内部に霧(fog)などの大気効果を設定する場合は、キーワード hollow を追加してその物体を中空にする。
< hollow の構文 >
object {
OBJECT
hollow
}
object 物体のキーワード、物体識別子を使うとき以外は省略できる。
OBJECT
内部に大気効果を含む物体。
hollow 中空のキーワード
CSGによる物体を中空にするためには、最上層の物体に設定するだけでよい。すべての要素物体は、個別に設定したものを除いて同じ中空状態であると仮定される。次の例では、union内部の球を両方とも中空にする。
union {
sphere { -0.5*x, 1 }
sphere { 0.5*x, 1 }>
hollow
}
次の例では、1つ目の球は中空ではないと設定されているため、2つ目の球だけが中空になる。
union {
sphere { -0.5*x, 1 hollow off }
sphere { 0.5*x, 1 }
hollow
}
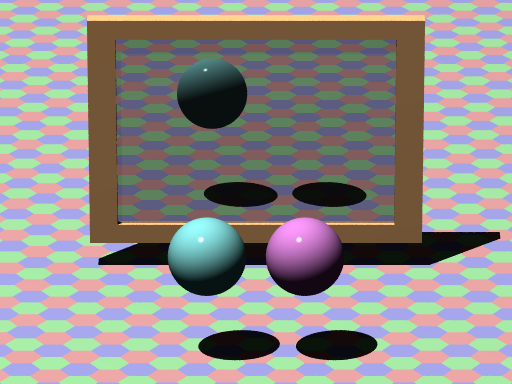
11.4-4 物体の影スイッチ(no_shadow)
キーワード no_shadow を記述し、物体の影が生じないようにできる。
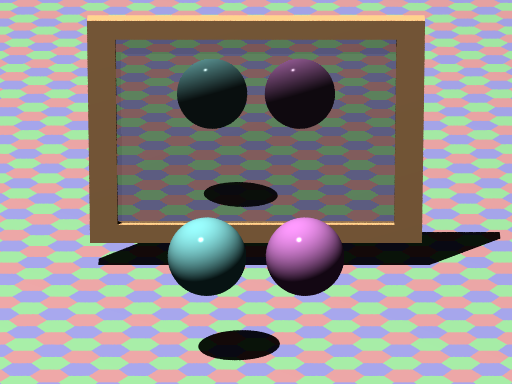
図11.4-4 (左側の球/通常)と(右側の球/no_shadow)
上図11.4-4 の右側の赤い球には no_shadow が設定されているため。球の影がない。鏡面にも影は映っていない。
∇ POV-Rayソース: 図11.4-4 (左側の球/通常)と(右側の球/no_shadow)
//-------------------- Fig. 11.4-4 no_shadow
#version 3.7
#include "colors.inc"
#include "textures.inc"
global_settings
{assumed_gamma 2.2}
camera{
location<0,40,15>
sky<0,0,1>
right <-image_width/image_height,0,0>
look_at<0,0,0.8>
angle 7
}
light_source{<30,30,100> color 1.5}
//---------------------------- mirror
#declare mir =
box{<0,0,0>,<1,0.7,1>
pigment{color rgb 0.1}
finish{reflection 0.5 }
}
#declare frm = union{
box{<0,0,1>,<1,1,1.1> }
box{<0,0,-0.1>,<1,1,0> }
box{<-0.1,0,-0.1>,<0,1,1.1>}
box{<1,0,-0.1>,<1.1,1,1.1> }
pigment{color rgb<0.8,0.6,0.4>*1.5}
}
union{
object{mir}
object{frm}
scale <3,0.2,2.1>
translate<-1.5,-2.8,-0.5>
}
//============================= sphere
sphere{<-0.5,0,0.1>,0.4
no_shadow // <<<-------- no_shadow
// no_image
// no_reflection
texture{finish{Shiny}
pigment{color rgb<1,0.6,1>} }
}
sphere{<0.5,0,0.1>,0.4
// no_shadow
// no_image
// no_reflection
texture{finish{Shiny}
pigment{color rgb<0.6,1,1>} }
}
//--------------------------- FLOOR
#declare col1=rgb<1,0.7,0.7>;
#declare col2=rgb<0.7,1,0.7>;
#declare col3=rgb<0.7,0.7,1>;
plane{z,-1
pigment{
hexagon color col1, color col2, color col3
scale 0.2 rotate 90*x
}
}
11.4-5 物体のイメージスイッチ(no_image)
キーワード no_image を記述し、物体が見えないようにできる。ただし、鏡面にはその物体は映る。
図11.4-5 (左側の球/通常)と(右側の球/no_image)
上図11.4-5 の右側の赤い球は no_image が設定されているため。球がカメラには写っていない。しかし、鏡面には球が映っている。
∇ POV-Rayソース: 図11.4-5 (左側の球/通常)と(右側の球/no_image)
//-------------------- Fig. 11.4-5 no_image
#version 3.7
#include "colors.inc"
#include "textures.inc"
global_settings
{assumed_gamma 2.2}
camera{
location<0,40,15>
sky<0,0,1>
right <-image_width/image_height,0,0>
look_at<0,0,0.8>
angle 7
}
light_source{<30,30,100> color 1.5}
//---------------------------- mirror
#declare mir =
box{<0,0,0>,<1,0.7,1>
pigment{color rgb 0.1}
finish{reflection 0.5 }
}
#declare frm = union{
box{<0,0,1>,<1,1,1.1> }
box{<0,0,-0.1>,<1,1,0> }
box{<-0.1,0,-0.1>,<0,1,1.1>}
box{<1,0,-0.1>,<1.1,1,1.1> }
pigment{color rgb<0.8,0.6,0.4>*1.5}
}
union{
object{mir}
object{frm}
scale <3,0.2,2.1>
translate<-1.5,-2.8,-0.5>
}
//=========================== sphere
sphere{<-0.5,0,0.1>,0.4
// no_shadow
no_image // <<<-------- no_image
// no_reflection
texture{finish{Shiny}
pigment{color rgb<1,0.6,1>} }
}
sphere{<0.5,0,0.1>,0.4
// no_shadow
// no_image
// no_reflection
texture{finish{Shiny}
pigment{color rgb<0.6,1,1>} }
}
//--------------------------- FLOOR
#declare col1=rgb<1,0.7,0.7>;
#declare col2=rgb<0.7,1,0.7>;
#declare col3=rgb<0.7,0.7,1>;
plane{z,-1
pigment{
hexagon color col1, color col2, color col3
scale 0.2 rotate 90*x
}
}
11.4-6 物体の鏡面反射スイッチ(no_reflection)
キーワード no_reflection を記述し、物体が鏡面に映らないようにできる。このオプションがある物体は鏡面に映らない。
図11.4-6 (左側の球/通常)と(右側の球/no_reflection)
上図11.4-6 の右側の赤い球には no_reflection が設定されているため。鏡には球が映っていない。球の影にはこの設定はないので影は鏡に映っている。
∇ POV-Rayソース: 図11.4-6 (左側の球/通常)と(右側の球/no_reflection)
//-------------------- Fig. 11.4-6 no_reflection
#version 3.7
#include "colors.inc"
#include "textures.inc"
global_settings
{assumed_gamma 2.2}
camera{
location<0,40,15>
sky<0,0,1>
right <-image_width/image_height,0,0>
look_at<0,0,0.8>
angle 7
}
light_source{<30,30,100> color 1.5}
//---------------------------- mirror
#declare mir =
box{<0,0,0>,<1,0.7,1>
pigment{color rgb 0.1}
finish{reflection 0.5 }
}
#declare frm = union{
box{<0,0,1>,<1,1,1.1> }
box{<0,0,-0.1>,<1,1,0> }
box{<-0.1,0,-0.1>,<0,1,1.1>}
box{<1,0,-0.1>,<1.1,1,1.1> }
pigment{color rgb<0.8,0.6,0.4>*1.5}
}
union{
object{mir}
object{frm}
scale <3,0.2,2.1>
translate<-1.5,-2.8,-0.5>
}
//============================ sphere
sphere{<-0.5,0,0.1>,0.4
// no_shadow
// no_image
no_reflection // <<<----no_reflection
texture{finish{Shiny}
pigment{color rgb<1,0.6,1>} }
}
sphere{<0.5,0,0.1>,0.4
// no_shadow
// no_image
// no_reflection
texture{finish{Shiny}
pigment{color rgb<0.6,1,1>} }
}
//--------------------------- FLOOR
#declare col1=rgb<1,0.7,0.7>;
#declare col2=rgb<0.7,1,0.7>;
#declare col3=rgb<0.7,0.7,1>;
plane{z,-1
pigment{
hexagon color col1, color col2, color col3
scale 0.2 rotate 90*x
}
}
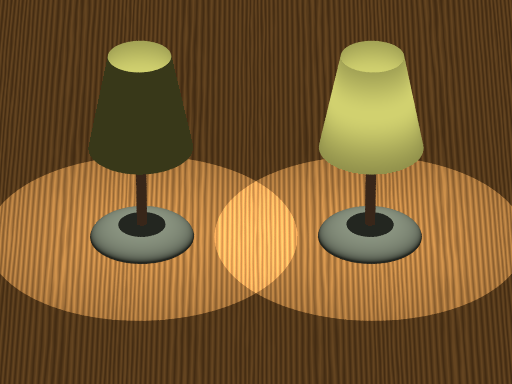
11.4-7 両面照明(double_illuminate)
キーワード double_illuminate を記述し、物体の内側と外側の両面に光が当たるようにできる。この効果により、光が透過しているかのような表現ができる。しかし、光は透過していないのでこの明るさは周辺には影響を与えない。
図11.4-7(左側セード/通常)と(右側セード/double_illuminate)
上図11.4-7 はセードに double_illuminate を設定した例である。セードが半透明のような効果がでている。
∇ POV-Rayソース: 図11.4-7(左側セード/通常)と(右側セード/double_illuminate)
//-------------------- Fig. 11.4-7 double_illuminate
#version 3.7
#include "colors.inc"
#include "textures.inc"
#include "Woods.inc"
global_settings
{assumed_gamma 2
ambient_light 2
}
camera{
location<0,40,25>
sky<0,0,1>
right <-image_width/image_height,0,0>
look_at<0,0,0.5>
angle 6
}
//======================================= object
#declare LUMP=union{
cone{<0,0,1>,0.5,<0,0,2>,0.3 open
pigment{ color <1,1,0.5>} }
light_source{<0,0,1.5> color 1}
}
#declare LEG=union{
cylinder{<0,0,0>,<0,0,1.2>,0.05 pigment{color <1,0.7,0.5>} }
sphere{<0,0,0>,0.5 scale 0.3*z pigment{color <0.65,0.7,0.6>} }
}
//============================================= double_illuminate
#declare LSTAND1=union{object{LUMP} object{LEG} }
#declare LSTAND2=union{object{LUMP double_illuminate} object{LEG} }
object{LSTAND1 translate x*1.1}
object{LSTAND2 double_illuminate translate x*-1.1}
//---------------------------- FLOOR
plane{z,0
texture {pigment { DMFWood4 rotate x*90}
finish{ambient 0.2}}
}
11.4-8 マテリアル(material)
マテリアル文は、テクスチャ 、インテリア 、インテリアテクスチャ を含むことができ、これらを1つにまとめることができる。インテリアはテクスチャと独立した存在であり、テクスチャ定義の中にインテリアを含めることができない。このため両者を1つにして記述できるマテリアルが存在する。
例)マテリアル
#declare MyGlass = material{ texture{ Glass_T } interior{ Glass_I } }
sphere{z*3, 1 material{ MyGlass } }
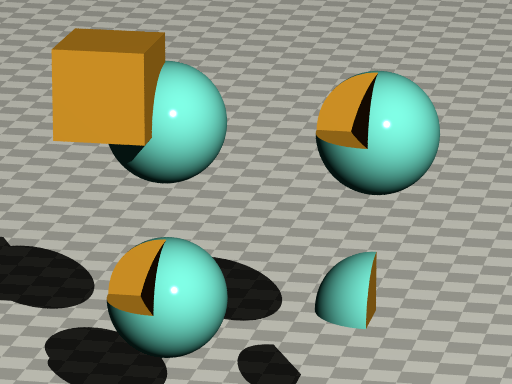
11.4-9 インバース(inverse)
物体を定義したとき、物体の実体(実在する領域)が自動的に定義される。インバースは、これを逆にする。通常、ボックスを定義した場合、ボックスの内側に実体が存在する。インバースを設定すると、ボックスの外側が実体となり、内側は空となる。イメージ的には無限大物体の内側にボックス形の空洞ができたものと考えればよい。
下記の図11.4-9a に示すように、下記2つは同じものになる。
図11.4-9a 論理積とインバース
上記の図を映像にすると下記の図11.4-9b インバースの例(左下)となる。
図11.4-9b インバースの例(左下)
∇ POV-Rayソース: 図11.4-9b インバースの例(左下)
//-------------------- Fig. 11.4-9b inverse
#version 3.7
#include "colors.inc"
#include "textures.inc"
global_settings
{assumed_gamma 2.2}
camera{
location <10,-50,15> //<-10,40,15>
sky<0,0,1>
right <-image_width/image_height,0,0>
look_at<0,0,0.4>
angle 9
}
light_source{<80,-150,100> color 1.5}
//----------------------------color
#declare CIA=rgb<0.5,1,0.9>;
#declare CIB=rgb<1,0.7,0.2>;
//======================= left up---union
union{
sphere{<0,0,0>,1
pigment{CIA} finish{Shiny}
}
box{0,1.5 pigment{CIB}
translate <-1.5,-1.5,0>
}
translate <-1.5,0,1.5>
}
//================ left down--- intersection + inverse
intersection{
sphere{<0,0,0>,1
pigment{CIA} finish{Shiny}
}
box{0,1.5 pigment{CIB}
inverse // <<<------------------ inverse
translate <-1.5,-1.5,0>
}
translate <-1.5,0,-1.5>
}
//======================= right up--- difference
difference{
sphere{<0,0,0>,1
pigment{CIA} finish{Shiny}
}
box{0,1.5 pigment{CIB}
translate <-1.5,-1.5,0>
}
translate <2,0,1.5>
}
//======================= rigth down--- intersection
intersection{
sphere{<0,0,0>,1
pigment{CIA} finish{Shiny}
}
box{0,1.5 pigment{CIB}
translate <-1.5,-1.5,0>
}
translate <2,0,-1.5>
}
//---------------------------------floor
#declare CA1=rgb<0.85,0.85,0.8>*1.2;
#declare CA2=rgb<0.85,0.85,0.8>*1.5;
plane{ z, -4
pigment{ checker CA1, CA2 scale 0.6 }
}
11.4-10 曲面の高精度計算(sturm)
高次多項式による曲面形状は非常に複雑な計算を行うため、正確に描かれないことがある。その場合キーワード sturm を設定して、このような高次多項式を時間をかけて正確に計算させることができる。
< sturm の構文 >
object {
OBJECT
sturm
}
object 物体のキーワード、物体識別子を使うとき以外は省略できる。
OBJECT
高次多項式による形状、次のものが使用できる。▷簡易回転体 (sor)▷回転体 (lathe;2次スプラインのみ)▷角柱 (prism;3次スプラインのみ)▷ブロブ (blob)▷3次曲面 (cubic)▷4次曲面 (quartic)▷高次曲面 (poly)
sturm 曲面の高精度計算キーワード
(End) 11.物体の形状