global_settings {
photons {
spacing PHOTON_SPACING | count PHOTONS_TO_SHOOT
[ gather MIN_GATHER, MAX_GATHER ]
[ media MAX_STEPS [, FACTOR ] ]
[ jitter JITTER_AMOUNT ]
[ max_trace_level PHOTON_TRACE_LEVEL ]
[ adc_bailout PHTON_ADC_BAILOUT ]
[ save_file "filename" | load_file "filename" ]
[ autostop AUTOSTOP_FRACTION ]
[ expand_thresholds PERCENT_INCREASE, EXPAND_MIN ]
[ radius GATHER_RADIUS, MULTIPLIER,
GATHER_RADIUS_MEDIA, MULTIPLIER ]
}
}
photons フォトンマッピングのキーワード(グローバル設定)
spacing PHOTON_SPACINGフォトン間の距離を設定 ▷「9.1-1 フォトン間隔」 参照
count PHOTONS_TO_SHOOTフォトン数の設定 ▷「9.1-2 フォトン数」 参照
gather MIN_GATHER, MAX_GATHER各点で収集するフォトンの最大値と最小値を設定、最小値、最大値を整数で設定する。通常は変更の必要なし。[デフォルト:20,100 ]
media MAX_STEPS [, FACTOR]メディアに対してフォトンを有効にする。MAX_STEPSは、区間あたりに割り当てられるフォトンの最大値の設定である。FACTORは通常のspacingとの比であり、メディアのspacingとなる。[デフォルト:0 ]
jitter JITTER_AMOUNTサンプリングで使用されるゆらぎの量を設定、通常は設定不要 [デフォルト:0.4 ]
max_trace_level PHOTON_TRACE_LEVELフォトンの最大反射・屈折回数の設定 [デフォルト:5 ] ▷「4.7 max_trace_level」 参照
adc_bailout PHTON_ADC_BAILOUT反射・屈折計算の精度の設定 [デフォルト:1/255 ](約0.0039) ▷「4.1 ADC_bailout」 参照
save_file "filename" フォトンマップを設定名でファイルに保存、load_file と同時に使用できない。
load_file "filename" フォトンマップを設定ファイルから読み込む、save_file と同時に使用できない。
autostop AUTOSTOP_FRACTION フォトンの発射の自動停止。設定された割合(0.0~1.0)のフォトンが標的物体に全く当たらないとき、フォトン発射を中止する。1つでも当たるとこの機能は解除される。
expand_thresholds PERCENT_INCREASE, EXPAND_MINより正確にフォトンを収集するための収集半径の増加割合PERCENT_INCREASE(20%がディフォルト)、この値でもあまりフォトンを収集できないとEXPAND_MIN(40%がディフォルト)で再収集を行う。
radius GATHER_RADIUS, MULTIPLIER, GATHER_RADIUS_MEDIA, MULTIPLIERフォトンの収集半径と半径調整用の乗数、メディア用のフォトンの収集半径と半径調整用の乗数の設定をする。省略すると、この値は自動設定される。
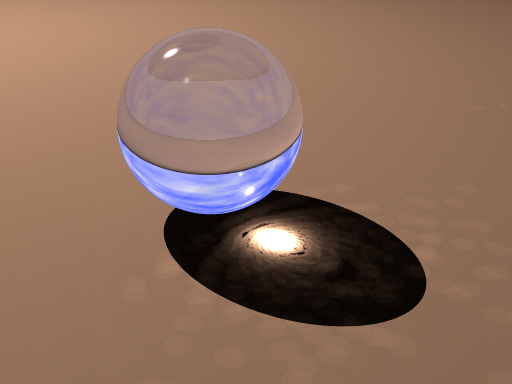
∇ POV-Rayソース: 図9.1-1 フォトン間隔(spacing)による集光の違い
//-------------- Fig. 9.1-1a spacing 0.01
//-------------- Fig. 9.1-1b spacing 0.1
#version 3.7
#include "colors.inc"
#include "textures.inc"
global_settings {
assumed_gamma 2.2
photons {
spacing 0.01 // <<<----- fig. 9.1-1 (a)
// spacing 0.1 // <<<----- fig. 9.1-1 (b)
}
}
//---------------------camera & light
camera{
location< 5,-18,10>
sky<0,0,1>
right <-image_width/image_height,0,0>
look_at<1.5,0,0.8>
angle 46
}
light_source {<-30,20,40>, color White*1.8 }
//---------------------sky
sky_sphere{
pigment{
wrinkles
color_map{
[ 0.3 color rgb<0.3,0.4,1.2>]
[ 0.9 White ]
}
scale <1, 0.2, 0.2>
}
}
//-------------------ground
plane {z, 0
pigment {color rgb<0.65,0.5,0.4>}
}
//----------------------object
sphere{<0,0,3.2> 3
material{M_Glass3}
photons {
target
collect off
reflection on
refraction on
}
}
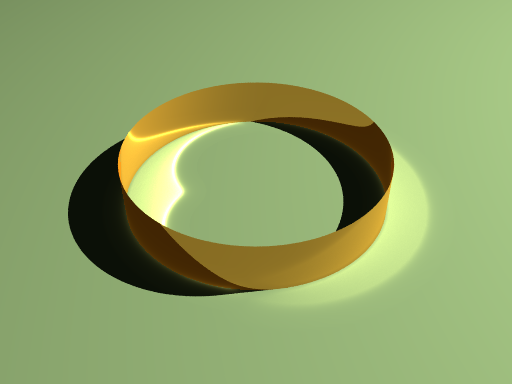
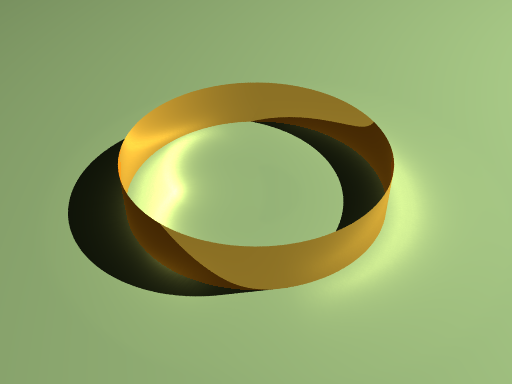
∇ POV-Rayソース: 図9.1-2 フォトン数(count)による集光の違い
//--------------- Fig. 9.1-2a count 200000
//--------------- Fig. 9.1-2b count 10000
#version 3.7
#include "colors.inc"
#include "textures.inc"
#include "metals.inc"
global_settings {
assumed_gamma 2.2
photons {
count 200000 // <<<------ Fig. 9.1-2 (a)
// count 10000 // <<<------ Fig. 9.1-2 (b)
}
}
//---------------------camera & light
camera{
location<10,-15,15>
sky<0,0,1>
right <-image_width/image_height,0,0>
look_at<0,0,0>
angle 46
}
light_source {<30, 20, 40>, color White*1.5 }
//---------------------sky
sky_sphere{
pigment{
wrinkles
color_map{
[ 0.3 color rgb<0.3,0.4,1.2>]
[ 0.9 White ]
}
scale <1, 0.2, 0.2>
}
}
//-------------------ground
plane {z, 0 pigment {color rgb<0.5,0.6,0.4>*1.5} }
//----------------------object
cylinder{<0,0,0>,<0,0,2>,5 open
texture { T_Gold_1A }
photons {
target
collect off
reflection on
}
}
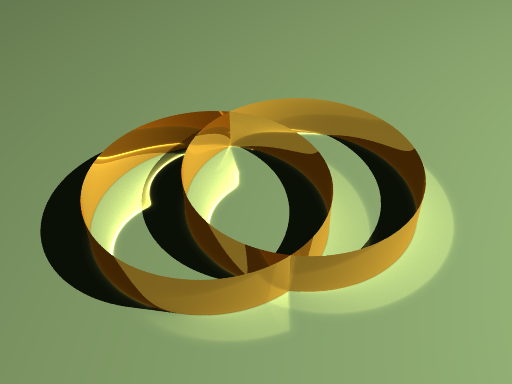
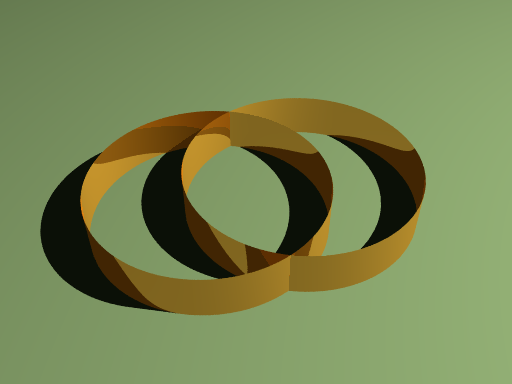
∇ POV-Rayソース: 図9.2-1 目標物体(target)の有無よる集光の違い
//-------------------- Fig. 9.2-1a taget
//-------------------- Fig. 9.2-1b no taget
// Fig. 9.2-1b target : comment out
#version 3.7
#include "colors.inc"
#include "metals.inc"
global_settings {
assumed_gamma 2.2
photons {spacing 0.01}
}
//---------------------camera & light
camera{
location< 5,18,18>
sky<0,0,1>
right <-image_width/image_height,0,0>
look_at<0,0,1>
angle 46
}
light_source {<-30, 20, 40>, color White*1.3
}
//---------------------sky
sky_sphere{
pigment{
wrinkles
color_map{
[ 0.3 color rgb<0.3,0.4,1.2>]
[ 0.9 White ]
}
scale <1, 0.2, 0.2>
}
}
//-------------------ground
plane {z, 0 pigment {color rgb<0.5,0.6,0.4>*1.5} }
//================================= object
cylinder{<-2,0,0>,<-2,0,2>,5 open
texture { T_Gold_1A}
photons {
// target // <<<-----------------target
collect off
reflection on
}
}
cylinder{<2,0,0>,<2,0,2>,5 open
texture { T_Gold_1A}
photons {
// target // <<<-------------------target
collect off
reflection on
}
}
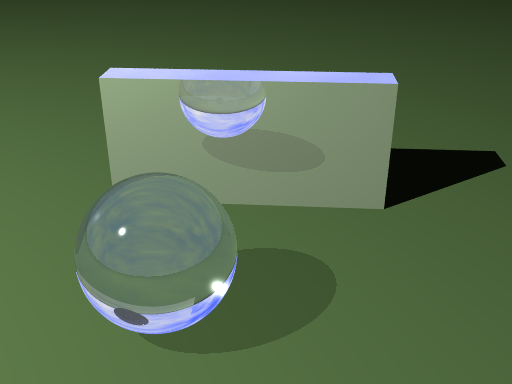
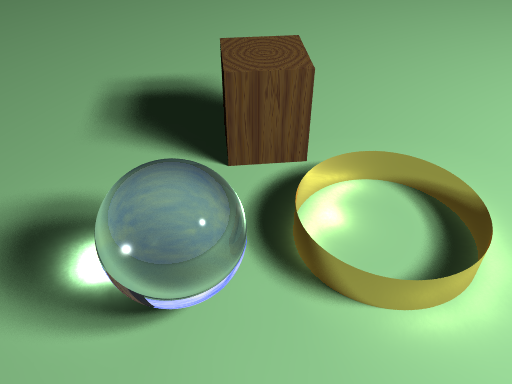
∇ POV-Rayソース: 図9.2-2 (a)反射・屈折(有り)
//------------------------ Fig. 9.2-2a on
// glass sphere : reflection refraction
// box : reflection
#version 3.7
#include "colors.inc"
#include "textures.inc"
global_settings {
assumed_gamma 2.2
photons {spacing 0.01 }
}
//---------------------camera & light
camera{
location< 5,-18,15>
sky<0,0,1>
right <-image_width/image_height,0,0>
look_at<3,10,0.8>
angle 48
}
light_source {<-30,-20,40>, color White*1.3 }
//---------------------sky
sky_sphere{
pigment{
wrinkles
color_map{
[ 0.3 color rgb<0.3,0.4,1.2>]
[ 0.9 White ]
}
scale <1, 0.2, 0.2>
}
}
//-------------------ground
plane {z, 0 pigment {color rgb<0.5,0.65,0.4>} }
//============================= object
sphere{<0,0,3.2> 3
material{M_Glass3}
photons {
target
collect off
reflection on // <<<-----Fig. 9.2-2a on
refraction on // <<<-----Fig. 9.2-2a on
}
}
box{0,1 scale <15,2,7>
pigment{White*0.5}
finish{reflection 0.7}
translate <-5,10,0>
photons {
target
collect off
reflection on // <<<------Fig. 9.2-2a on
}
}
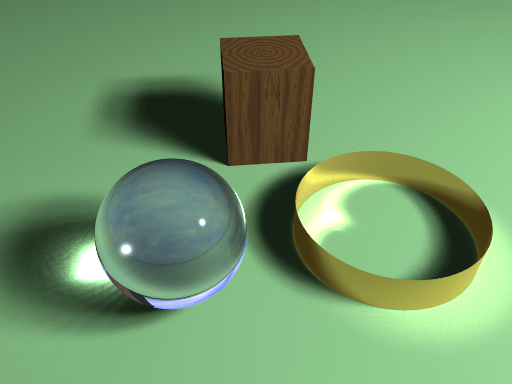
∇ POV-Rayソース: 図9.2-2 (b)反射・屈折(無し)
//------------------------ Fig. 9.2-2b off
// glass sphere : reflection refraction
// box : reflection
#version 3.7
#include "colors.inc"
#include "textures.inc"
global_settings {
assumed_gamma 2.2
photons {spacing 0.01 }
}
//---------------------camera & light
camera{
location< 5,-18,15>
sky<0,0,1>
right <-image_width/image_height,0,0>
look_at<3,10,0.8>
angle 48
}
light_source {<-30,-20,40>, color White*1.3 }
//---------------------sky
sky_sphere{
pigment{
wrinkles
color_map{
[ 0.3 color rgb<0.3,0.4,1.2>]
[ 0.9 White ]
}
scale <1, 0.2, 0.2>
}
}
//-------------------ground
plane {z, 0 pigment {color rgb<0.5,0.65,0.4>} }
//================================ object
sphere{<0,0,3.2> 3
material{M_Glass3}
photons {
target
collect off
// reflection on // <<<-----Fig. 9.2-2b off
// refraction on // <<<-----Fig. 9.2-2b off
}
}
box{0,1 scale <15,2,7>
pigment{White*0.5}
finish{reflection 0.7}
translate <-5,10,0>
photons {
target
collect off
// reflection on // <<<------Fig. 9.2-2b off
}
}
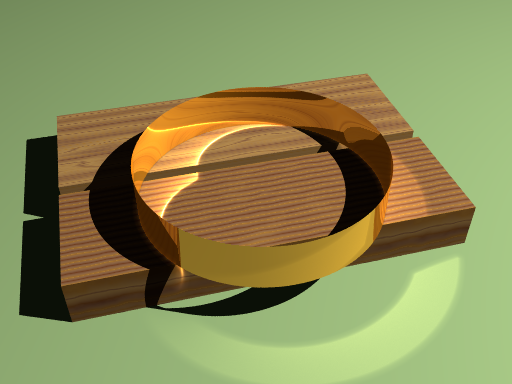
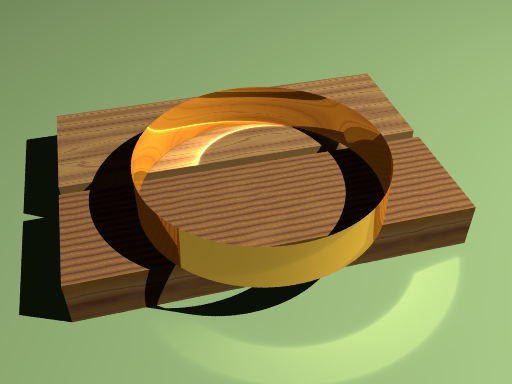
∇ POV-Rayソース: 図9.2-3 フォトン収集(collect)よる集光の違い
//-------------------- Fig. 9.2-3 correct
#version 3.7
#include "colors.inc"
#include "textures.inc"
#include "metals.inc"
#include "Woods.inc"
global_settings {
assumed_gamma 2.2
photons {spacing 0.01}
}
//---------------------camera & light
camera{
location< 5,18,16>
sky<0,0,1>
right <-image_width/image_height,0,0>
look_at<0.5,1,1>
angle 46
}
light_source {<-30, 20, 40>, color White*1.5 }
//---------------------sky
sky_sphere{
pigment{
wrinkles
color_map{
[ 0.3 color rgb<0.3,0.4,1.2>]
[ 0.9 White ]
}
scale <1, 0.2, 0.2>
}
}
//-------------------ground
plane {z, -2 pigment {color rgb<0.5,0.6,0.4>*1.5} }
//----------------------object
cylinder{<0,0,0>,<0,0,2>,5 open
texture { T_Gold_1A}
photons {
target
collect off
reflection on
refraction on
}
}
//============================================ object
box{<-8,-8,-2><8,-2.5,0>
texture {T_Wood7 rotate y*90 scale 5}
}
box{<-8,-2,-2><8,3,0>
texture {T_Wood13 rotate y*90 scale 15}
photons {
collect on //----------Fig. 9.2-3a
// collect off //----------Fig. 9.2-3b
}
}
上記の例では、(d)が最も高画質になる。高画質にするためには、フォトンをより大量に放出し面光源に多くの点高原を使用すればよいが、計算時間の増大を招くので、適切に設定する必要がある。
∇ POV-Rayソース: 図9.3-1 (a) spacing 0.1/面光源 3x3
//-------------------- Fig. 9.3-1a
#version 3.7
#include "colors.inc"
#include "metals.inc"
#include "textures.inc"
#include "Woods.inc"
global_settings {
assumed_gamma 2.2
photons {spacing 0.1 } // <<<----------Fig. 9.3-1a
}
//---------------------camera & light
camera {
location < 8,15, 16>
sky <0,0,1>
right <-image_width/image_height,0,0>
look_at < 6, -4, 0>
angle 60
}
//=========================== area light
light_source {
<-30,20,35> color White
area_light<20,0,0>,<0,20,0> 3,3 // <<<---Fig. 9.3-1a
jitter
photons { area_light }
}
//=========================== object 1
cylinder{<0,0,0>,<0,0,2>, 4.5 open
texture{ T_Gold_4B}
photons{
target
collect off
reflection on
}
}
//=========================== object 2
sphere{<10,2,3.2>, 3
material{M_Glass3}
photons{
target
collect off
reflection on
refraction on
}
}
//=========================== object 3
box{-3, 3 texture{T_Wood7 scale 4 }
scale <0.8,0.8,1>
translate<5,-9,3>
}
//-------------------ground
plane{z 0 pigment {color rgb<0.7,1,0.7>*1.5} }
//---------------------sky
sky_sphere{
pigment{
wrinkles
color_map{
[ 0.3 color rgb<0.3,0.4,1.2>]
[ 0.9 White ]
}
scale <1, 0.2, 0.2>
}
}
∇ POV-Rayソース: 図9.3-1 (b) spacing 0.1/面光源 10x10
//-------------------- Fig. 9.3-1b
#version 3.7
#include "colors.inc"
#include "metals.inc"
#include "textures.inc"
#include "Woods.inc"
global_settings {
assumed_gamma 2.2
photons {spacing 0.1 } //-----------Fig. 9.3-1b
}
//---------------------camera & light
camera {
location < 8,15, 16>
sky <0,0,1>
right <-image_width/image_height,0,0>
look_at < 6, -4, 0>
angle 60
}
//=========================== area light
light_source {
<-30,20,35> color White
area_light<20,0,0>,<0,20,0> 10,10 // <<<---Fig. 9.3-b
jitter
photons { area_light }
}
//=========================== object 1
cylinder{<0,0,0>,<0,0,2>, 4.5 open
texture{ T_Gold_4B}
photons{
target
collect off
reflection on
}
}
//=========================== object 2
sphere{<10,2,3.2>, 3
material{M_Glass3}
photons{
target
collect off
reflection on
refraction on
}
}
//=========================== object 3
box{-3, 3 texture{T_Wood7 scale 4 }
scale <0.8,0.8,1>
translate<5,-9,3>
}
//-------------------ground
plane{z 0 pigment {color rgb<0.7,1,0.7>*1.5} }
//---------------------sky
sky_sphere{
pigment{
wrinkles
color_map{
[ 0.3 color rgb<0.3,0.4,1.2>]
[ 0.9 White ]
}
scale <1, 0.2, 0.2>
}
}
∇ POV-Rayソース: 図9.3-1 (c) spacing 0.01/面光源 3x3
//-------------------- Fig. 9.3-1c
#version 3.7
#include "colors.inc"
#include "metals.inc"
#include "textures.inc"
#include "Woods.inc"
global_settings {
assumed_gamma 2.2
photons {spacing 0.01 } //-----------Fig. 9.3-1c
}
//---------------------camera & light
camera {
location < 8,15, 16>
sky <0,0,1>
right <-image_width/image_height,0,0>
look_at < 6, -4, 0>
angle 60
}
//=========================== area light
light_source {
<-30,20,35> color White
area_light<20,0,0>,<0,20,0> 3,3 // <<<---Fig. 9.3-1c
jitter
photons { area_light }
}
//=========================== object 1
cylinder{<0,0,0>,<0,0,2>, 4.5 open
texture{ T_Gold_4B}
photons{
target
collect off
reflection on
}
}
//=========================== object 2
sphere{<10,2,3.2>, 3
material{M_Glass3}
photons{
target
collect off
reflection on
refraction on
}
}
//=========================== object 3
box{-3, 3 texture{T_Wood7 scale 4 }
scale <0.8,0.8,1>
translate<5,-9,3>
}
//-------------------ground
plane{z 0 pigment {color rgb<0.7,1,0.7>*1.5} }
//---------------------sky
sky_sphere{
pigment{
wrinkles
color_map{
[ 0.3 color rgb<0.3,0.4,1.2>]
[ 0.9 White ]
}
scale <1, 0.2, 0.2>
}
}
∇ POV-Rayソース: 図9.3-1 (d) spacing 0.01/面光源 10x10
//-------------------- Fig. 9.3-1d
#version 3.7
#include "colors.inc"
#include "metals.inc"
#include "textures.inc"
#include "Woods.inc"
global_settings {
assumed_gamma 2.2
photons {spacing 0.01 } //-----------Fig. 9.3-1d
}
//---------------------camera & light
camera {
location < 8,15, 16>
sky <0,0,1>
right <-image_width/image_height,0,0>
look_at < 6, -4, 0>
angle 60
}
//=========================== area light
light_source {
<-30,20,35> color White
area_light<20,0,0>,<0,20,0> 10,10 //<<<---Fig. 9.3-1d
jitter
photons { area_light }
}
//=========================== object 1
cylinder{<0,0,0>,<0,0,2>, 4.5 open
texture{ T_Gold_4B}
photons{
target
collect off
reflection on
}
}
//=========================== object 2
sphere{<10,2,3.2>, 3
material{M_Glass3}
photons{
target
collect off
reflection on
refraction on
}
}
//=========================== object 3
box{-3, 3 texture{T_Wood7 scale 4 }
scale <0.8,0.8,1>
translate<5,-9,3>
}
//-------------------ground
plane{z 0 pigment {color rgb<0.7,1,0.7>*1.5} }
//---------------------sky
sky_sphere{
pigment{
wrinkles
color_map{
[ 0.3 color rgb<0.3,0.4,1.2>]
[ 0.9 White ]
}
scale <1, 0.2, 0.2>
}
}