▷ 前を見る
13.1-29 キルト(quilted)
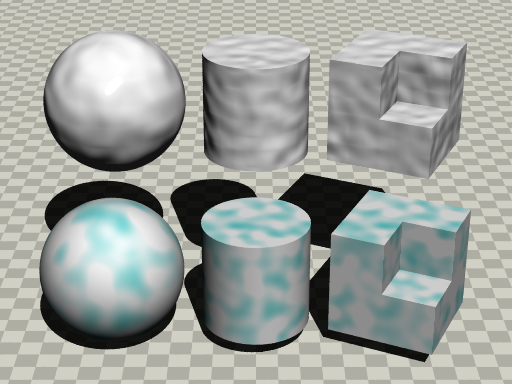
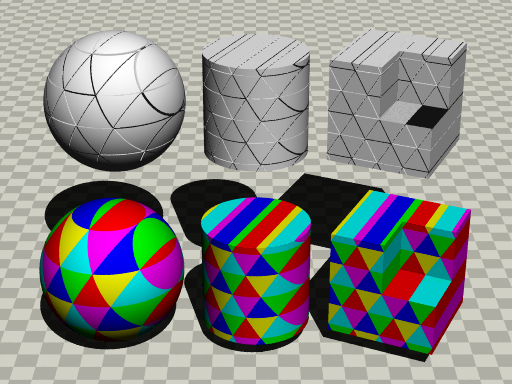
quilted は、サイズ1の立方体を並べてキルトやタイルのような表面を作るパターンである。このパターンは法線専用として最初に開発され、normal 設定にはオプションがある。
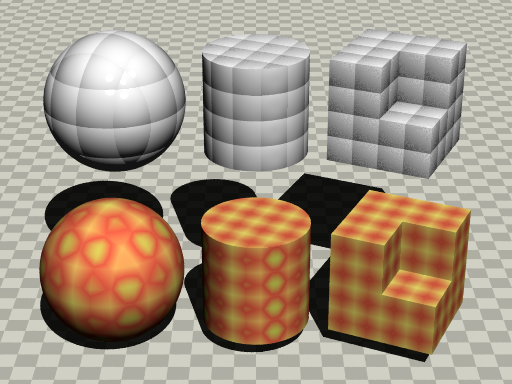 |
(上段)ノーマルで使用
(下段)ピグメントで使用
図13.1-29a キルト(quilted)
|
//-------------------- Fig. 13.1-29a /quilted/
#version 3.7
#include "colors.inc"
#include "textures.inc"
global_settings
{ assumed_gamma 2.2 }
//========================== quilted / pigment
#declare T1=
texture{
pigment{
quilted
color_map{
[0.0 color rgb<0.9,1,0.4>]
[0.2 color rgb<1,0.4,0.3>]
[0.7 color rgb<0.8,0.9,0.4>*1.4]
[1.0 White]}
control0 1
control1 1
scale 0.5
}
}
//========================== quilted / normal
#declare T2=
texture{
pigment{White}
normal{
quilted 0.4
control0 1
control1 1
scale 0.5
}
finish{phong 0.8 phong_size 200}
}
//--------------------------------------------- camera - light
camera{
location <0,-14,8>
sky <0, 0, 1>
right <-image_width/image_height,0,0>
look_at <0, 0, 1.2>
angle 25
}
light_source{ <100, -400, 500> color rgb 1.5}
//---------------------------------floor
#declare CA1=rgb<0.85,0.85,0.8>;
#declare CA2=rgb<0.85,0.85,0.8>*1.2;
plane{ z, -1.01
pigment{ checker color CA1, color CA2 scale 0.3 }
}
//---------------------------------sphere
sphere{ 0,1 texture{T1} rotate -25*z translate -2*x}
sphere{ 0,1 texture{T2} rotate -25*z translate <-2,1.3,2>}
//---------------------------------Cylinder
cylinder{-z,z,1 texture{T1} rotate -25*z scale 0.75}
cylinder{-z,z,1 texture{T2} rotate -25*z scale 0.75
translate <0,1.3,2>}
//---------------------------------Cube
#declare BXA = difference{
box{-1,1}
box{-1,1 translate <1,-1,1>} }
object{ BXA texture{T1} rotate -25*z
scale .75 translate 2*x}
object{ BXA texture{T2} rotate -25*z
scale .75 translate <2,1.3,2>}
< quilted の構文/ピグメント>
|
pigment {
quilted
[ control0 C0 ]
[ control1 C1 ]
}
|
| pigment |
ピグメントのキーワード |
| quilted |
キルトのキーワード |
control0 C0
control1 C1 |
キルトの縫い目(またはタイルの溝)の曲率の設定、通常は 0.0~1.0 の範囲で設定する。[デフォルト:1.0 ] |
< quilted の構文/ノーマル>
|
normal {
quilted [BUMP_SIZE]
[ control0 C0 ]
[ control1 C1 ]
}
|
| normal |
ノーマルのキーワード |
| quilted |
キルトのキーワード |
| BUMP_SIZE |
凹凸の程度(0.1~5.0 程度)[デフォルト:1.0 ] |
control0 C0
control1 C1 |
キルトの縫い目(またはタイルの溝)の曲率の設定、0.0~1.0 の範囲で設定 [デフォルト:1.0 ] |
この制御値(C0,C1)は曲線の上端と下端の傾きを調整する。両端の制御値を0にすると、鋭い角を生じる直線の傾きを与える。両端の制御値を1にすると、結果として柔らかくより丸い角のS 字カーブを与える。
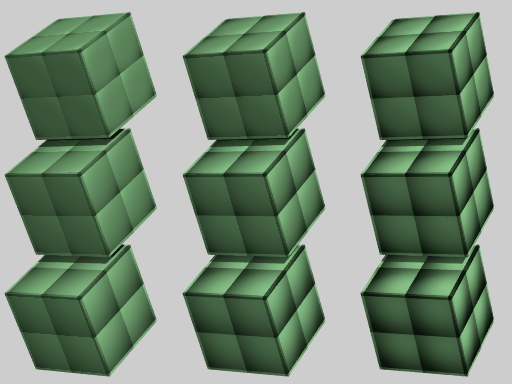 |
上段左から:(0.0, 0.0), (0.0, 0.5), (0.0, 1.0)
中段左から:(0.5, 0.0), (0.5, 0.5), (0.5, 1.0)
下段左から:(1.0, 0.0), (1.0, 0.5), (1.0, 1.0)
図13.1-29b (CO,C1)の値による表面の変化
|
//-------------------- Fig. 13.1-29b /quilted/ fig
#version 3.7
#include "colors.inc"
#include "textures.inc"
global_settings
{ assumed_gamma 2.2 }
camera{
location <0,-20,0>
sky <0, 0, 1>
right <-image_width/image_height,0,0>
look_at <0, 3, 0>
angle 25
}
light_source {<300,-500,500> color White*0.7}
light_source {<-50,-500,10> color White*0.5}
background { color White*0.8 }
//================================ quilted
//===================== control0 0
#declare COLG=rgb<0.7,1,0.7>;
#declare AA00=
texture{
pigment{COLG}
normal{
quilted 1
control0 0 control1 0
scale 0.75
}
}
#declare AA05=
texture{
pigment{COLG}
normal{
quilted 1
control0 0 control1 0.5
scale 0.75
}
}
#declare AA10=
texture{
pigment{COLG}
normal{
quilted 1
control0 0 control1 1
scale 0.75
}
}
//===================== control0 0.5
#declare BB00=
texture{
pigment{COLG}
normal{
quilted 1
control0 0.5 control1 0
scale 0.75
}
}
#declare BB05=
texture{
pigment{COLG}
normal{
quilted 1
control0 0.5 control1 0.5
scale 0.75
}
}
#declare BB10=
texture{
pigment{COLG}
normal{
quilted 1
control0 0.5 control1 1
scale 0.75
}
}
//===================== control0 1
#declare CC00=
texture{
pigment{COLG}
normal{
quilted 1
control0 1 control1 0
scale 0.75
}
}
#declare CC05=
texture{
pigment{COLG}
normal{
quilted 1
control0 1 control1 0.5
scale 0.75
}
}
#declare CC10=
texture{
pigment{COLG}
normal{
quilted 1
control0 1 control1 1
scale 0.75
}
}
//-----------------------------object
#declare BX = box{ -1,1 scale .8 }
//-------top row, left to right
object { BX
texture{AA00}
rotate <30,0,-30>
translate <-3,0,2>
}
object { BX
texture{AA05}
rotate <30,0,-30>
translate <0,0,2>
}
object { BX
texture{AA10}
rotate <30,0,-30>
translate <3,0,2>
}
//-------middle row, left to right
object { BX
texture{BB00}
rotate <30,0,-30>
translate <-3,0,0>
}
object { BX
texture{BB05}
rotate <30,0,-30>
translate <0,0,0>
}
object { BX
texture{BB10}
rotate <30,0,-30>
translate <3,0,0>
}
//-------bottom row, left to right
object { BX
texture{CC00}
rotate <30,0,-30>
translate <-3,0,-2>
}
object { BX
texture{CC05}
rotate <30,0,-30>
translate <0,0,-2>
}
object { BX
texture{CC10}
rotate <30,0,-30>
translate <3,0,-2>
}
| < quilted > |
| 利用可能なマッピング |
デフォルトの
波形タイプ |
デフォルトの
カラーマップ |
○ color_map
○ pigment_map
○ texture_map
× slope_map
× normal_map
○ density_map
|
ramp_wave |
× 無 |
13.1-30 放射(radial)
radial パターンは +y 軸まわりにマップの色が変化していく、y 軸を中心にした放射状の縞を作る。通常このパターンは、y 軸から放射される縞のサイクルを制御するためにオプションの frequency を使用する。
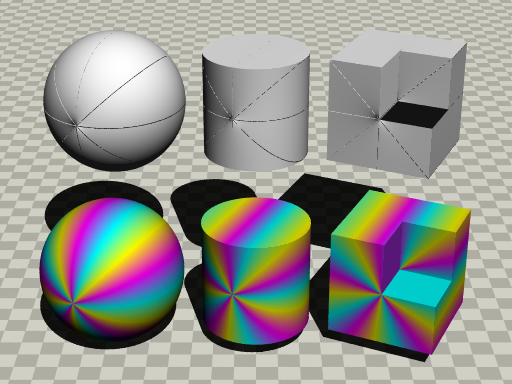 |
(上段)ノーマルで使用
(下段)ピグメントのデフォルトを使用
図13.1-30a 放射(radial)
|
//-------------------- Fig. 13.1-30a /radial/
#version 3.7
#include "colors.inc"
#include "textures.inc"
global_settings
{ assumed_gamma 2.2 }
//========================== radial / pigment
#declare T1=
texture{
pigment{
radial
// color_map{[0.0 Quartz][0.33 Orchid][0.66 Orange][1 Quartz]}
frequency 5
scale 0.3
}
}
//========================== radial / normal
#declare T2=
texture{
pigment{White}
normal{
radial 0.8
frequency 5
scale 0.3
}
}
//--------------------------------------------- camera - light
camera{
location <0,-14,8>
sky <0, 0, 1>
right <-image_width/image_height,0,0>
look_at <0, 0, 1.2>
angle 25
}
light_source{ <100, -400, 500> color rgb 1.5}
//---------------------------------floor
#declare CA1=rgb<0.85,0.85,0.8>;
#declare CA2=rgb<0.85,0.85,0.8>*1.2;
plane{ z, -1.01
pigment{ checker color CA1, color CA2 scale 0.3 }
}
//---------------------------------sphere
sphere{ 0,1 texture{T1} rotate -25*z translate -2*x}
sphere{ 0,1 texture{T2} rotate -25*z translate <-2,1.3,2>}
//---------------------------------Cylinder
cylinder{-z,z,1 texture{T1} rotate -25*z scale 0.75}
cylinder{-z,z,1 texture{T2} rotate -25*z scale 0.75
translate <0,1.3,2>}
//---------------------------------Cube
#declare BXA = difference{
box{-1,1}
box{-1,1 translate <1,-1,1>} }
object{ BXA texture{T1} rotate -25*z
scale .75 translate 2*x}
object{ BXA texture{T2} rotate -25*z
scale .75 translate <2,1.3,2>}
 |
|
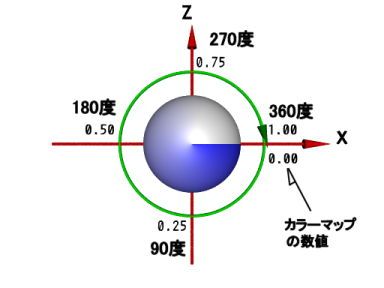
図13.1-30b カラーマップのradialの色の変化
|
カラーマップの1サイクルは、0.0から始まり、+y 軸の回転角度によりカラーマップの数値が変化して行く、360度回転すると 0.0 に戻る。 frequency は、このサイクルを繰り返す回数を設定する。frequency = 3 であれば、1サイクルが120度になる。
| < radial > |
| 利用可能なマッピング |
デフォルトの
波形タイプ |
デフォルトの
カラーマップ |
○ color_map
○ pigment_map
○ texture_map
○ slope_map
○ normal_map
○ density_map
|
ramp_wave |
〇 有 |
13.1-31 波紋(ripples)
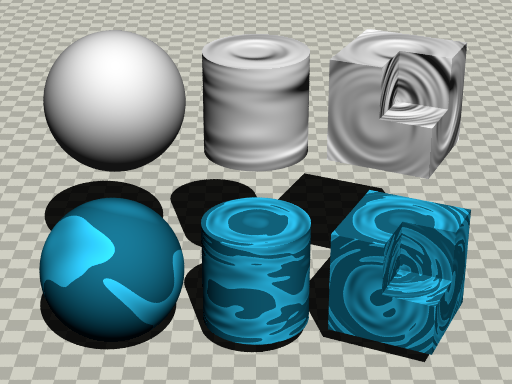
ripples パターンは、水の波紋のような表面を作る。当初、ripples は法線専用として開発された。波紋は<0,0,0>~<1,1,1>の立方体内でランダムに10箇所で発生する。
このパターンでは、いくつかのパターン修正オプションは特殊な働きをする。scale, frequency, phase は次のような効果を持つ。
・scale :波紋の中心の間隔を制御する。
・frequency :波紋の波の間隔を制御する。
・phase :アニメーションにおいて波紋を外側に向かって動かす。
また、global_settings { number_of_waves FLOAT } を使って発生する波紋の中心の数を変えることができる。これはシーン全体に影響するため、パターンごとに波紋の中心の数を変えることはできない。▷「4.8 波紋の数」参照
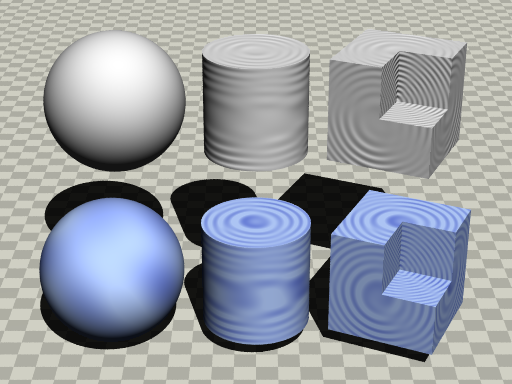 |
(上段)ノーマルで使用
(下段)ピグメントで使用
図13.1-31 波紋(ripples)
|
//-------------------- Fig. 13.1-31 /ripples/
#version 3.7
#include "colors.inc"
#include "textures.inc"
global_settings
{ assumed_gamma 2.2 }
//========================== ripples / pigment
#declare T1=
texture{
pigment{
ripples
color_map{
[0.0 color rgb<0.4,0.5,1>]
[0.6 color rgb<0.7,0.8,1>*1.2]
}
scale 0.1
}
}
//========================== ripples / normal
#declare T2=
texture{
pigment{White}
normal{
ripples 0.6
scale 0.1
}
}
//--------------------------------------------- camera - light
camera{
location <0,-14,8>
sky <0, 0, 1>
right <-image_width/image_height,0,0>
look_at <0, 0, 1.2>
angle 25
}
light_source{ <100, -400, 500> color rgb 1.5}
//---------------------------------floor
#declare CA1=rgb<0.85,0.85,0.8>;
#declare CA2=rgb<0.85,0.85,0.8>*1.2;
plane{ z, -1.01
pigment{ checker color CA1, color CA2 scale 0.3 }
}
//---------------------------------sphere
sphere{ 0,1 texture{T1} rotate -25*z translate -2*x}
sphere{ 0,1 texture{T2} rotate -25*z translate <-2,1.3,2>}
//---------------------------------Cylinder
cylinder{-z,z,1 texture{T1} rotate -25*z scale 0.75}
cylinder{-z,z,1 texture{T2} rotate -25*z scale 0.75
translate <0,1.3,2>}
//---------------------------------Cube
#declare BXA = difference{
box{-1,1}
box{-1,1 translate <1,-1,1>} }
object{ BXA texture{T1} rotate -25*z
scale .75 translate 2*x}
object{ BXA texture{T2} rotate -25*z
scale .75 translate <2,1.3,2>}
| < ripples > |
| 利用可能なマッピング |
デフォルトの
波形タイプ |
デフォルトの
カラーマップ |
○ color_map
○ pigment_map
○ texture_map
○ slope_map
○ normal_map
○ density_map
|
ramp_wave |
× 無 |
(ノーマルとして使用する場合、ripples は表面の法線の修正に専用の関数を使用するため、ノーマルマップ、スロープマップ、波形タイプ修正で使用できないとあるが、使用してもエラーはでない。)
13.1-32 slope
(省略)
13.1-33 球(spherical)
spherical パターンは、同心球の層が外に変化しながら広がってくイメージである。カラーマップの数値は 1.0 が中心で、0.0 が外側である。この spherical の概要は、「13.1-12 円柱(cylindrical)」とほぼ同じである。
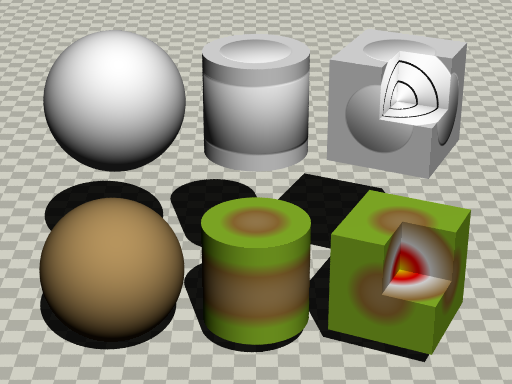 |
(上段)ノーマルで使用
(下段)ピグメントで使用
図13.1-33 球(spherical)
|
//-------------------- Fig. 13.1-33 /spherical/
#version 3.7
#include "colors.inc"
#include "textures.inc"
global_settings
{ assumed_gamma 2.2 }
//========================== spherical / pigment
#declare T1=
texture{
pigment{
spherical
color_map{
[0.0 YellowGreen]
[0.1 Bronze2]
[0.5 White]
[0.7 Red]
[1.0 Yellow]
}
scale 1.2
}
}
//========================== spherical / normal
#declare T2=
texture{
pigment{White}
normal{
spherical 3
frequency 3
scale 1.2
}
}
//--------------------------------------------- camera - light
camera{
location <0,-14,8>
sky <0, 0, 1>
right <-image_width/image_height,0,0>
look_at <0, 0, 1.2>
angle 25
}
light_source{ <100, -400, 500> color rgb 1.5}
//---------------------------------floor
#declare CA1=rgb<0.85,0.85,0.8>;
#declare CA2=rgb<0.85,0.85,0.8>*1.2;
plane{ z, -1.01
pigment{ checker color CA1, color CA2 scale 0.3 }
}
//---------------------------------sphere
sphere{ 0,1 texture{T1} rotate -25*z translate -2*x}
sphere{ 0,1 texture{T2} rotate -25*z translate <-2,1.3,2>}
//---------------------------------Cylinder
cylinder{-z,z,1 texture{T1} rotate -25*z scale 0.75}
cylinder{-z,z,1 texture{T2} rotate -25*z scale 0.75
translate <0,1.3,2>}
//---------------------------------Cube
#declare BXA = difference{
box{-1,1}
box{-1,1 translate <1,-1,1>} }
object{ BXA texture{T1} rotate -25*z
scale .75 translate 2*x}
object{ BXA texture{T2} rotate -25*z
scale .75 translate <2,1.3,2>}
| < spherical > |
| 利用可能なマッピング |
デフォルトの
波形タイプ |
デフォルトの
カラーマップ |
○ color_map
○ pigment_map
○ texture_map
○ slope_map
○ normal_map
○ density_map
|
ramp_wave |
× 無 |
13.1-34 螺旋1(spiral1)
spiral1 パターンは、ネジのように z 軸の周りで螺旋を生成する。
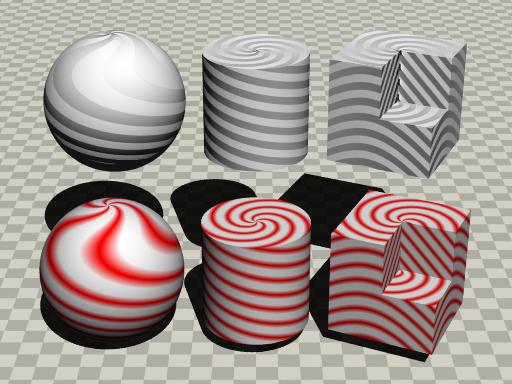 |
(上段)ノーマルで使用
(下段)ピグメントで使用
図13.1-34 螺旋1(spiral1)
|
//-------------------- Fig. 13.1-34 /spiral1/
#version 3.7
#include "colors.inc"
#include "textures.inc"
global_settings
{ assumed_gamma 2.2 }
//========================== spiral1 / pigment
#declare T1=
texture{
pigment{
spiral1 5
color_map{
[0.0 Red]
[0.6 White]
}
scale 0.3 }
}
//========================== spiral1 / normal
#declare T2=
texture{
pigment{White}
normal{
spiral1 5, 0.6
scale 0.3
}
}
//--------------------------------------------- camera - light
camera{
location <0,-14,8>
sky <0, 0, 1>
right <-image_width/image_height,0,0>
look_at <0, 0, 1.2>
angle 25
}
light_source{ <100, -400, 500> color rgb 1.5}
//---------------------------------floor
#declare CA1=rgb<0.85,0.85,0.8>;
#declare CA2=rgb<0.85,0.85,0.8>*1.2;
plane{ z, -1.01
pigment{ checker color CA1, color CA2 scale 0.3 }
}
//---------------------------------sphere
sphere{ 0,1 texture{T1} rotate -25*z translate -2*x}
sphere{ 0,1 texture{T2} rotate -25*z translate <-2,1.3,2>}
//---------------------------------Cylinder
cylinder{-z,z,1 texture{T1} rotate -25*z scale 0.75}
cylinder{-z,z,1 texture{T2} rotate -25*z scale 0.75
translate <0,1.3,2>}
//---------------------------------Cube
#declare BXA = difference{
box{-1,1}
box{-1,1 translate <1,-1,1>} }
object{ BXA texture{T1} rotate -25*z
scale .75 translate 2*x}
object{ BXA texture{T2} rotate -25*z
scale .75 translate <2,1.3,2>}
< spiral1 の構文/ピグメント >
|
pigment {
spiral1 NUMBER_OF_ARMS
}
|
| pigment |
ピグメントのキーワード |
| spiral1 |
螺旋1のキーワード |
| NUMBER_OF_ARMS |
螺旋の腕の数 |
< spiral1 の構文/ノーマル >
|
normal {
spiral1 NUMBER_OF_ARMS [, BUMP_SIZE ]
}
|
| normal |
ノーマルのキーワード |
| spiral1 |
螺旋1のキーワード |
| NUMBER_OF_ARMS |
螺旋の腕の数 |
| BUMP_SIZES |
凹凸の程度 [デフォルト :0.5 ] |
| < spiral1 > |
| 利用可能なマッピング |
デフォルトの
波形タイプ |
デフォルトの
カラーマップ |
○ color_map
○ pigment_map
○ texture_map
○ slope_map
○ normal_map
○ density_map
|
ramp_wave |
× 無 |
13.1-35 螺旋2(spiral2)
spiral2 パターンは、z 軸の周りで2重螺旋を生成する。この螺旋は2つの反対方向の螺旋が重なり合っている。使用法はspiral1と同じ。
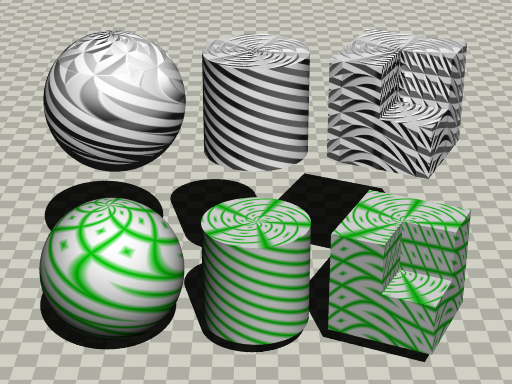 |
(上段)ノーマルで使用
(下段)ピグメントで使用
図13.1-35 螺旋2(spiral2)
|
//-------------------- Fig. 13.1-35 /spiral2/
#version 3.7
#include "colors.inc"
#include "textures.inc"
global_settings
{ assumed_gamma 2.2 }
//========================== spiral2 / pigment
#declare T1=
texture{
pigment{
spiral2 5
color_map{
[0.0 Green*0.8]
[0.6 White]
}
scale 0.5
}
}
//========================== spiral2 / normal
#declare T2=
texture{
pigment{White}
normal{
spiral2 5, 0.6
scale 0.5
}
}
//--------------------------------------------- camera - light
camera{
location <0,-14,8>
sky <0, 0, 1>
right <-image_width/image_height,0,0>
look_at <0, 0, 1.2>
angle 25
}
light_source{ <100, -400, 500> color rgb 1.5}
//---------------------------------floor
#declare CA1=rgb<0.85,0.85,0.8>;
#declare CA2=rgb<0.85,0.85,0.8>*1.2;
plane{ z, -1.01
pigment{ checker color CA1, color CA2 scale 0.3 }
}
//---------------------------------sphere
sphere{ 0,1 texture{T1} rotate -25*z translate -2*x}
sphere{ 0,1 texture{T2} rotate -25*z translate <-2,1.3,2>}
//---------------------------------Cylinder
cylinder{-z,z,1 texture{T1} rotate -25*z scale 0.75}
cylinder{-z,z,1 texture{T2} rotate -25*z scale 0.75
translate <0,1.3,2>}
//---------------------------------Cube
#declare BXA = difference{
box{-1,1}
box{-1,1 translate <1,-1,1>} }
object{ BXA texture{T1} rotate -25*z
scale .75 translate 2*x}
object{ BXA texture{T2} rotate -25*z
scale .75 translate <2,1.3,2>}
| < spiral2 > |
| 利用可能なマッピング |
デフォルトの
波形タイプ |
デフォルトの
カラーマップ |
○ color_map
○ pigment_map
○ texture_map
○ slope_map
○ normal_map
○ density_map
|
ramp_wave |
× 無 |
13.1-36 斑点(spotted)
spotted パターンは bozo と同一である。▷「13.1-5 bozo」参照
 |
(上段)ノーマルで使用
(下段)ピグメントで使用
図13.1-36 斑点(spotted)
|
//-------------------- Fig. 13.1-36 /spotted/
#version 3.7
#include "colors.inc"
#include "textures.inc"
global_settings
{ assumed_gamma 2.2 }
//========================== spotted / pigment
#declare T1=
texture{
pigment{
spotted
color_map{
[0.0 color rgb<0.3,1,1>*0.8]
[0.6 White]}
scale 0.3
}
}
//========================== spotted / normal
#declare T2=
texture{
pigment{White}
normal{
spotted 2
scale 0.3
}
finish{phong 0.8 phong_size 200}
}
//--------------------------------------------- camera - light
camera{
location <0,-14,8>
sky <0, 0, 1>
right <-image_width/image_height,0,0>
look_at <0, 0, 1.2>
angle 25
}
light_source{ <100, -400, 500> color rgb 1.5}
//---------------------------------floor
#declare CA1=rgb<0.85,0.85,0.8>;
#declare CA2=rgb<0.85,0.85,0.8>*1.2;
plane{ z, -1.01
pigment{ checker color CA1, color CA2 scale 0.3 }
}
//---------------------------------sphere
sphere{ 0,1 texture{T1} rotate -25*z translate -2*x}
sphere{ 0,1 texture{T2} rotate -25*z translate <-2,1.3,2>}
//---------------------------------Cylinder
cylinder{-z,z,1 texture{T1} rotate -25*z scale 0.75}
cylinder{-z,z,1 texture{T2} rotate -25*z scale 0.75
translate <0,1.3,2>}
//---------------------------------Cube
#declare BXA = difference{
box{-1,1}
box{-1,1 translate <1,-1,1>} }
object{ BXA texture{T1} rotate -25*z
scale .75 translate 2*x}
object{ BXA texture{T2} rotate -25*z
scale .75 translate <2,1.3,2>}
| < spotted > |
| 利用可能なマッピング |
デフォルトの
波形タイプ |
デフォルトの
カラーマップ |
○ color_map
○ pigment_map
○ texture_map
○ slope_map
○ normal_map
○ density_map
|
ramp_wave |
× 無 |
13.1-37 正方形(square)
square パターンは、x-z 平面に正方形の繰り返しパターン生成する。正方形の各辺の長さは1で、正方形は y 方向に無限に伸びるイメージである。デフォルトで、ピグメントを4色(赤、青、黄、緑)持っている。
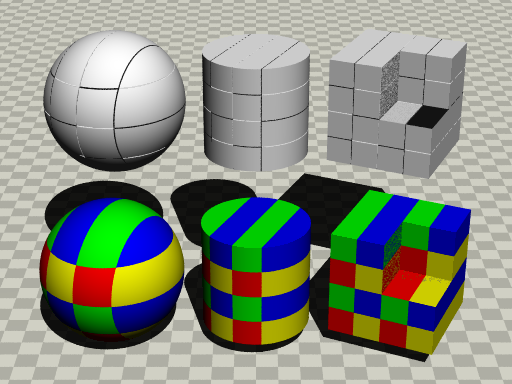 |
(上段)ノーマルで使用
(下段)ピグメントのデフォルトを使用
図13.1-37 正方形(Square)
|
//-------------------- Fig. 13.1-37 /square/
#version 3.7
#include "colors.inc"
#include "textures.inc"
global_settings
{ assumed_gamma 2.2 }
//========================== square / pigment
#declare T1=
texture {
pigment {
square
// Cyan,White,Red,Green
scale 0.51
}
}
//========================== square / normal
#declare T2=
texture{
pigment{White}
normal{
square
scale 0.51
}
}
//--------------------------------------------- camera - light
camera{
location <0,-14,8>
sky <0, 0, 1>
right <-image_width/image_height,0,0>
look_at <0, 0, 1.2>
angle 25
}
light_source{ <100, -400, 500> color rgb 1.5}
//---------------------------------floor
#declare CA1=rgb<0.85,0.85,0.8>;
#declare CA2=rgb<0.85,0.85,0.8>*1.2;
plane{ z, -1.01
pigment{ checker color CA1, color CA2 scale 0.3 }
}
//---------------------------------sphere
sphere{ 0,1 texture{T1} rotate -25*z translate -2*x}
sphere{ 0,1 texture{T2} rotate -25*z translate <-2,1.3,2>}
//---------------------------------Cylinder
cylinder{-z,z,1 texture{T1} rotate -25*z scale 0.75}
cylinder{-z,z,1 texture{T2} rotate -25*z scale 0.75
translate <0,1.3,2>}
//---------------------------------Cube
#declare BXA = difference{
box{-1,1}
box{-1,1 translate <1,-1,1>} }
object{ BXA texture{T1} rotate -25*z
scale .75 translate 2*x}
object{ BXA texture{T2} rotate -25*z
scale .75 translate <2,1.3,2>}
< suare の構文>
|
pigment {
square
[<COLOR1> [, <COLOR2>
[, <COLOR3> [, <COLOR4>] ] ] ]
}
|
| pigment |
ピグメントのキーワード |
| square |
正方形のキーワード |
| <COLOR1> ~ <COLOR4> |
正方形の色、4色以内 |
| < square > |
| 利用可能なマッピング |
デフォルトの
波形タイプ |
デフォルトの
カラーマップ |
○ color_map
○ pigment_map
○ texture_map
○ slope_map
○ normal_map
○ density_map
|
ramp_wave |
〇 有 |
13.1-38 タイリング(tiling)
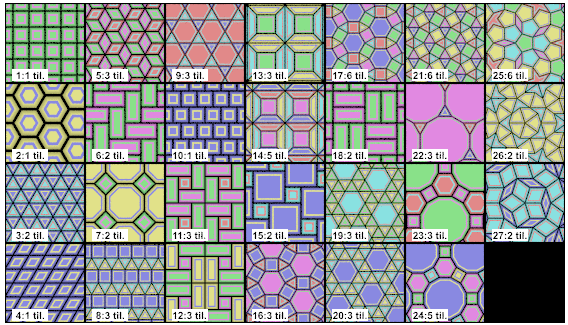
tiling パターンは x-z 平面にタイルを敷き詰める。全部で27種類のタイルが用意されている。x-y 平面に敷き詰めるときは、パターンを x 軸回りに +90 度回転する。
 |
(上段)ノーマルで使用
(下段)ピグメントで使用
図13.1-38a タイリング(tiling)
|
//-------------------- Fig. 13.1-38 /tiling/
#version 3.7
#include "colors.inc"
#include "textures.inc"
global_settings
{ assumed_gamma 2.2 }
//========================== tiling / pigment
#declare Tac0=rgb<1.0, 1.0, 1.0>; // White
#declare Tac1=rgb<1.0, 0.0, 0.0>; // Red
#declare Tac2=rgb<0.0, 1.0, 0.0>; // Green
#declare Tac3=rgb<0.0, 0.0, 1.0>; // Blue
#declare Tac4=rgb<1.0, 1.0, 0.5>; // Yellow
#declare Tac5=rgb<0.0, 1.0, 1.0>; // Cyan
#declare Tac6=rgb<1.0, 0.0, 1.0>; // Magenta
#include "cmap_tile.inc"
#declare T1=
texture{
pigment{
tiling 6 // <<<----- Tile Pattern
color_map { Tacmap2 } // <<<----- colors
}
scale 0.2
}
////========================== tiling / normal
#declare T2=
texture{
pigment{White}
normal{
tiling 6 1.5 // <<<--- Tile , Bump size
scale 0.2
}
}
//--------------------------------------------- camera - light
camera{
location <0,-14,8>
sky <0, 0, 1>
right <-image_width/image_height,0,0>
look_at <0, 0, 1.2>
angle 25
}
light_source{ <100, -400, 500> color rgb 1.5}
//---------------------------------floor
#declare CA1=rgb<0.85,0.85,0.8>;
#declare CA2=rgb<0.85,0.85,0.8>*1.2;
plane{ z, -1.01
pigment{ checker color CA1, color CA2 scale 0.3 }
}
//---------------------------------sphere
sphere{ 0,1 texture{T1} rotate -25*z translate -2*x}
sphere{ 0,1 texture{T2} rotate -25*z translate <-2,1.3,2>}
//---------------------------------Cylinder
cylinder{-z,z,1 texture{T1} rotate -25*z scale 0.75}
cylinder{-z,z,1 texture{T2} rotate -25*z scale 0.75
translate <0,1.3,2>}
//---------------------------------Cube
#declare BXA = difference{
box{-1,1}
box{-1,1 translate <1,-1,1>} }
object{ BXA texture{T1} rotate -25*z
scale .75 translate 2*x}
object{ BXA texture{T2} rotate -25*z
scale .75 translate <2,1.3,2>}
上記のソースは cmap_tile.inc を使っているので、後述の「● 簡易なタイルの色設定について」を参照する。
< tiling の構文/ピグメント >
|
pigment {
tiling PATTERN_NUMBER
}
|
| pigment |
ピグメントのキーワード |
| tiling |
タイリングのキーワード |
| PATTERN_NUMBER |
タイルの設定 1から27の整数 |
 |
|
図13.1-38b タイルの番号(1~27)
|
● 簡易なタイルの色設定について
tiling パターンは タイルの色を決定が少し難しそうなので、簡易的に設定できるようにカラーマップを6種類準備した。タイルの色は7種類、Tac0 ~ Tac6 まであり、変更のときに分かりやすいように、初期値として極端な色に設定している。タイルの色にはコーキング部分の色も含んでいる。タイルの色はカラーマップにより割り当てられる。カラーマップは cmap_tile.inc に6種類あり、それらは CmapTac1 ~ CmapTac6 となっている。
//-----------------tiling color_map
/******
#declare Tac0=rgb<1.0, 1.0, 1.0>; // White
#declare Tac1=rgb<1.0, 0.0, 0.0>; // Red
#declare Tac2=rgb<0.0, 1.0, 0.0>; // Green
#declare Tac3=rgb<0.0, 0.0, 1.0>; // Blue
#declare Tac4=rgb<1.0, 1.0, 0.5>; // Yellow
#declare Tac5=rgb<0.0, 1.0, 1.0>; // Cyan
#declare Tac6=rgb<1.0, 0.0, 1.0>; // Magenta
******/
#declare CmapTac1 =
color_map {
[0.0000 Tac1] [0.8000 Tac1]
[0.8000 Tac0] [1.0000 Tac0]
}
#declare CmapTac2 =
color_map {
[0.0000 Tac1] [0.4000 Tac1]
[0.4000 Tac0] [0.5000 Tac0]
[0.5000 Tac2] [0.9000 Tac2]
[0.9000 Tac0] [1.0000 Tac0]
}
#declare CmapTac3 =
color_map {
[0.0000 Tac1] [0.2667 Tac1]
[0.2667 Tac0] [0.3333 Tac0]
[0.3333 Tac2] [0.6000 Tac2]
[0.6000 Tac0] [0.6667 Tac0]
[0.6667 Tac3] [0.9333 Tac3]
[0.9333 Tac0] [1.0000 Tac0]
}
#declare CmapTac4 =
color_map {
[0.0000 Tac1] [0.2000 Tac1]
[0.2000 Tac0] [0.2500 Tac0]
[0.2500 Tac2] [0.4500 Tac2]
[0.4500 Tac0] [0.5000 Tac0]
[0.5000 Tac3] [0.7000 Tac3]
[0.7000 Tac0] [0.7500 Tac0]
[0.7500 Tac4] [0.9500 Tac4]
[0.9500 Tac0] [1.0000 Tac0]
}
#declare CmapTac5 =
color_map {
[0.0000 Tac1] [0.1600 Tac1]
[0.1600 Tac0] [0.2000 Tac0]
[0.2000 Tac2] [0.3600 Tac2]
[0.3600 Tac0] [0.4000 Tac0]
[0.4000 Tac3] [0.5600 Tac3]
[0.5600 Tac0] [0.6000 Tac0]
[0.6000 Tac4] [0.7600 Tac4]
[0.7600 Tac0] [0.8000 Tac0]
[0.8000 Tac5] [0.9600 Tac5]
[0.9600 Tac0] [1.0000 Tac0]
}
#declare CmapTac6 =
color_map {
[0.0000 Tac1] [0.1333 Tac1]
[0.1333 Tac0] [0.1667 Tac0]
[0.1667 Tac2] [0.3000 Tac2]
[0.3000 Tac0] [0.3333 Tac0]
[0.3333 Tac3] [0.4667 Tac3]
[0.4667 Tac0] [0.5000 Tac0]
[0.5000 Tac4] [0.6333 Tac4]
[0.6333 Tac0] [0.6667 Tac0]
[0.6667 Tac5] [0.8000 Tac5]
[0.8000 Tac0] [0.8333 Tac0]
[0.8333 Tac6] [0.9667 Tac6]
[0.9667 Tac0] [1.0000 Tac0]
}
各カラーマップによりで使う色数が異なっている。カラーマップ CmapTac1 ~ CmapTac6 が2色~7色に対応している。カラーマップ名と色彩の変数名次のようになっていて、それらがタイルの色となる。
| カラーマップ名 | 色彩の変数名 |
| CmapTac1 | Tac0, Tac1 |
| CmapTac2 | Tac0, Tac1, Tac2 |
| ・・・ | ・・・ |
| CmapTac6 | Tac0, Tac1, Tac2, Tac3, Tac4, Tac5, Tac6 |
POV-Rayで tiling パターンを使うときのソース部分の例を示す。この例では、tiling パターンは 12 、カラーマップは CmapTac3 を使い、x-y 平面上にタイルを敷き詰る。
//--------------------------------------------tiling
//------tiling color
#declare Tac0 = rgb<1.0, 1.0, 1.0>; // White
#declare Tac1 = rgb<1.0, 0.0, 0.0>; // Red
#declare Tac2 = rgb<0.0, 1.0, 0.0>; // Green
#declare Tac3 = rgb<0.0, 0.0, 1.0>; // Blue
#declare Tac4 = rgb<1.0, 1.0, 0.0>; // Yellow
#declare Tac5 = rgb<0.0, 1.0, 1.0>; // Cyan
#declare Tac6 = rgb<1.0, 0.0, 1.0>; // Magenta
#include "cmap_tile.inc" //------ 1.
#declare TILE= pigment{ tiling 12 color_map { CmapTac3 } } //---- 2.
plane{z, 0 texture{ TILE scale 0.5 rotate x*90} } //---- 3.
以下に実行するときの手順を示す。
0.(準備)上記の cmap_tile.inc をファイルにセーブする。ファイル名を cmap_tile.inc とする。cmap_tile.inc はPOV-Rayファイルがあるフォルダに入れておく。
1.始めにタイルの色が #declare で7色宣言され、次に cmap_tile.inc ファイルが読み込まれる。この部分(1~10 行目)まではそのままコピーして使う。
2.TILE の宣言で、タイルの番号が 12 、カラーマップに CmapTac3 を設定している。
3.そのタイルを最後に x-y 平面上に敷き詰めている。(タイルは何もしないと x-z 平面に敷き詰められるので、 rotate x*90 が必要)
4.最初にまず実行して結果を確認する。下図のような結果になる。
5.次に、#declare 宣言の4色 Tac0, Tac1, Tac2, Tac3 を自分の好きな色に変更したり、違うカラーマップを使ってみる。使わない色の #declare 宣言は不要でも削除しないこと。
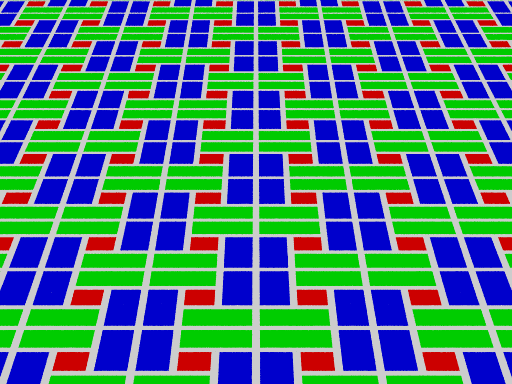 |
図13.1-38c タイリングの例
|
//-------------------- Fig. 13.1-38c /tiling/ ex
#version 3.7
#include "colors.inc"
#include "textures.inc"
global_settings
{ assumed_gamma 2.2 }
//---------------------------- camera - light
camera{
location <0,-14,8>
sky <0, 0, 1>
right <-image_width/image_height,0,0>
look_at <0, 0, 1.2>
angle 25
}
light_source{ <100, -400, 500> color rgb 1.5}
//========================== tiling
#declare Tac0=rgb<1.0, 1.0, 1.0>; // White
#declare Tac1=rgb<1.0, 0.0, 0.0>; // Red
#declare Tac2=rgb<0.0, 1.0, 0.0>; // Green
#declare Tac3=rgb<0.0, 0.0, 1.0>; // Blue
#declare Tac4=rgb<1.0, 1.0, 0.5>; // Yellow
#declare Tac5=rgb<0.0, 1.0, 1.0>; // Cyan
#declare Tac6=rgb<1.0, 0.0, 1.0>; // Magenta
#include "cmap_tile.inc"
#declare TILE= pigment{ tiling 12 color_map { CmapTac3 } } //---- 2.
plane{z, 0 texture{ TILE scale 0.5 rotate x*90} } //---- 3.
※ 上記の設定は簡易的な設定なので、うまく設定できない場合もあります。正確なタイル設定については、POV-Ray添付のシーンファイル scenes/textures/patterns/tiling.pov を参照してください。
| < tiling > |
| 利用可能なマッピング |
デフォルトの
波形タイプ |
デフォルトの
カラーマップ |
○ color_map
○ pigment_map
○ texture_map
○ slope_map
○ normal_map
○ density_map
|
ramp_wave |
× 無 |
13.1-39 三角形(triangular)
triangular パターンは、x-z 平面に正三角形の繰り返しパターン生成する。正三角形は y 方向に無限に伸びるイメージである。デフォルトで、ピグメントを6色(青、緑、赤、マゼンタ、シアン、黄)持っている。
 |
(上段)ノーマルで使用
(下段)ピグメントのデフォルトを使用
図13.1-39 三角形(triangular)
|
//-------------------- Fig. 13.1-39 /triangular/
#version 3.7
#include "colors.inc"
#include "textures.inc"
global_settings
{ assumed_gamma 2.2 }
//========================== triangular / pigment
#declare T1=
texture {
pigment {
triangular
// Coral,Scarlet,NeonPink,SkyBlue,Wheat,Navy
scale 0.5
}
}
//========================== triangular / normal
#declare T2=
texture{
pigment{White}
normal{
triangular
scale 0.5
}
}
//--------------------------------------------- camera - light
camera{
location <0,-14,8>
sky <0, 0, 1>
right <-image_width/image_height,0,0>
look_at <0, 0, 1.2>
angle 25
}
light_source{ <100, -400, 500> color rgb 1.5}
//---------------------------------floor
#declare CA1=rgb<0.85,0.85,0.8>;
#declare CA2=rgb<0.85,0.85,0.8>*1.2;
plane{ z, -1.01
pigment{ checker color CA1, color CA2 scale 0.3 }
}
//---------------------------------sphere
sphere{ 0,1 texture{T1} rotate -25*z translate -2*x}
sphere{ 0,1 texture{T2} rotate -25*z translate <-2,1.3,2>}
//---------------------------------Cylinder
cylinder{-z,z,1 texture{T1} rotate -25*z scale 0.75}
cylinder{-z,z,1 texture{T2} rotate -25*z scale 0.75
translate <0,1.3,2>}
//---------------------------------Cube
#declare BXA = difference{
box{-1,1}
box{-1,1 translate <1,-1,1>} }
object{ BXA texture{T1} rotate -25*z
scale .75 translate 2*x}
object{ BXA texture{T2} rotate -25*z
scale .75 translate <2,1.3,2>}
< triangular の構文>
|
pigment {
triangular
[<COLOR1> [, <COLOR2> [, <COLOR3> [, <COLOR4>]
[, <COLOR5> [, <COLOR6>] ] ] ] ] ]
}
|
| pigment |
ピグメントのキーワード |
| triangular |
triangularパターンのキーワード |
| <COLOR1> ~ <COLOR6> |
正三角形の色、6色以内 |
| < triangular > |
| 利用可能なマッピング |
デフォルトの
波形タイプ |
デフォルトの
カラーマップ |
○ color_map
○ pigment_map
○ texture_map
○ slope_map
○ normal_map
○ density_map
|
ramp_wave |
〇 有 |
13.1-40 波(waves)
waves パターンは、ripples と同様の波であるが、waves は riplles のものよりも丸くて幅が広い特徴がある。当初、waves も法線専用として開発された。波は<0,0,0>~<1,1,1>の立方体内でランダムに10箇所で発生する。frequency, scale, phase によるパターン修正は、次のような効果がある。
・frequency :波紋の波の間隔を制御する。
・scale :波紋の中心の間隔を制御する。
・phase :アニメーションにおいて波紋を外側に向かって動かす。
frequency や scale の変更でいりいろな表現ができる。また、global_settings { number_of_waves FLOAT } を使って発生する波紋の中心の数を変えることができる。これはシーン全体に影響するため、パターンごとに波紋の中心の数を変えることはできない。▷「4.8 波紋の数」参照
 |
(上段)ノーマルで使用
(下段)ピグメントで使用
図13.1-40 波(waves)
|
//-------------------- Fig. 13.1-40 /waves/
#version 3.7
#include "colors.inc"
#include "textures.inc"
global_settings
{ assumed_gamma 2.2 }
//========================== waves / pigment
#declare T1=
texture{
pigment{
waves
color_map{
[0.0 color rgb<0.2,0.8,1>*1.2]
[0.6 color rgb<0.2,0.8,1>*0.6]
}
frequency 2
scale 0.2
}
}
//========================== waves / normal
#declare T2=
texture{
pigment{White}
normal{
waves 0.6
scale 0.1
}
}
//--------------------------------------------- camera - light
camera{
location <0,-14,8>
sky <0, 0, 1>
right <-image_width/image_height,0,0>
look_at <0, 0, 1.2>
angle 25
}
light_source{ <100, -400, 500> color rgb 1.5}
//---------------------------------floor
#declare CA1=rgb<0.85,0.85,0.8>;
#declare CA2=rgb<0.85,0.85,0.8>*1.2;
plane{ z, -1.01
pigment{ checker color CA1, color CA2 scale 0.3 }
}
//---------------------------------sphere
sphere{ 0,1 texture{T1} rotate -25*z translate -2*x}
sphere{ 0,1 texture{T2} rotate -25*z translate <-2,1.3,2>}
//---------------------------------Cylinder
cylinder{-z,z,1 texture{T1} rotate -25*z scale 0.75}
cylinder{-z,z,1 texture{T2} rotate -25*z scale 0.75
translate <0,1.3,2>}
//---------------------------------Cube
#declare BXA = difference{
box{-1,1}
box{-1,1 translate <1,-1,1>} }
object{ BXA texture{T1} rotate -25*z
scale .75 translate 2*x}
object{ BXA texture{T2} rotate -25*z
scale .75 translate <2,1.3,2>}
| < waves > |
| 利用可能なマッピング |
デフォルトの
波形タイプ |
デフォルトの
カラーマップ |
○ color_map
○ pigment_map
○ texture_map
○ slope_map
○ normal_map
○ density_map
|
ramp_wave |
× 無 |
(ノーマルとして使用する場合、waves は表面の法線の修正に専用の関数を使用するため、ノーマルマップ、スロープマップ、波形タイプ修正で使用できないとあるが、使用してもエラーはでない。)
13.1-41 木材(wood)
wood パターンは、z 軸を中心とする同心円の縞模様である。turbulence を少し加えて適切に色づけすれば、このパターンはよりリアルに見える。デフォルトのカラーマップが組み込まれている。
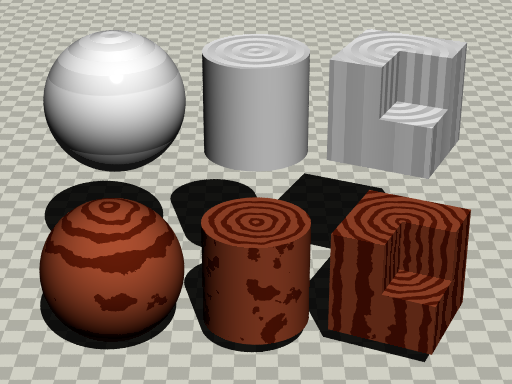 |
(上段)ノーマルで使用
(下段)ピグメントのデフォルトを使用
図13.1-41 木材(wood)
|
//-------------------- Fig. 13.1-41 /wood/
#version 3.7
#include "colors.inc"
#include "textures.inc"
global_settings
{ assumed_gamma 2.2 }
//========================== wood / pigment
#declare T1=
texture{
pigment{
wood
// color_map{
// [0.0 color rgb<1,0.5,0.1>]
// [0.6 color rgb<1,0.9,0.5>]
// }
turbulence 0.05
scale 0.3
}
}
//========================== wood / normal
#declare T2=
texture{
pigment{White}
normal{
wood 0.6
scale 0.3
}
finish{phong 0.8 phong_size 200}
}
//--------------------------------------------- camera - light
camera{
location <0,-14,8>
sky <0, 0, 1>
right <-image_width/image_height,0,0>
look_at <0, 0, 1.2>
angle 25
}
light_source{ <100, -400, 500> color rgb 1.5}
//---------------------------------floor
#declare CA1=rgb<0.85,0.85,0.8>;
#declare CA2=rgb<0.85,0.85,0.8>*1.2;
plane{ z, -1.01
pigment{ checker color CA1, color CA2 scale 0.3 }
}
//---------------------------------sphere
sphere{ 0,1 texture{T1} rotate -25*z translate -2*x}
sphere{ 0,1 texture{T2} rotate -25*z translate <-2,1.3,2>}
//---------------------------------Cylinder
cylinder{-z,z,1 texture{T1} rotate -25*z scale 0.75}
cylinder{-z,z,1 texture{T2} rotate -25*z scale 0.75
translate <0,1.3,2>}
//---------------------------------Cube
#declare BXA = difference{
box{-1,1}
box{-1,1 translate <1,-1,1>} }
object{ BXA texture{T1} rotate -25*z
scale .75 translate 2*x}
object{ BXA texture{T2} rotate -25*z
scale .75 translate <2,1.3,2>}
| < wood > |
| 利用可能なマッピング |
デフォルトの
波形タイプ |
デフォルトの
カラーマップ |
○ color_map
○ pigment_map
○ texture_map
○ slope_map
○ normal_map
○ density_map
|
ramp_wave |
〇 有 |
13.1-42 しわ(wrinkles)
wrinkles パターンは、しわになったセロハンやアルミ箔のような表面を作る。当初、wrinkles は法線専用として開発された。
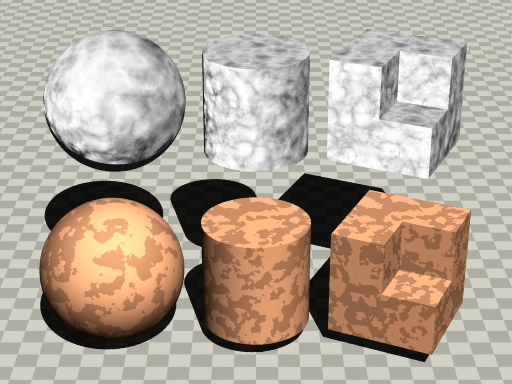 |
(上段)ノーマルで使用
(下段)ピグメントで使用
図13-42 しわ(wrinkles)
|
//-------------------- Fig. 13.1-42 /wrinkles/
#version 3.7
#include "colors.inc"
#include "textures.inc"
global_settings
{ assumed_gamma 2.2 }
//========================== wrinkles / pigment
#declare T1=
texture{
pigment{
wrinkles
color_map{
[0.0 color rgb<1,0.7,0.5>]
[0.5 color rgb<1,0.7,0.5>]
[0.5 color rgb<1,0.7,0.5>*1.3]
}
scale 0.2
}
}
//========================== wrinkles / normal
#declare T2=
texture{
pigment{White}
normal{
wrinkles 1
scale 0.3
}
}
//--------------------------------------------- camera - light
camera{
location <0,-14,8>
sky <0, 0, 1>
right <-image_width/image_height,0,0>
look_at <0, 0, 1.2>
angle 25
}
light_source{ <100, -400, 500> color rgb 1.5}
//---------------------------------floor
#declare CA1=rgb<0.85,0.85,0.8>;
#declare CA2=rgb<0.85,0.85,0.8>*1.2;
plane{ z, -1.01
pigment{ checker color CA1, color CA2 scale 0.3 }
}
//---------------------------------sphere
sphere{ 0,1 texture{T1} rotate -25*z translate -2*x}
sphere{ 0,1 texture{T2} rotate -25*z translate <-2,1.3,2>}
//---------------------------------Cylinder
cylinder{-z,z,1 texture{T1} rotate -25*z scale 0.75}
cylinder{-z,z,1 texture{T2} rotate -25*z scale 0.75
translate <0,1.3,2>}
//---------------------------------Cube
#declare BXA = difference{
box{-1,1}
box{-1,1 translate <1,-1,1>} }
object{ BXA texture{T1} rotate -25*z
scale .75 translate 2*x}
object{ BXA texture{T2} rotate -25*z
scale .75 translate <2,1.3,2>}
| < wrinkles > |
| 利用可能なマッピング |
デフォルトの
波形タイプ |
デフォルトの
カラーマップ |
○ color_map
○ pigment_map
○ texture_map
× slope_map
× normal_map
○ density_map
|
ramp_wave |
× 無 |
▷ 次を見る