7. 大 気 効 果
大気効果には、天空や霧・背景色などがある。天空設定により空や雲のさまざまな表現ができる。大気効果はシーン全体を包む背景や大気に関する設定に使われる。
POV-Ray3.1からは霧はメディアでも表現可能になった。メディアは光源との相互作用があり、霧の中の街路灯のような表現がよりリアルにできるようになっている。
7.1 背景色(background)
シーン全体の背景色を設定する。
< background の構文 >
|
[ background { color <COLOR> } ]
|
| background |
背景色のキーワード |
| color <COLOR> |
背景色に設定する色 [デフォルト:rgb<0,0,0> ] |
※ 背景を透明にしたい場合は、背景色を Clear に設定し、コマンドライン入力で、+UA と入力し実行する。(背景色のアルファチャンネルが 0 に設定されたPNGファイルが出力される。)
7.2 天空(sky_sphere)
天空は背景となる空を表現する。天空(天球)は無限の大きさを持つ球であり、視点の位置に関係なく空を表現できる。雲などの表現もできるが、地上に映る雲の影には対応していない。
< sky_sphere の構文 >
|
sky_sphere {
pigment { PIGMENT_1 }
[ pigment { PIGMENT_2 } ]
...
[ pigment { PIGMENT_n } ]
[ TRANSFORMATION ]
}
|
| sky_sphere |
天空のキーワード |
pigment { PIGMENT_1 }
~ pigment { PIGMENT_n } |
天空のピグメントの設定、複数のピグメントを層として重ねることができる。▷「12.1 ピグメント」参照 |
| TRANSFORMATION |
変形の設定 ▷「3.2 変形」参照 |
※ 天空はシーンの中で1つしか使用できない。
※ ピグメントを重ねる場合、内側の層は一部を透明する。そうでなければ、すべての外側の層が見えなくなる。
天空はピグメントを何層にも重ねることができる。その場合、最初に記述したピグメントが一番外側になり、最後に記述したピグメントが一番内側(手前側)になる。
※ 正射影と円筒投影のカメラでは平行光線を使うため、天空の一部しか見ることができ ない(ただし鏡のボールのような曲面に反射した空は見ることができる)。
※ 天空の設定には主にカラーマップとピグメントマップを使用する。また、イメージマップを使って2次元画像を貼り付けることもできる。それぞれのマップの使用法は、▷「12.1 ピグメント」参照。
カラーマップを使った一般的な天空の使用例を以下に示す。
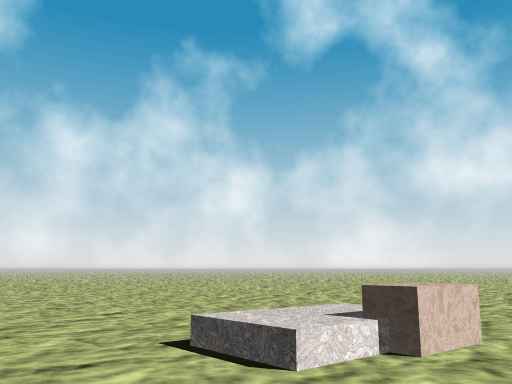
7.2-1 天空の色
カラーマップで gradient z を使うことによって、地平線から天頂まで滑らかに色が変わる天空の色を表現できる。これは天空表現のもっとも基本となる。
 |
| 図7.2-1 青空 |
//-------------------- Fig. 7.2-1 sky
#version 3.7
#include "colors.inc"
#include "textures.inc"
#include "stones.inc"
global_settings
{assumed_gamma 2.2}
camera{
location<0,-4,2.5>
sky<0,0,1>
right <-image_width/image_height,0,0>
look_at<0,0,3.2>
angle 60
}
//-------------------------parallel light
light_source
{<600,-250,500> color 1.5 parallel }
//=============================== basic sky
sky_sphere{
pigment{
gradient z
color_map{
[0.0 White*1]
[0.5 SkyBlue*1]
}
}
emission 1
}
//-------------------------ground
plane{z,0
pigment{rgb<0.75,0.8,0.5>*1.2}
normal{granite 0.3 scale 10}
finish{phong 1 specular 0.3}
}
//------------------ fog
fog{ fog_type 2
distance 150
color White*0.7
fog_offset 0.1
fog_alt 1.0
turbulence 0.5
rotate x*90
}
//---------------------------object
union{
box{ 0,1 scale <2,4,2>
texture {T_Grnt0 scale 2}
rotate z*-50
translate <3.5,1,0>
finish{ambient rgb 0.35}
}
box{ 0,1 scale <5,8,1>
texture {T_Stone8 scale 1}
rotate z*-50
translate <-2.2,1.5,0>
finish{ambient rgb 0.35}
}
translate y*10
}
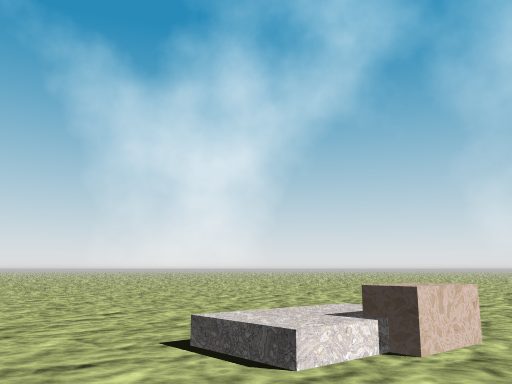
7.2-2 雲
カラーマップやピグメントマップをうまく使えば天空上に雲を表現できる。雲の表現は、テクスチャのパターンタイプを利用しカラーマップの色に clear の色を使う。この色は透明色なので他のピグメント(青空)と重ねたときに雲の隙間から空が見える。
 |
| 図7.2-2a 青空+雲 |
上図7.2-2 は、雲にパターンの しわ(wrinkles)を使っている。
//-------------------- Fig. 7.2-2a sky+cloud
#version 3.7
#include "colors.inc"
#include "textures.inc"
#include "stones.inc"
global_settings
{assumed_gamma 2.2}
camera{
location<0,-4,2.5>
sky<0,0,1>
right <-image_width/image_height,0,0>
look_at<0,0,3.2>
angle 60
}
//-------------------------parallel light
light_source
{<600,-250,500> color 1.5 parallel }
//================================== sky
sky_sphere{
pigment{ //---------- sky pigment
gradient z
color_map{
[0.0 White*0.9]
[0.5 SkyBlue*0.9]
}
}
pigment{ //----------- cloud pigment
wrinkles
color_map{
[0.5 Clear]
[1.0 White]
}
scale 0.2 // <<<---- scale
}
emission 1
}
//-------------------------ground
plane{z,0
pigment{rgb<0.75,0.8,0.5>*1.2}
normal{granite 0.3 scale 10}
finish{phong 1 specular 0.3}
}
//------------------ fog
fog{ fog_type 2
distance 150
color White*0.7
fog_offset 0.1
fog_alt 1.0
turbulence 0.5
rotate x*90
}
//---------------------------object
union{
box{ 0,1 scale <2,4,2>
texture {T_Grnt0 scale 2}
rotate z*-50
translate <3.5,1,0>
finish{ambient rgb 0.35}
}
box{ 0,1 scale <5,8,1>
texture {T_Stone8 scale 1}
rotate z*-50
translate <-2.2,1.5,0>
finish{ambient rgb 0.35}
}
translate y*10
}
雲に使用したパターンはランダムに生成されるので、雲に使っているパターンに対して回転(rotate)やスケーリング(scale)を行うと同じものでも表情が違ったものが生成される。次の図7.2-2b は、前図と同じ雲を使用し回転とスケーリングを行った例である。
 |
| 図7.2-2b 青空+雲(rotate, sacle 変更) |
//-------------------- Fig. 7.2-2b sky+cloud
#version 3.7
#include "colors.inc"
#include "textures.inc"
#include "stones.inc"
global_settings
{assumed_gamma 2.2}
camera{
location<0,-4,2.5>
sky<0,0,1>
right <-image_width/image_height,0,0>
look_at<0,0,3.2>
angle 60
}
//-------------------------parallel light
light_source
{<600,-250,500> color 1.5 parallel }
//================================ sky
sky_sphere{
pigment{ //--------- sky pigment
gradient z
color_map{
[0.0 White*0.9]
[0.5 SkyBlue*0.9]
}
}
pigment{ //---------- cloud pigment
wrinkles
color_map{
[0.5 Clear]
[1.0 White]
}
rotate z*120 scale 0.5 // <<<----rotate, scale
}
emission 1
}
//-------------------------ground
plane{z,0
pigment{rgb<0.75,0.8,0.5>*1.2}
normal{granite 0.3 scale 10}
finish{phong 1 specular 0.3}
}
//------------------ fog
fog{ fog_type 2
distance 150
color White*0.7
fog_offset 0.1
fog_alt 1.0
turbulence 0.5
rotate x*90
}
//---------------------------object
union{
box{ 0,1 scale <2,4,2>
texture {T_Grnt0 scale 2}
rotate z*-50
translate <3.5,1,0>
finish{ambient rgb 0.35}
}
box{ 0,1 scale <5,8,1>
texture {T_Stone8 scale 1}
rotate z*-50
translate <-2.2,1.5,0>
finish{ambient rgb 0.35}
}
translate y*10
}
7.2-3 重なり合う雲
雲を複数作ると、それらを重ねて使うことができる。青空のピグメントは不透明なので最初に記述する。続けて雲を記述すると、青空と雲が重なって見える。雲を複数記述すると、雲の部分は不透明なので、一番最後に記述した雲がすべて見えることになる。雲のピグメントを何層にも重ねると、さまざまな空を表現できる。
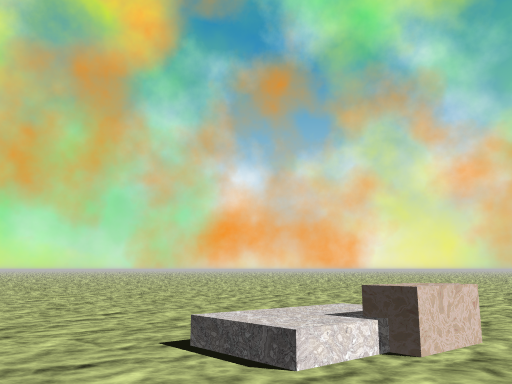 |
| 図7.2-3 重なり合う雲 |
上図7.2-4 は、ピグメントで作成した雲を重ねている。重ねたことがわかりやすいように、雲にさまざまな色をつけている。オレンジ色の雲が一番最後に記述した雲である。
//-------------------- Fig. 7.2-3 sky+clods
#version 3.7
#include "colors.inc"
#include "textures.inc"
#include "stones.inc"
global_settings
{assumed_gamma 2.2}
camera{
location<0,-4,2.5>
sky<0,0,1>
right <-image_width/image_height,0,0>
look_at<0,0,3.2>
angle 60
}
//-------------------------parallel light
light_source
{<600,-250,500> color 1.5 parallel }
//================================ sky
#declare BR=0.9;
#declare SKYC=color SkyBlue;
sky_sphere{
pigment{ //------------sky
gradient z
color_map{
[0.0 White*BR]
[0.5 SKYC*BR]
}
}
pigment{ //--------White cloud
wrinkles
color_map{
[0.5 Clear]
[1.0 White]
}
scale 0.2
}
pigment{ //-------Green cloud
wrinkles
color_map{
[0.5 Clear]
[1.0 Green]
}
rotate z*30 scale 0.6
}
pigment{ //-------Yellow cloud
wrinkles
color_map{
[0.5 Clear]
[1.0 Yellow]
}
rotate z*60 scale 0.3
}
pigment{ //-------Orange cloud
wrinkles
color_map{
[0.5 Clear]
[1.0 Orange]
}
rotate z*90 scale 0.2
}
emission 1
}
//-------------------------ground
plane{z,0
pigment{rgb<0.75,0.8,0.5>*1.2}
normal{granite 0.3 scale 10}
finish{phong 1 specular 0.3}
}
//------------------ fog
fog{ fog_type 2
distance 150
color White*0.7
fog_offset 0.1
fog_alt 1.0
turbulence 0.5
rotate x*90
}
//---------------------------object
union{
box{ 0,1 scale <2,4,2>
texture {T_Grnt0 scale 2}
rotate z*-50
translate <3.5,1,0>
finish{ambient rgb 0.35}
}
box{ 0,1 scale <5,8,1>
texture {T_Stone8 scale 1}
rotate z*-50
translate <-2.2,1.5,0>
finish{ambient rgb 0.35}
}
translate y*10
}
7.2-4 太陽
gradient のパターンを応用して天空上に太陽を表現できる。
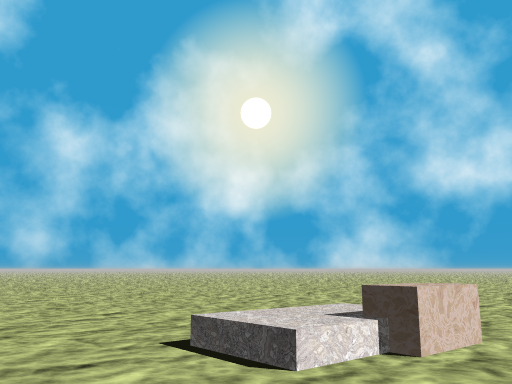 |
| 図7.2-4 青空+太陽 |
//-------------------- Fig. 7.2-4 sky+sun
#version 3.7
#include "colors.inc"
#include "textures.inc"
#include "stones.inc"
global_settings
{assumed_gamma 2.2}
camera{
location<0,-4,2.5>
sky<0,0,1>
right <-image_width/image_height,0,0>
look_at<0,0,3.2>
angle 60
}
//-------------------------parallel light
light_source
{<600,-250,500> color 1.5 parallel }
//=================================== sky
sky_sphere{
pigment{ //------------sky + sun
gradient z
color_map{
[0.97 SkyBlue]
[0.9994 color rgb<1,1,0.9> filter 0.08]
[0.9995 White*1.2]
}
rotate x*-70
}
pigment{ //------------cloud
wrinkles
color_map{
[0.5 Clear]
[1.0 White]
}
scale 0.2
}
// emission 1
}
//-------------------------ground
plane{z,0
pigment{rgb<0.75,0.8,0.5>*1.2}
normal{granite 0.3 scale 10}
finish{phong 1 specular 0.3}
}
//------------------ fog
fog{ fog_type 2
distance 150
color White*0.7
fog_offset 0.1
fog_alt 1.0
turbulence 0.5
rotate x*90
}
//---------------------------object
union{
box{ 0,1 scale <2,4,2>
texture {T_Grnt0 scale 2}
rotate z*-50
translate <3.5,1,0>
finish{ambient rgb 0.35}
}
box{ 0,1 scale <5,8,1>
texture {T_Stone8 scale 1}
rotate z*-50
translate <-2.2,1.5,0>
finish{ambient rgb 0.35}
}
translate y*10
}
7.3 霧(fog)
POV-Ray では2種類の霧、コンスタント フォグとグラウンド フォグが使用できる。コンスタント フォグはシーン全体で一定の濃度の霧であり、グラウンド フォグは地表面から天頂方向に沿って徐々に減衰する霧である。この霧は大気を通過する光線の軌跡の表現などはできない。必要であればメディアの散乱を使用する。▷「8.1 散乱」参照
< fog の構文 >
|
fog {
[ fog_type 1 | 2 ]
distance FLOAT
color <COLOR>
[ turbulence <VECTOR> ]
[ turb_depth FLOAT ]
[ lambda FLOAT ]
[ octaves INTEGER ]
[ fog_offset FLOAT ]
[ fog_alt FLOAT ]
[ up <VECTOR> ]
[ TRANSFORMATION ]
}
|
| fog |
霧のキーワード |
| fog_type 1 | 2 |
霧のタイプの設定、fog_type 1:コンスタント フォグ(一様な霧)、fog_type 2:グラウンド フォグ(地表の霧) [デフォルト:1 ] |
| distance FLOAT |
霧の透明度の設定 |
| color <COLOR> |
霧の色の設定 rgb<r,g,b>(または色名) |
| turbulence <VECTOR> |
霧の乱れの設定 [デフォルト:<0,0,0> ] ▷「13.2-4(c) 乱れ(turbulence)」参照 |
| turb_depth FLOAT |
turbulence の視線方向の乱れの程度の設定、通常は 0.0~1.0 以上の数値 [デフォルト:0.5 ] |
| omega FLOAT |
turbulence の乱れ方の制御 [デフォルト:0.5 ] ▷「13.2-4(c4) omega」参照 |
| lambda FLOAT |
turbulence の乱れ方の制御 [デフォルト:2.0 ] ▷「13.2-4(c3) lambda」参照 |
| octaves INTEGER |
turbulence の乱れ方の制御 [デフォルト:6 ] ▷「13.2-4(c2) octaves」参照 |
| fog_offset FLOAT |
グラウンド フォグが減衰し始める高さの設定 [デフォルト:0.0 ] |
| fog_alt FLOAT |
グラウンド フォグの減衰率 [デフォルト:0.0 ] |
| up <VECTOR> |
グラウンド フォグの上方向を示すベクトル、霧が減衰する方向を決定する。[デフォルト:<0,1,0> ] |
| TRANSFORMATION |
変形の設定(通常は rotate しか使用しない。また translateは 使っても全く効果はない。) ▷「3.2 変形」参照 |
※ fog を使用するためにはカメラが中空物体(hollowを設定した物体)の中になければな らない。▷「11.4-3 中空(hollow)」参照
霧の濃度はfog_offset + fog_altの高さにおいて25%になる。任意の高さhにおける霧の濃度は次式によって計算される。
- (h> fog_alt の部分)霧の濃度=- 1 / (1 + (h - fog_offset) / fog_alt) ^2
- (h≦ fog_alt の部分)霧の濃度=- 1
ある光線沿いの濃度の合計は、最初の点の高さから最後の点の高さまでの積分によって計算される。
視点からの距離が distance と等しい点では、物体の色が64%、霧の色が36%となる。任意の距離dにおける点の色は次のように計算される。( D:distance )
- C_pixel = exp(-d/D) * C_object + (1-exp(-d/D)) * C_fog
霧の色は次の3つの要素に影響する。
- ● 霧と背景を掛け合わせた結果の色の決定。
- ● 透過の境界値の設定。霧を通して最低限見ることができる光の量をtransmitの値で調整する。
(例えば transmit 0.3 では背景が最低30% 見える。)
- ● 霧によるフィルターの設定。背景の光は霧の色に掛け合わされる。
(例えば filter 0.7 では背景の光の70%がフィルターされ、残りの30%はフィルターされない霧を作る。)
 |
| 図7.3 霧のない晴天の状態 |
//-------------------- Fig. 7.3 No fog
#version 3.7
global_settings{assumed_gamma 2.2}
#include "colors.inc"
#include "textures.inc"
camera{
location<45,-40,15>
sky<0,0,1>
right <-image_width/image_height,0,0>
look_at<50,50,5>
angle 50
}
light_source{<-50,-50,200> color White
parallel point_at 0}
sky_sphere{
pigment{
wrinkles
color_map{
[0.0 SkyBlue]
[0.8 White]
}
scale 0.2
}
}
plane{z,0
pigment{checker color rgb 1.4 color rgb<1,0.4,0.2>}
finish{phong 1 reflection 0.2}
scale 5
}
#declare D=0;
#while(D<15)
#declare C=0;
#while (C<10)
box{0,1 scale <1.5,1.5,25>
pigment{color rgb<0.6,1,0.3>}
translate <C*10, D*10,0>
finish{phong 1 reflection 0.2} }
#declare C=C+1;
#end
#declare D=D+1;
#end
フォグの例を以下に示す。上図はフォグ無しの比較用イメージである。
7.3-1 コンスタント フォグ
コンスタント フォグはシーン全体に一定の霧を与える。
 |
| 図7.3-1 コンスタント フォグ |
//------------------- Fig. 7.31 constant fog
#version 3.7
global_settings{assumed_gamma 2.2}
#include "colors.inc"
#include "textures.inc"
camera{
location<45,-40,15>
sky<0,0,1>
right <-image_width/image_height,0,0>
look_at<50,50,5>
angle 50
}
light_source{<-50,-50,200> color White
parallel point_at 0}
sky_sphere{
pigment{
wrinkles
color_map{
[0.0 SkyBlue]
[0.8 White]
}
scale 0.2
}
}
//============================ constant fog
fog{
color White
distance 100
}
//----------------------------object pillars
#declare D=0;
#while(D<15)
#declare C=0;
#while (C<10)
box{0,1 scale <1.5,1.5,25>
pigment{color rgb<0.6,1,0.3>}
translate <C*10, D*10,0>
finish{phong 1 reflection 0.2} }
#declare C=C+1;
#end
#declare D=D+1;
#end
//-----------------------------------ground
plane{z,0
pigment{checker color rgb 1.4 color rgb<1,0.4,0.2>}
finish{phong 1 reflection 0.2}
scale 5
}
7.3-2 グラウンド フォグ
グラウンド フォグは地表面から徐々に減衰していく霧である。
 |
| 図7.3-2 グラウンド フォグ |
//------------------- Fig. 7.32 ground fog
#version 3.7
global_settings{assumed_gamma 2.2}
#include "colors.inc"
#include "textures.inc"
camera{
location<45,-40,15>
sky<0,0,1>
right <-image_width/image_height,0,0>
look_at<50,50,5>
angle 50
}
light_source{<-50,-50,200> color White
parallel point_at 0}
sky_sphere{
pigment{
wrinkles
color_map{
[0.0 SkyBlue]
[0.8 White]
}
scale 0.2
}
}
//================================ ground fog
fog{
color White
fog_type 2
fog_alt 1
fog_offset 0.1
distance 5
rotate x*90
turbulence z*0.2
turb_depth 0.2
}
//----------------------------object pillars
#declare D=0;
#while(D<15)
#declare C=0;
#while (C<10)
box{0,1 scale <1.5,1.5,25>
pigment{color rgb<0.6,1,0.3>}
translate <C*10, D*10,0>
finish{phong 1 reflection 0.2} }
#declare C=C+1;
#end
#declare D=D+1;
#end
//-----------------------------------ground
plane{z,0
pigment{checker color rgb 1.4 color rgb<1,0.4,0.2>}
finish{phong 1 reflection 0.2}
scale 5
}
7.3-3 レイヤー フォグ
複数の霧の設定によって、それらを重ねて使うことができる。色、高さ、turbulenceの異なるグラウンド フォグを層状にして使用すると効果的である。
図7.3-3は白いコンスタントフォグの上に黄色のグランドフォグを重ねている。
 |
| 図7.3-3 レイヤー フォグ |
//------------------- Fig. 7.33 layer fog
#version 3.7
global_settings{assumed_gamma 2.2}
#include "colors.inc"
#include "textures.inc"
camera{
location<45,-40,15>
sky<0,0,1>
right <-image_width/image_height,0,0>
look_at<50,50,5>
angle 50
}
light_source{<-50,-50,200> color White
parallel point_at 0}
sky_sphere{
pigment{
wrinkles
color_map{
[0.0 SkyBlue]
[0.8 White]
}
scale 0.2
}
}
//================================ layer fog
//--------------- constant fog (white)
fog{
color White
distance 100
}
//--------------- ground fog (yellow)
fog{
color Yellow*0.5
fog_type 2
fog_alt 1
fog_offset 0.1
distance 5
rotate x*90
turbulence z*0.2
turb_depth 0.2
}
//----------------------------object pillars
#declare D=0;
#while(D<15)
#declare C=0;
#while (C<10)
box{0,1 scale <1.5,1.5,25>
pigment{color rgb<0.6,1,0.3>}
translate <C*10, D*10,0>
finish{phong 1 reflection 0.2} }
#declare C=C+1;
#end
#declare D=D+1;
#end
//-----------------------------------ground
plane{z,0
pigment{checker color rgb 1.4 color rgb<1,0.4,0.2>}
finish{phong 1 reflection 0.2}
scale 5
}
7.4 虹(rainbow)
虹を表現する。この虹はフォトンマッピングのような光学的なものではなく、円弧を描く霧のようなカラーマップを利用している。
< rainbow の構文 >
|
rainbow {
direction <DIR>
[ angle FLOAT ]
[ widrh FLOAT ]
[ distance FLOAT ]
[ jitter FLOAT ]
[ color_map COLOR_MAP ]
[ up <UP> ]
[ arc_angle FLOAT ]
[ falloff_angle FLOAT ]
}
|
| rainbow |
虹のキーワード |
| direction <DIR> |
虹の方向設定 ベクトル <x,y,z> |
| angle FLOAT |
虹の地上面からの角度 |
| widrh FLOAT |
虹の幅 [デフォルト:0.0] |
| distance FLOAT |
虹があるところまでの距離 |
| jitter FLOAT |
虹へのランダムノイズの付加 [デフォルト:0.0] |
| color_map COLOR_MAP |
虹のカラーマップ [デフォルト:clear 透明で色なし] |
| up <UP> |
虹の角度0の方向 ベクトル <x,y,z> [デフォルト:<0,1,0>] |
| arc_angle FLOAT |
虹が見える角度(円弧表示サイズ)[デフォルト:180] |
| falloff_angle FLOAT |
虹が減衰を始める角度(円弧サイズ)、arc_angle 以下 [デフォルト:180](減衰しない) |
虹は、360度の円弧が基本となっている。円弧の幅が虹の幅になり、虹の色はカラーマップで設定される。虹 rainbow は、この円弧を天空にどのように表示するかを設定することで表現されている。
次の図7.4 虹のある青空 に虹の使用例を示す。
 |
| 図7.4 虹のある青空 |
//-------------------- Fig. 7.4 rainbow
#version 3.7
#include "colors.inc"
#include "textures.inc"
#include "stones.inc"
global_settings
{assumed_gamma 2.2}
camera{
location<0,-4,2.5>
sky<0,0,1>
right <-image_width/image_height,0,0>
look_at<0,0,3>
angle 60
}
//-------------------------parallel light
light_source
{<600,-250,500> color 1.5 parallel }
//================================ rainbow
//----color define
#declare rbw1=rgb<1,0,0>;
#declare rbw2=rgb<1,0.8>;
#declare rbw3=rgb<0,0.53,0>;
#declare rbw4=rgb<0,0.5,0.7>;
#declare rbw5=rgb<0.57,0,0.5>;
rainbow {
angle 35
width 6
distance 1.0e5
direction <-0.2, 1,-0.2>
color_map {
[0.0 color rbw1 transmit 0.98]
[0.2 color rbw5 transmit 0.85]
[0.4 color rbw4 transmit 0.85]
[0.6 color rbw3 transmit 0.85]
[0.8 color rbw2 transmit 0.85]
[1.0 color rbw1 transmit 0.98]
}
}
//---------------------------------sky
#declare BR=1;
#declare SKYC=color SkyBlue;
sky_sphere{
pigment{ //----------sky
gradient z
color_map{
[0.0 White*BR]
[0.5 SKYC*BR]
}
}
emission 1
}
//-------------------------ground
plane{z,0
pigment{rgb<0.75,0.8,0.5>*1.2}
normal{granite 0.3 scale 10}
finish{phong 1 specular 0.3}
}
//------------------ fog
fog{ fog_type 2
distance 150
color White*0.7
fog_offset 0.1
fog_alt 1.0
turbulence 0.5
rotate x*90
}
//---------------------------object
union{
box{ 0,1 scale <2,4,2>
texture {T_Grnt0 scale 2}
rotate z*-50
translate <3.5,1,0>
finish{ambient rgb 0.35}
}
box{ 0,1 scale <5,8,1>
texture {T_Stone8 scale 1}
rotate z*-50
translate <-2.2,1.5,0>
finish{ambient rgb 0.35}
}
translate y*10
}
(End) 7.大気効果